


There’s no denying that sunset photography is one of the most popular genres in landscape photography, and for good reason. A sky drenched in warm pinks, deep reds, and golden light has a way of transforming even ordinary scenes into something worth stopping for.
But here’s the thing: most sunset photos look the same. You see the colorful sky, you take the shot, and you get a decent image. Nice, but not memorable. Not the kind of photo that makes someone stop scrolling.
What separates a compelling sunset photo from a forgettable one isn’t luck; it’s preparation, the right technique, and knowing how to read the light.
In this guide, I’ll walk you through everything you need to know about sunset photography. You’ll find the camera settings I use and how to think about exposure in changing light, how to handle the tricky contrast between a bright sky and a dark foreground, composition techniques that go beyond just pointing at the colors, and how to process your images to bring out the best in that golden light.
Whether you’re picking up a camera for the first time or looking to push your sunset shots further, there’s something here for you. Let’s start with timing, because getting to the right place at the right moment is the foundation for everything else.
When to Shoot: Timing and the Light Phases
Sunset photography isn’t just about the moment the sun hits the horizon. Understanding the different phases of evening light and how each one behaves is one of the most important things you can do to improve your images.
Golden Hour
Golden hour begins roughly an hour before sunset, when the sun sits low on the horizon, and the light turns warm, soft, and directional. Shadows stretch long, textures in the landscape come alive, and everything takes on that characteristic golden glow. For landscape photographers, this is often the most rewarding time to be outside as the light is dynamic enough to be interesting but soft enough to be forgiving.
Recommended Reading: Why You Should Start Shooting Landscapes During Golden Hour
The Moment of Sunset
As the sun approaches the horizon, contrast increases dramatically. The sky can shift through orange, red, and purple in a matter of minutes. This is also when exposure becomes most challenging, with a significant difference in brightness between the sky and the land below.

Blue Hour
Don’t pack up when the sun disappears. The period after sunset, called blue hour, produces some of the most beautiful and underappreciated light in landscape photography. The sky takes on deep blues and soft purples, the light becomes more even, and long exposure possibilities open up. Some of my favorite images have come from staying at a location for a little longer after sunset.
Arrive early, stay late. Give yourself time before golden hour to find your composition, set up, and be ready when the light peaks. And resist the urge to leave the moment the sun drops below the horizon, what comes next is often just as good.
I’ve lost count of how many times I’ve driven away from a location and looked in the rearview mirror to see the sky absolutely on fire behind me. It’s a lesson you only need to learn once.
Planning Your Location and the Sun’s Position
Knowing where the sun will set and what that means for your composition is one of the simplest ways to improve your success rate.
The direction of light at sunset changes everything. Are you shooting towards the sun, with the landscape silhouetted against a glowing sky? Are you shooting with the sun to the side, where warm sidelight sculpts the texture of rocks and land? Or are you shooting away from the sun, where the sky behind you might have the most interesting clouds and color?
There’s a common assumption that you need to shoot directly towards the sunset to get a good image. That’s not true. Some of my most interesting sunset images were taken facing away from the sun, where the warm light was painting the landscape behind me in a way no one else was looking at.
Apps like PhotoPills and The Photographer’s Ephemeris let you see exactly where and when the sun will set at any location. Plan your shot in advance, know where the light will come from, and set yourself up in a position to take advantage of it.
If you’re visiting a location for the first time, arrive even earlier than you think you need to. Use the extra time to explore different angles, find the strongest foreground, and make compositional decisions before the light pressure is on.
Camera Settings for Sunset Photography
One of the most common questions I get about sunset photography is: “What settings should I use?” And my honest answer is that there’s no single correct answer; the right settings depend entirely on the conditions you’re shooting in.
Are you shooting towards the sun or away from it? Is the sky heavily overcast or completely clear? Has the sun gone down, or is it still above the horizon? All of these factors change what your camera needs to do.
That said, there are some solid principles that apply in most situations.
Manual Mode vs Aperture Priority
I shoot in manual mode for all of my photography, including sunsets. It gives me complete control and prevents the exposure from shifting unexpectedly as the scene changes.
That said, if you’re still building confidence with the exposure triangle, aperture priority is a perfectly good choice for sunset photography. Set your aperture and ISO, let the camera handle the shutter speed, and use exposure compensation to adjust if the result is too bright or too dark.
Aperture
For most sunset landscapes, I shoot between f/8 and f/11. This range gives you sharp focus across the scene, from the foreground through to the horizon. You generally don’t need to go beyond f/11, as at very small apertures, diffraction softens the image, and you rarely gain anything useful.
If you’re deliberately isolating a subject and want a shallow depth of field, you can open up, but for most landscape scenes, f/8–f/11 is the sweet spot.
Recommended Reading: Mastering Aperture in Photography [An Essential Guide]
ISO
Start at your camera’s base ISO, typically ISO 64, 100, or 200, depending on the model. This gives you the cleanest image with the least noise.
If you’re on a tripod (which you should be for sunset photography), a slower shutter speed is not a problem, so there’s rarely a reason to push the ISO up. As the light fades into blue hour and beyond, you’ll start to need either a higher ISO or a longer exposure. With modern cameras and tools like DxO PureRAW, even higher ISOs are very manageable in post.
If you’re shooting handheld, you’ll need to balance ISO against shutter speed to avoid camera shake. As a general rule, your shutter speed should be at least 1/focal length to avoid blur from camera movement.
Recommended Reading: ISO in Digital Photography [A Comprehensive Guide]
Shutter Speed
Shutter speed is the camera setting I adjust most during a sunset shoot. With aperture and ISO set, I adjust the shutter speed to achieve the correct exposure as the light changes around sunset.


How slow you can go depends on whether you’re on a tripod. On a tripod, even several seconds is fine. Handheld, you need to keep the shutter speed high enough to freeze your own movement.
Recommended Reading: What is Shutter Speed in Photography? Complete Guide with Examples
Expose for the Highlights
This is probably the most important practical advice I can give for sunset photography: expose for the highlights and protect your sky.
It’s much easier to bring shadow detail out of a RAW file than it is to recover a blown-out sky. If in doubt, underexpose slightly. The image might look dark on the back of the camera, but with careful post-processing, you can recover the foreground beautifully without losing the sky.
Use your histogram to check that the highlights aren’t clipping. If the right side of the histogram is being pushed off the edge, bring your exposure down.
Recommended Reading: How the Histogram Will Improve Your Photography
White Balance
Auto white balance works reasonably well at sunset, but I prefer to set it manually. Shooting in Daylight or Cloudy mode typically gives you a warmer result that better reflects the actual quality of the light. If you’re shooting RAW (which you should be), you can always adjust white balance in post, but starting with a warmer setting helps you see the scene more accurately while you’re shooting.
Recommended Reading: Mastering White Balance in Photography: How to Get Perfect Colors
Handling Exposure: Sky vs Foreground
The biggest technical challenge in sunset photography is managing the contrast between a bright sky and a much darker foreground. Your camera can’t always capture the full range dynamic in a single exposure the same way your eyes can, so you need a strategy.
You have three main options:
1. Expose for the Sky and Recover the Foreground in Post
With modern cameras you can pull a lot of shadow detail out of dark foreground when photographing in RAW. Because of this, I always recommend to expose for the sky, then bring up the shadows in Lightroom or Photoshop during post-processing.

This works well in moderate lighting conditions. If the contrast is extreme, the results can look unnatural.
2. Graduated ND Filter
A graduated ND filter is a piece of glass (or resin) that’s darker on one half and transitions to clear on the other. You position the dark half over the sky to reduce its brightness, which allows you to expose for both sky and foreground in a single shot.
This is a good solution when you have a relatively flat horizon but it becomes less effective when your horizon has mountains or trees breaking into the sky.
3. Exposure Bracketing and Blending
The most flexible approach is to bracket your exposures. This means taking multiple shots at different exposure values and blending them in post-processing. One exposure for the sky, one for the foreground, merged together in Lightroom or Photoshop.
This gives you the most control and works regardless of how complex your horizon is. It does require more time in post, but for scenes with difficult dynamic range, it produces the cleanest results.
Recommended Reading: Graduated ND Filters or Multiple Exposures: Which is Best for Landscape Photography?
Composition for Sunset Photography
A dramatic sky is only half of a great sunset photo. The other half is what’s in front of it.
Use a Strong Foreground
One of the most common mistakes in sunset photography is having a dark, empty foreground that contributes nothing to the image. The sky gets all the attention, the land below is just a silhouette, and the image feels flat and disconnected.
A strong foreground gives the viewer somewhere to enter the frame and something to connect with. Rocks, water, interesting textures, leading lines; anything that has shape, detail, and visual interest at ground level will make your sunset photo significantly stronger.
Think of the foreground and the sky as equal partners in the composition, not foreground as background and sky as subject.

Watch Your Horizon Line
Where you place the horizon in the frame matters. If the sky is the most interesting part of the scene, dramatic clouds, vivid color, give it more room and push the horizon lower. If the foreground is interesting, patterns in sand, reflections in water, strong textures, let it take up more of the frame and bring the horizon higher.
Avoid placing the horizon in the exact centre of the frame unless you have a strong reason. It tends to split the image in two without adding tension or interest.
Look for Reflections
Water is your friend at sunset. Even a shallow puddle, a wet beach, or a calm lake can mirror the colors in the sky and dramatically extend the warmth and color throughout the frame. Coastlines, rivers, and lakeshores are worth seeking out specifically for this reason.
Consider Shooting Away from the Sun
As I mentioned earlier, don’t assume the best shot is always facing directly into the sunset. Turn around. The warm light behind you may be illuminating the landscape in a way that’s just as interesting, or more interesting, than the sun itself.
Recommended Reading: Composition in Landscape Photography: The Complete Guide
Dealing with Lens Flare
Shooting towards the sun inevitably raises the risk of lens flare (those distracting blobs, streaks, and color casts that bounce around between the glass elements of your lens).
Some flare can be atmospheric and intentional. Most of the time, it just weakens the image.
Here are a few practical ways to deal with it:
- Adjust your composition slightly to move the sun just outside the frame. Even a small shift can eliminate flare entirely.
- Block the sun with your hand or a finger between shots, especially useful when bracketing. This is surprisingly effective.
- Capture two versions: one normal shot, and one with the sun blocked by your hand. In post-processing, you can blend the clean foreground from the second shot into the final image, removing the flare while keeping the quality of the light.
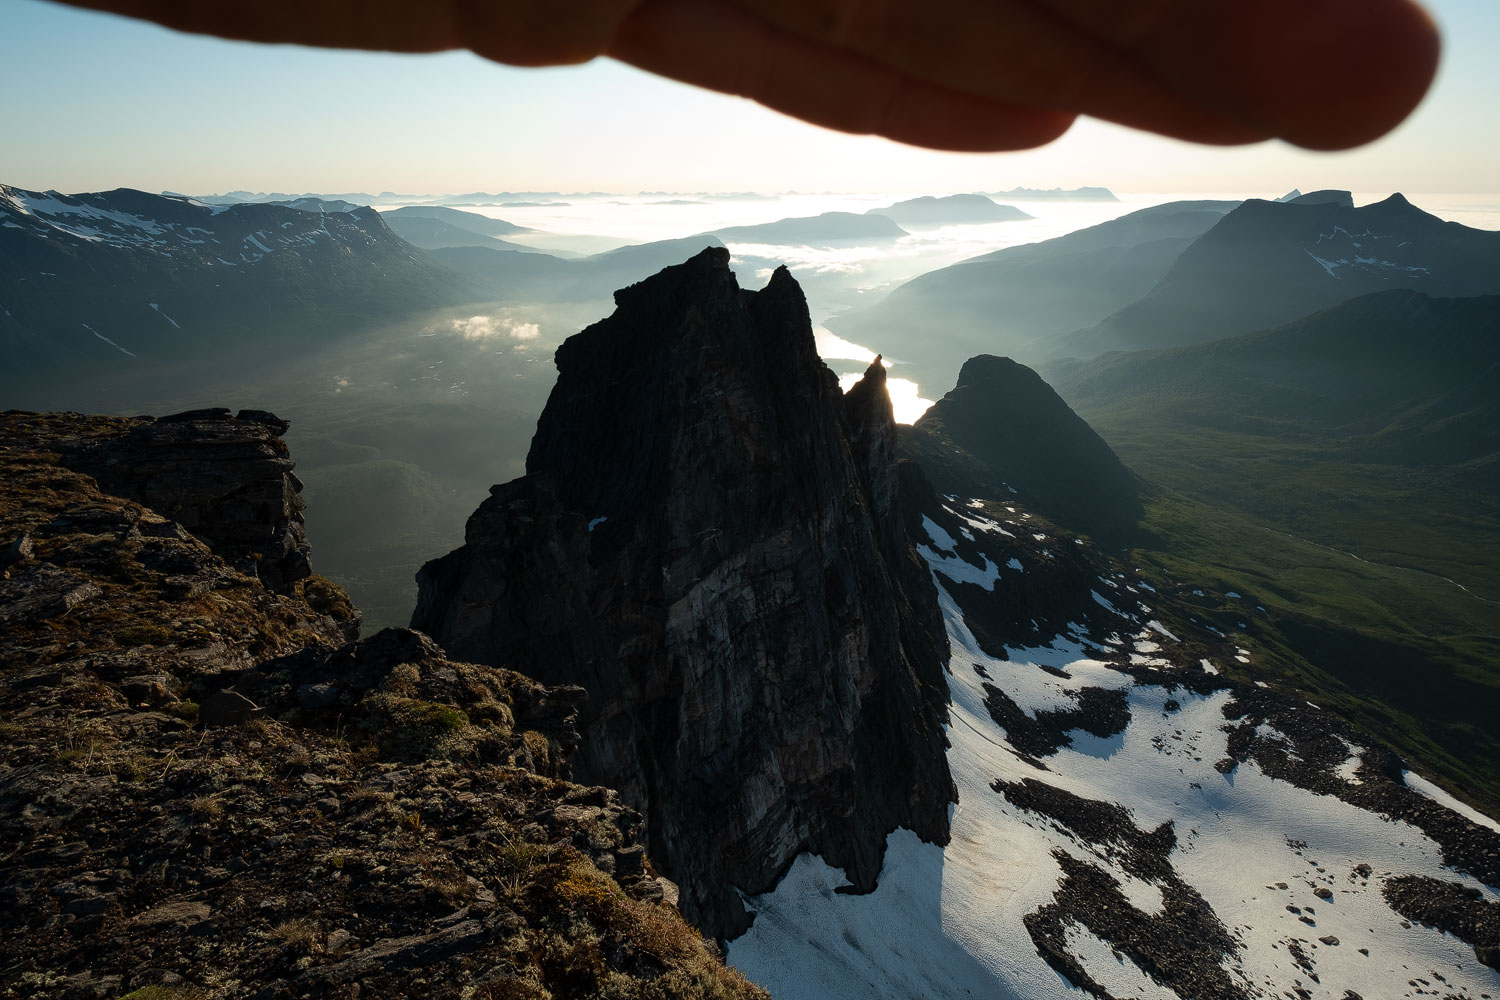
This technique takes a little practice but becomes second nature quickly. The key is working on a tripod so the two shots align perfectly.
Recommended Reading: Understanding Layers and Masks in Photoshop
Filters for Sunset Photography
Beyond the graduated ND for controlling exposure, a couple of other filters are worth having in your kit for sunset work.
Polarising Filter
A circular polarising filter (CPL) reduces glare and reflections, deepens blue skies, and can increase overall color saturation. At sunset it can help cut through any haze in the atmosphere and give you richer, more saturated colors, particularly useful when shooting across water.
The effect is strongest when you’re shooting at approximately 90 degrees to the sun, so it’s less useful when shooting directly into the sunset but can add a lot when shooting to the side.
Neutral Density Filters for Long Exposures
If you’re after silky smooth water or dramatic cloud movement during golden hour or blue hour, a strong neutral density filter (6-stop, 10-stop) gives you the long shutter speeds needed for those effects.
Personally, I use the NiSi JetMag Pro Landscape Kit, and find it extremely easy to work with in the field. You can read my review here.
Recommended Reading: How to Choose Your First Filters
How to Edit Sunset Photos
Getting the shot is half the job. The other half is processing it in a way that brings out the qualities of the light without overdoing it.
Start with White Balance
If you shot in RAW, white balance is fully adjustable after the fact. For sunset images, shifting the temperature warmer (towards the orange end of the scale) usually produces a result that feels true to what you saw. How far you go depends on the image, but the tendency is always to go too far too fast. Keep it subtle.

Use the HSL Panel for Color Control
The HSL (Hue, Saturation, Luminance) panel in Lightroom gives you precise control over individual colors in your image. For sunsets, the most useful adjustments are typically in the orange and red channels; increasing saturation slightly to bring out the warmth in the sky, and adjusting luminance to control how bright those tones appear.
Be careful with the orange slider in particular. It’s easy to push it too far and end up with a scene that looks more like a cinema poster than a photograph.
Color Grading for Atmosphere
The Color Grading tool (available in both Lightroom and now Nik Color Efex 9) lets you add color casts to specific tonal ranges. For sunset work, a subtle warm tone applied to the highlights reinforces the feeling of the golden light, while a slightly cooler shadow tone can add depth and separation between the warm sky and the darker foreground.
The key word is subtle. A small shift in the highlights towards orange or amber, and a small push in the shadows towards blue or teal, can transform the mood of a sunset image without it looking processed. If you can immediately tell the color grading has been applied, it’s probably too much.
The Orton Effect
The Orton Effect adds a soft, dreamy glow to an image that can work beautifully with sunset light, enhancing the feeling of warmth and atmosphere without losing detail. It works by blending a sharp version of the image with a soft, blurred, and brightened version.
Use it sparingly. A little goes a long way, and it’s very easy to overdo. On sunset images specifically, I tend to reduce the opacity significantly from whatever feels like “enough”, the effect compounds with the warmth already in the scene.
Dodging and Burning
Dodging (brightening) and burning (darkening) specific areas of the image is one of the most powerful tools in landscape post-processing, and it’s particularly useful for sunset images.
Where the setting sun is catching the landscape, such as a hillside, a rock face, the tops of waves, you can use a dodge brush to gently brighten those areas and emphasise the light direction. For areas that should feel darker and recede into shadow, use a burn brush to deepen them slightly.
One technique I use regularly for sunsets is to paint with a low-opacity coloured brush to enhance the light. For example, a warm orange or amber brush at 4–8% opacity applied to the areas where the sunset light is hitting can subtly intensify the warmth of the light in a way that feels natural rather than processed. It takes practice to get right, but the results are worth it.
Recommended Reading: Post-Processing for Landscape Photography: The Complete Guide
Conclusion
Sunset photography rewards preparation and patience; know when the light will peak, have your composition figured out before it does, and be ready to stay until after the color fades.
The technical side, managing exposure, handling the contrast between sky and foreground, and choosing the right filters, becomes easier with experience. But the foundation is always the same: be there early, stay late, and pay attention to what the light is doing at every stage.
If you’re looking to build a more consistent post-processing workflow for your landscape images, the Lightroom Toolbox is a set of workflow presets I’ve built specifically for landscape photography, designed to give you a strong starting point for images like these.
And if you want to go deeper on any of the techniques covered here, the guides below are a good place to continue:
- Composition in Landscape Photography
- Post-Processing for Landscape Photography
- Ultimate Guide to Long Exposure Photography
- How the Histogram Will Improve Your Photography
Now get out there and shoot. The light won’t wait.
My Gear
Want to know what lenses I personally use for sunset photography? Here’s my go-to kit:
- Wide-Angle: Nikkor Z 14-24mm f/2.8 – Ideal for dramatic foregrounds and sweeping vistas.
- Midrange: Nikkor Z 24-70mm f/4 – Versatile and lightweight, ideal for travel and mid-range compositions.
- Telephoto: Sigma 100-400mm f/5-f/6.3 – Lightweight and perfect for compressing scenes or isolating details in the distance.
These are affiliate links, which help support the site at no extra cost to you.
DID YOU ENJOY THE ARTICLE? THEN DON’T FORGET TO SHARE IT!


Frequently Asked Questions About Sunset Photography
There’s no one-size-fits-all answer, but a good starting point is ISO 100, aperture between f/8 and f/11, and a shutter speed based on your creative intent. A slower shutter speed can blur motion for effect, while a faster one freezes it. Always expose to protect the highlights in the sky.
Use techniques like exposure bracketing, graduated ND filters, or post-processing blends to manage the high dynamic range. Avoid exposing for the shadows only; you risk losing detail in the sky.
Not always, but they can make a difference. Graduated ND filters help balance the exposure between a bright sky and a darker foreground. ND filters allow for longer shutter speeds, which can be used creatively to blur motion.
Cameras can’t always capture the full dynamic range or vividness of what you see. Shooting in RAW and applying subtle contrast, color, and clarity adjustments in post-processing can help bring back the magic.
Absolutely. While a DSLR or mirrorless setup gives more control, you can still get great results with a phone if you compose carefully and expose for the highlights. Using apps that let you shoot in RAW is a big plus.


Thank you for a compelling article. Excellent suggestions to be practised.
Hi John,
Thanks for your comment! I’m glad to hear that you found it useful. Let me know if you have any questions as you begin implementing some of these tips into your workflow!