


Looking for an easier way to add professional color effects and creative adjustments to your photos? For over a decade, Nik Color Efex by DxO has been the go-to choice for photographers wanting to boost colors, enhance contrast, and add a personal creative touch to their images.
But does version 9 move the needle? Is it worth investing in the Nik Collection 9 for this plugin alone? And how does it compare to today’s best photo editing tools like Lightroom and Photoshop?
In this updated Nik Color Efex 9 review, I’ll show you what’s new, share how I actually use it in my own landscape photography workflow, and give you an honest take on whether it deserves a spot in your post-processing workflow.
I was given early access to version 9 ahead of its release, so this review is based on hands-on testing.
Jump to Sections (Click to expand):
DxO has also provided CaptureLandscapes readers with an exclusive 15% discount on all new purchases. You’ll find the details and code at the end of this review, but first, let’s dive into what makes Nik Color Efex 9 worth your attention.
What is Nik 9 Color Efex?
If this is your first time hearing about Nik Color Efex, let’s take a quick step back before diving into what’s new in version 8.
Color Efex, formerly known as Color Efex Pro, is one of seven photo editing plugins included in the latest Nik Collection 9 by DxO (you can read the full Nik Collection review here). Its main purpose is to apply creative effects, color adjustments, and advanced local edits to your photos.
One thing to note is that Color Efex is not sold as a standalone plugin. It comes bundled with the full Nik Collection suite. If you’re on the fence about investing, I highly recommend trying the 30-day free trial to see how it fits your workflow.
While the Nik Collection includes seven different tools, Color Efex is the most popular and widely used, especially among landscape and nature photographers.
You can use it:
- As a plugin for Adobe Lightroom Classic, Photoshop, Affinity Photo, or DxO PhotoLab
- As a standalone application if you prefer working outside of your main editor
With more than 50 customizable filters and powerful local adjustment tools like Control Points and Luminosity Masks, Color Efex continues to be one of the most versatile plugins available today. It can feel overwhelming at first, but it’s trusted by photographers worldwide for a reason; it simply works.
Recommended Reading: Nik Collection 9 Review: Is DxO’s Photo Editing Suite Worth It? [2026 Review]
What’s New in Color Efex 9?
If you own a previous version of the Nik Collection, the big question is: what’s new in Color Efex 9, and is it worth upgrading?
Version 9 brings the most significant updates to Color Efex in recent years. While previous versions focused largely on workflow improvements and masking refinements, version 9 adds three tools that push Color Efex into genuinely new territory: Color Grading, AI Masks, and Blending Modes.
Color Grading
Color Grading is the headline addition in Color Efex 9, and the one I’ve spent the most time testing. If you use Color Grading in Lightroom, this will feel familiar, but with a few differences worth knowing about.
Like Lightroom, you can work with the Global color or target Highlights, Midtones, and Shadows individually. What makes the Color Efex implementation slightly different is that all three tonal range knobs sit on the same wheel, rather than across four separate wheels. In practice, this makes it easier to fine-tune the relationship between tonal ranges without constantly switching between panels.
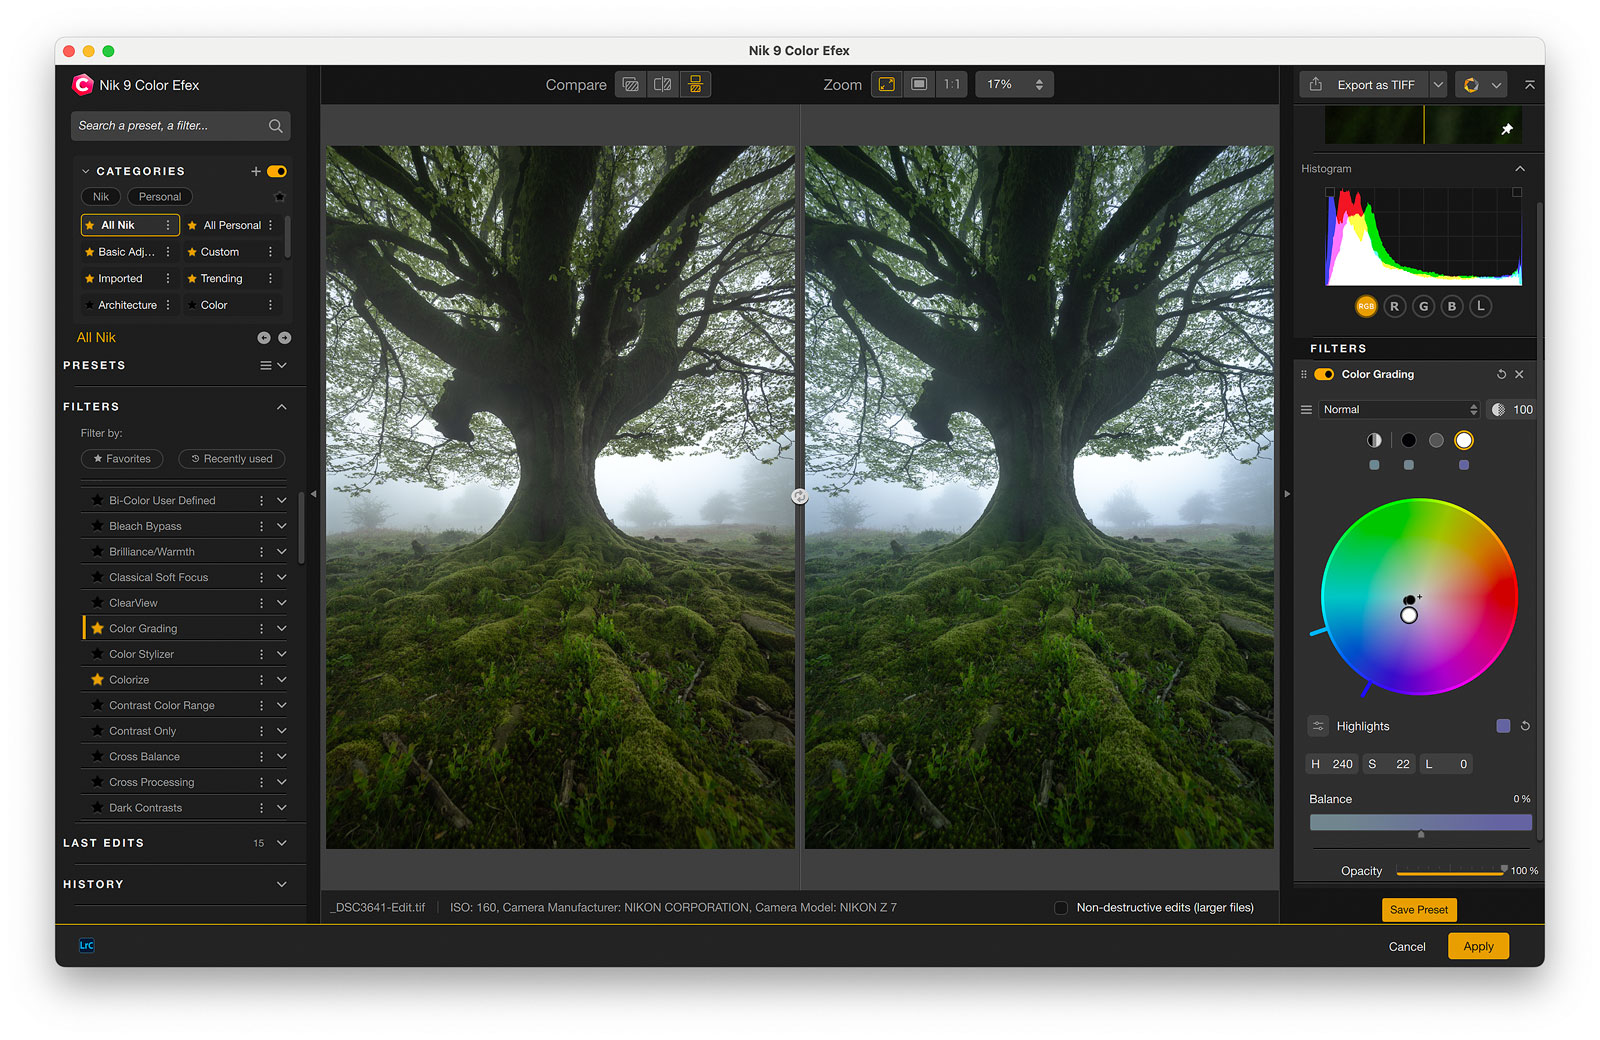
The same keyboard shortcuts apply as in Lightroom: hold Shift while moving the knob to adjust only the hue, or hold Option (Mac) to adjust only the saturation. If you’re already comfortable with Lightroom’s Color Grading, the learning curve here is minimal.
After spending time with both, I find the Color Efex implementation produces results that feel slightly less aggressive and more natural-looking than Lightroom’s equivalent. For landscape photography, the key is still to work with low saturation values; a little goes a long way. But the more I’ve tested it, the more I’ve come to prefer it for subtle creative color work.
AI Masks
AI Masks bring fast and precise object selection to Color Efex. Apply a filter, create an AI Mask, and click directly on any object in the image or draw a box around it. Color Efex generates the selection in seconds.
One thing worth knowing about the workflow: the first time you use the Object mask on an image, there’s a short processing time of around 10 seconds while the software analyzes the photo and identifies all the objects in the frame. Once that’s done, selecting any other object in the same image is instant, the heavy lifting has already been done.
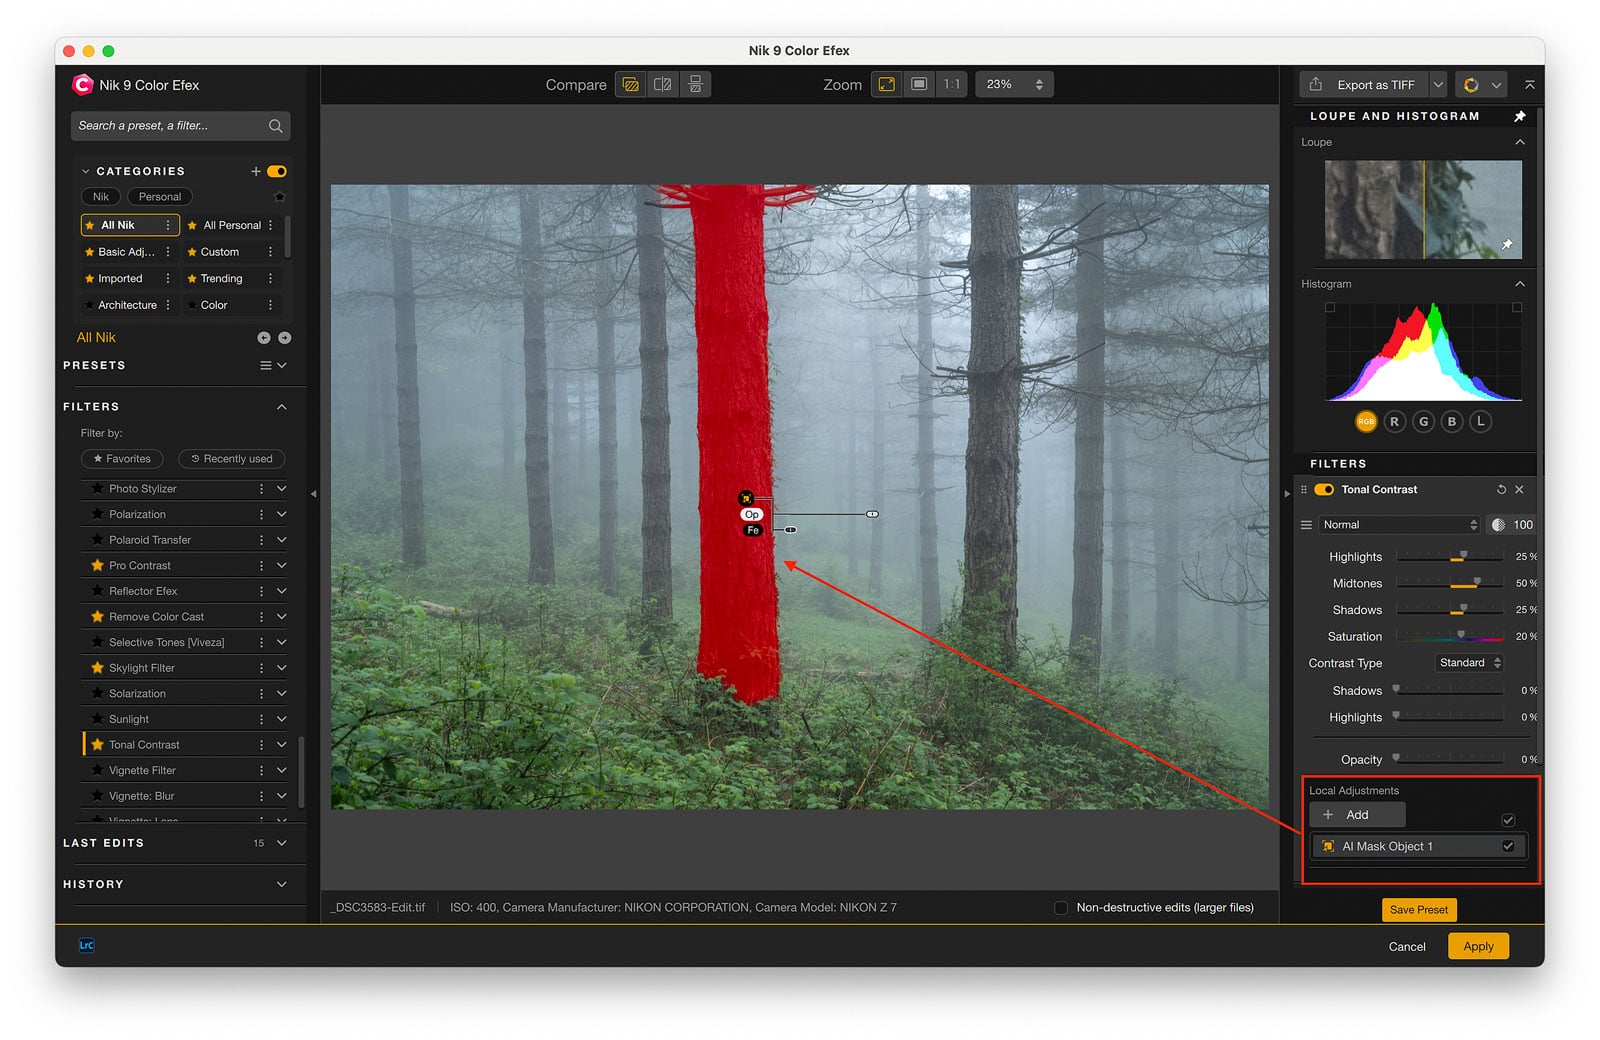
Mask quality is solid for most subjects. In areas with complex overlapping textures, such as branches, fine foliage, intricate edges, you may need to refine the mask manually, but for clean subjects, it works well. It’s a good addition for photographers who want to do precise local adjustments within Color Efex itself, without jumping out to Lightroom or Photoshop to create a selection.
Blending Modes
Nik Color Efex and Nik Analog Efex now include Blending Modes, with 18 options that control how each filter interacts with the underlying image. If you’re used to Blending Modes in Photoshop, this will feel familiar.
The modes I find most relevant for a landscape workflow are Overlay, Soft Light, and Luminosity. The first two work well for contrast effects and subtle glow, while Luminosity is particularly useful for ensuring that contrast adjustments only affect the tonal values rather than the colors. For example, if you’re using the Pro Contrast filter to add Dynamic Contrast, you may notice it slightly affects color saturation as a side effect. Setting the Blending Mode to Luminosity eliminates that, keeping the contrast adjustment clean.
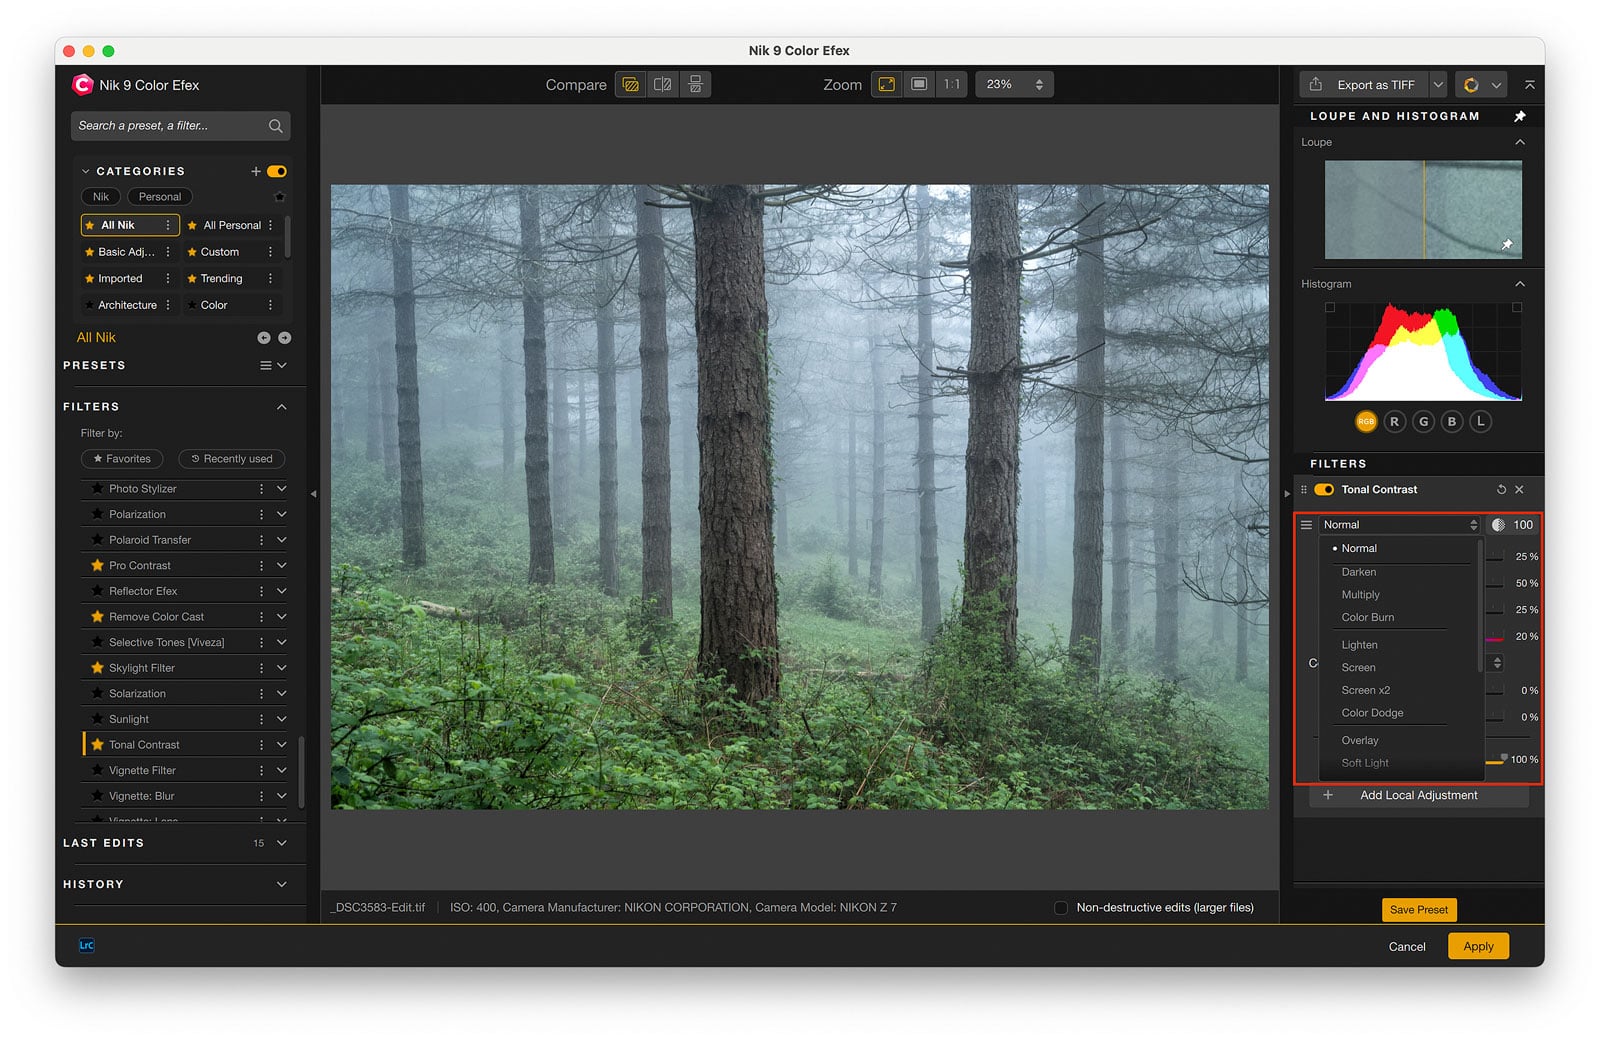
It’s a more advanced feature that takes some experimentation to get the most from, but for photographers who are already comfortable with Blending Modes in Photoshop, it adds a useful layer of control.
Depth Masks
Also new in version 9, Depth Masks use AI to generate a depth map of your image, letting you target adjustments based on distance from the camera. Intuitive sliders with adjustable feathering let you define the depth range from foreground to background, producing smooth, natural transitions without manual masking. For landscape work, this has real potential for selectively treating different depth planes in a scene.
Workflow Improvements
Several smaller updates improve the everyday experience. Preset Hover Preview gives you a real-time preview when browsing presets without clicking each one. Mask Overlays let you see local adjustments clearly without obscuring the image. A redesigned local adjustments palette consolidates all tools in one place. And local adjustments can now be copied and pasted between images using a keyboard shortcut, a practical time-saver when working on a series of similar shots.
Exclusive Reader Offer
DxO has given CaptureLandscapes readers a 15% discount on all new purchases.
You’ll find the full details and your discount code at the end of this review.
Nik 9 Color Efex Interface and User Experience
The Nik 9 Color Efex layout is built up of six sections:
- The Menu Bar
- The Upper Toolbar
- The Image Display Area
- The Left Panel
- The Right Panel
- The Lower Toolbar
I won’t go into the details of every menu here (you can check the user manual if you’re curious), but here are a few things worth knowing:
- The Left Panel contains a list of all available filters.
- When you select a filter, its adjustment sliders and options appear in the Right Panel.
- You apply adjustments live, meaning the image updates instantly in the Image Display Area as you tweak the sliders.
- The adjustments aren’t permanent. You can go back and change values at any time during your workflow.
Pro Tip:
When using Color Efex as a Photoshop plugin, choose Apply as Smart Object. This allows you to re-open Color Efex later and refine your adjustments without starting over.
The Best Color Efex Filters
As of writing this, Color Efex has a total of 63 filters. To be honest, it’s unlikely that you’ll use more than a handful of them. Exactly which ones depend on what you want to achieve in post-processing.
Some filters are more… experimental… than others, but let’s just say that there are filters for everyone.
For landscape photography, I find that there are six filters that stand out. These mainly focus on tones and contrast, but will make a significant difference to the photo when used correctly.
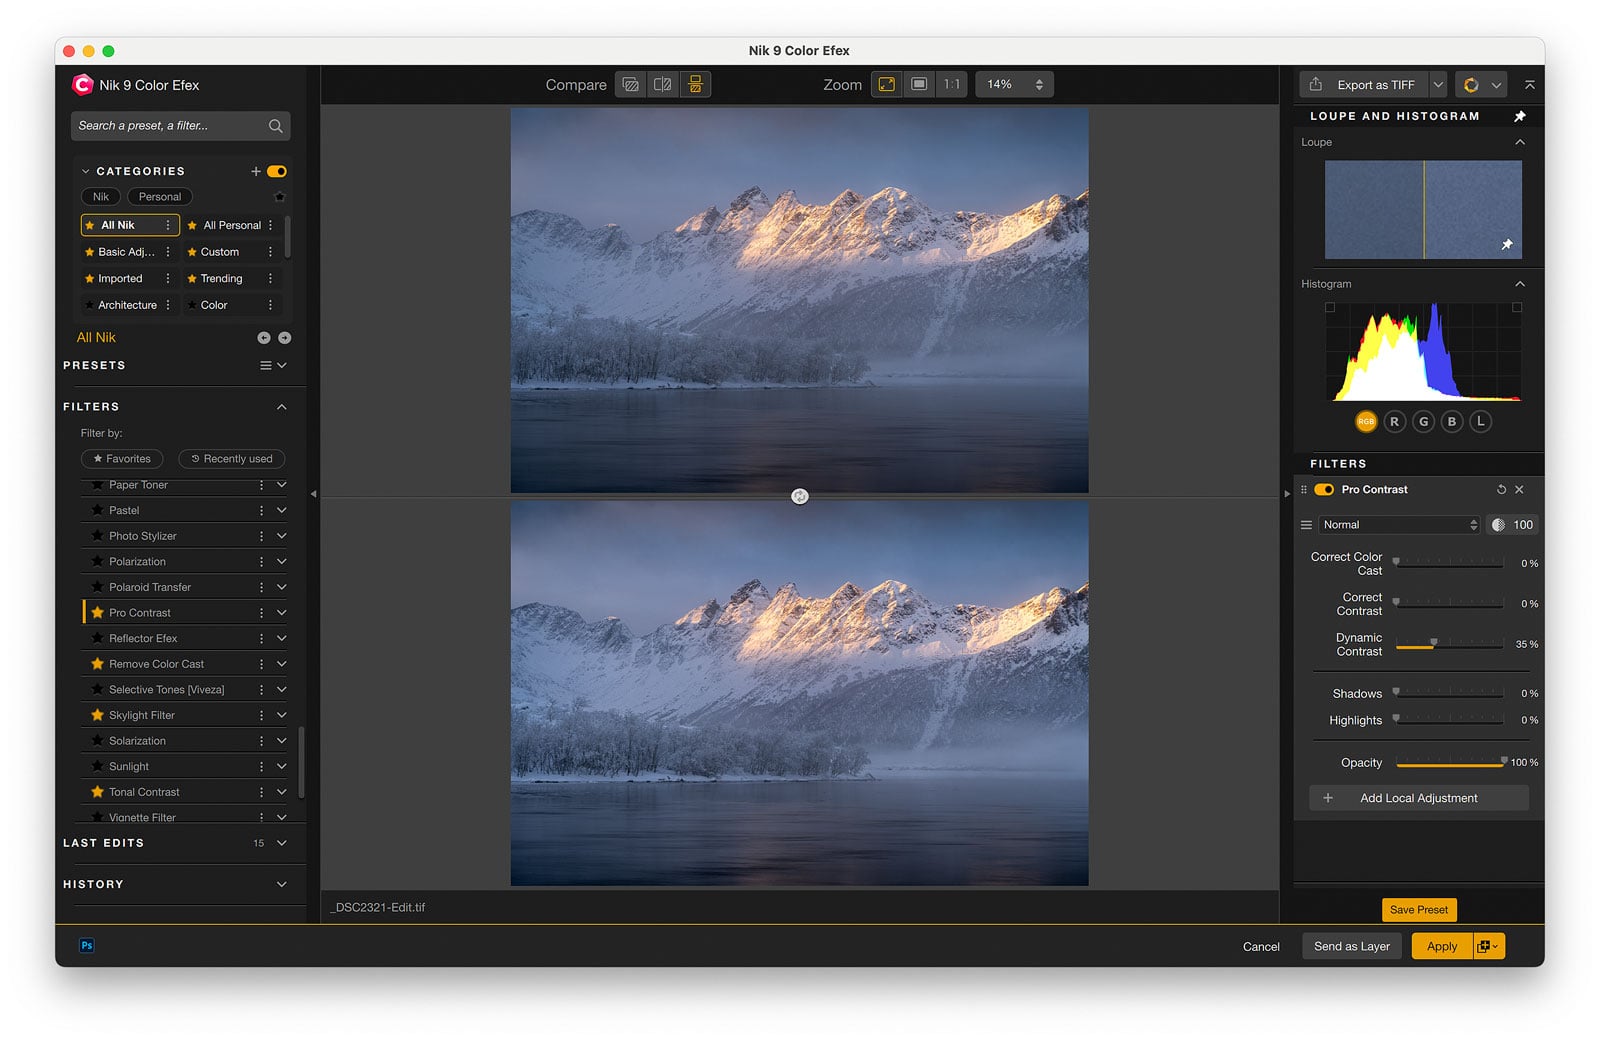
#1 Pro Contrast
The Pro Contrast filter is used, as the name indicates, to adjust the contrast in an image (though there’s also a slider for correcting color cast)
While the Correct Color Cast slider does a good job, the Dynamic Contrast slider is the most important.
Dynamic Contrast is an advanced slider that adjusts the contrast of each area according to the tone distribution. That means that it adjusts different parts of the photo with varying degrees.
As with any tool, this should be used with care. Generally speaking, you want to avoid using a percentage over 40 or 50.
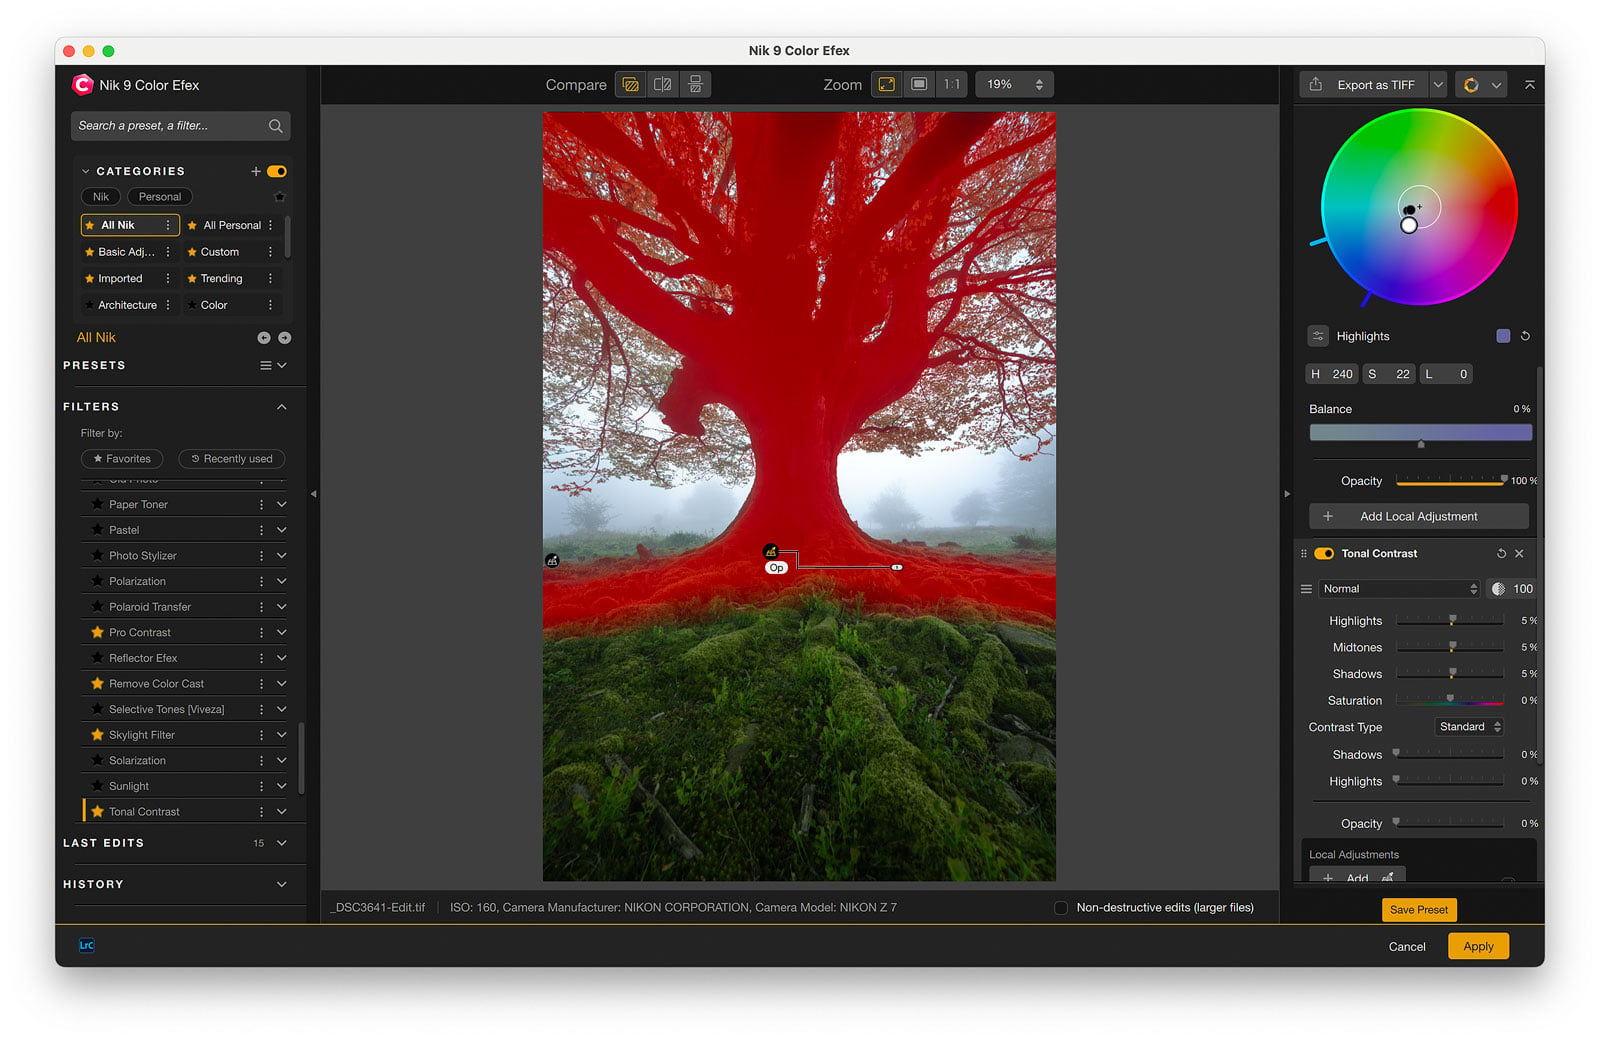
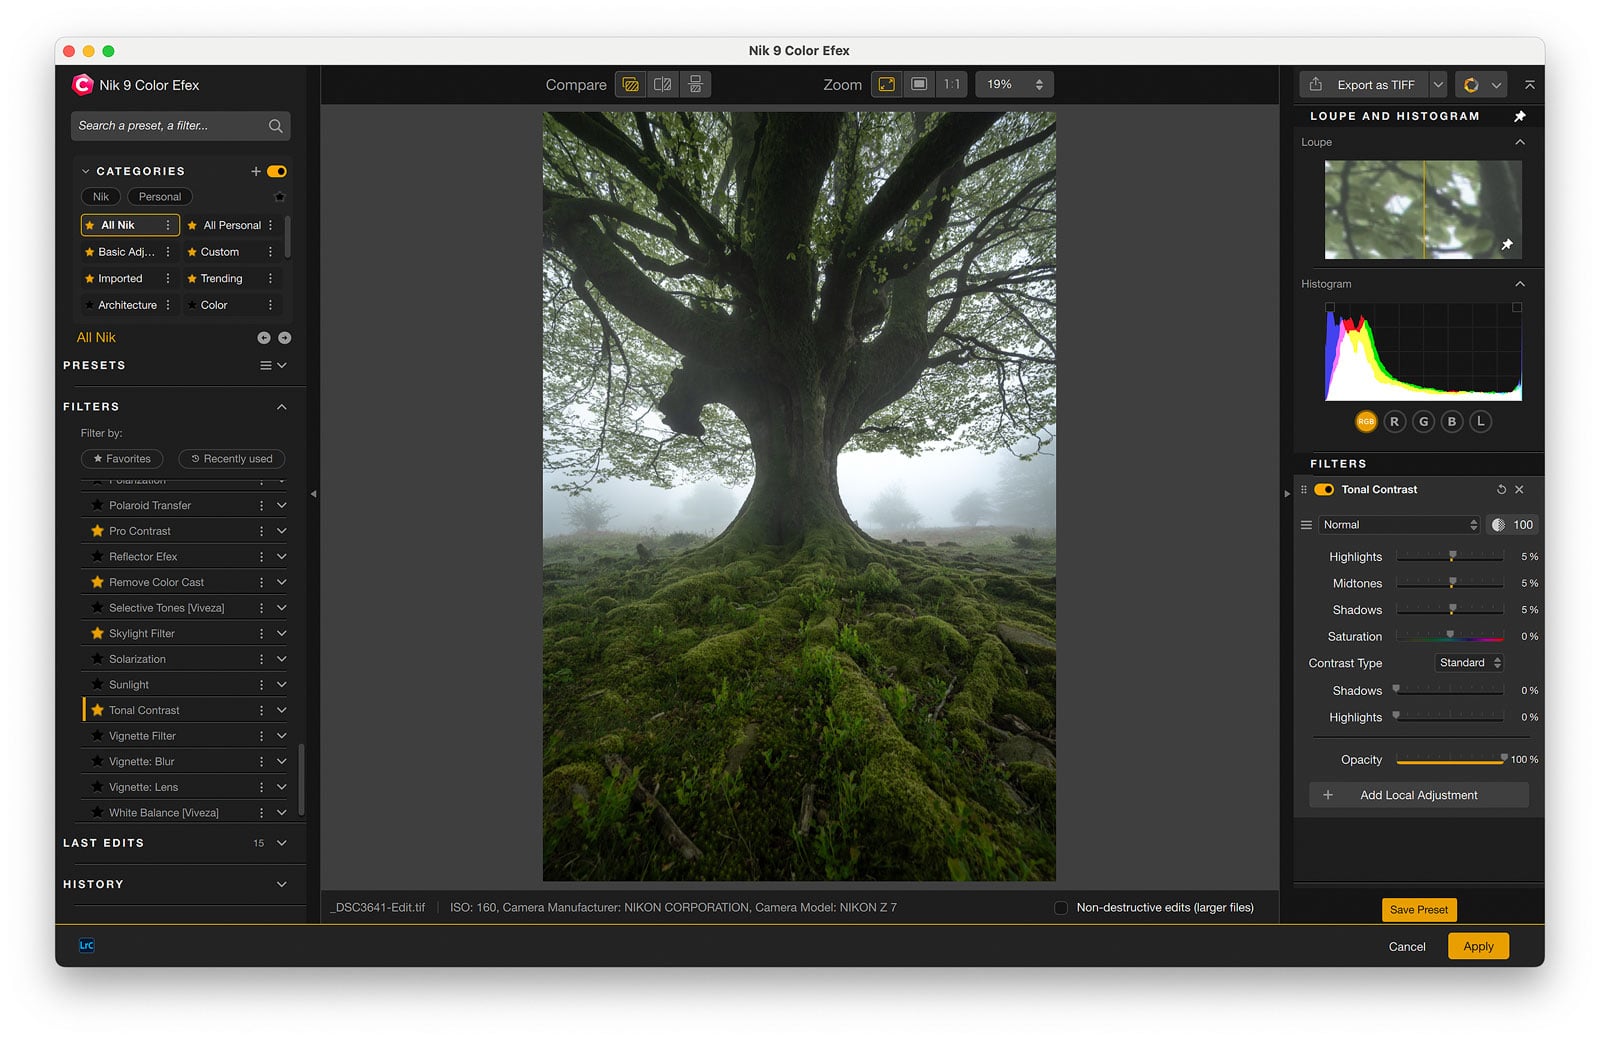
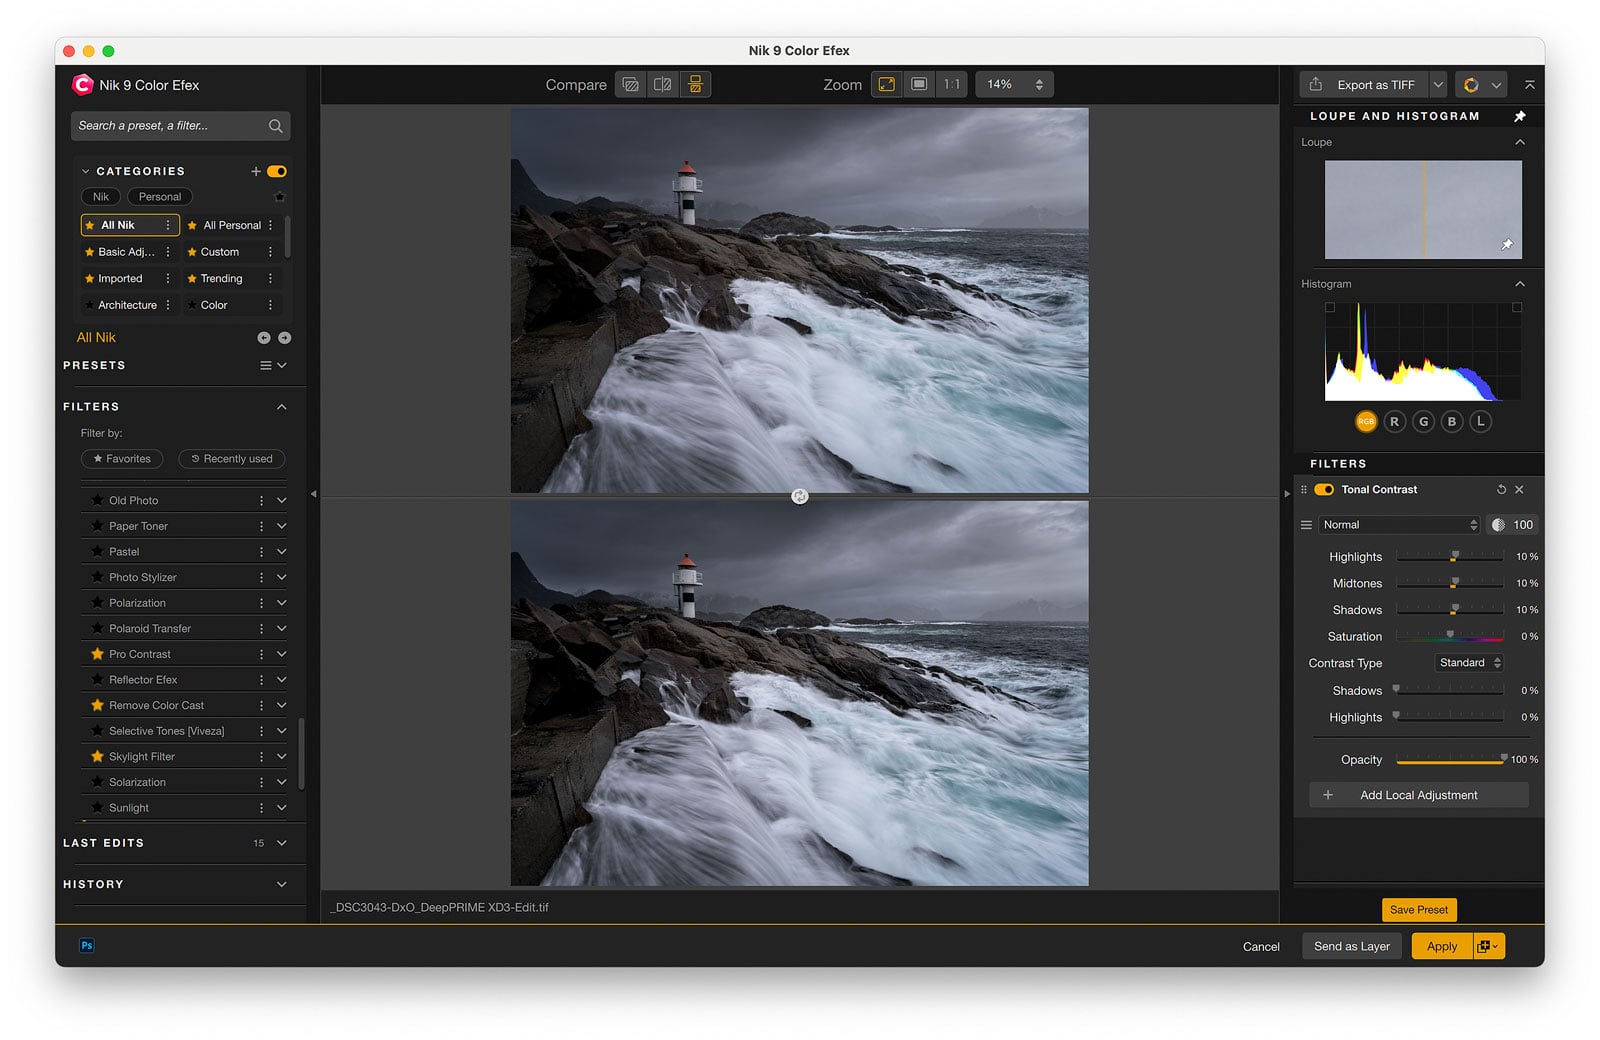
#2Tonal Contrast
Including two filters that target contrast might seem a little over the top, but both are exceptionally good. Used together, they can create outstanding results (which is one reason to hold back a little on the sliders).
The Tonal Contrast filter is the best contrast filter in Color Efex 9, and I’d argue that it has been since version one of the Nik Collection.
A common mistake among aspiring photographers is that contrast is adjusted only globally. This is rarely a good idea. In fact, most images benefit from local contrast adjustments, as well. That’s precisely what the Tonal Contrast filter is used for. Here, you can individually adjust the contrast in the Highlights, Midtones, and Shadows.
Aim to use a 5 to 15 percent strength for each of the three contrast sliders. This can give the photo a nice ‘pop’.
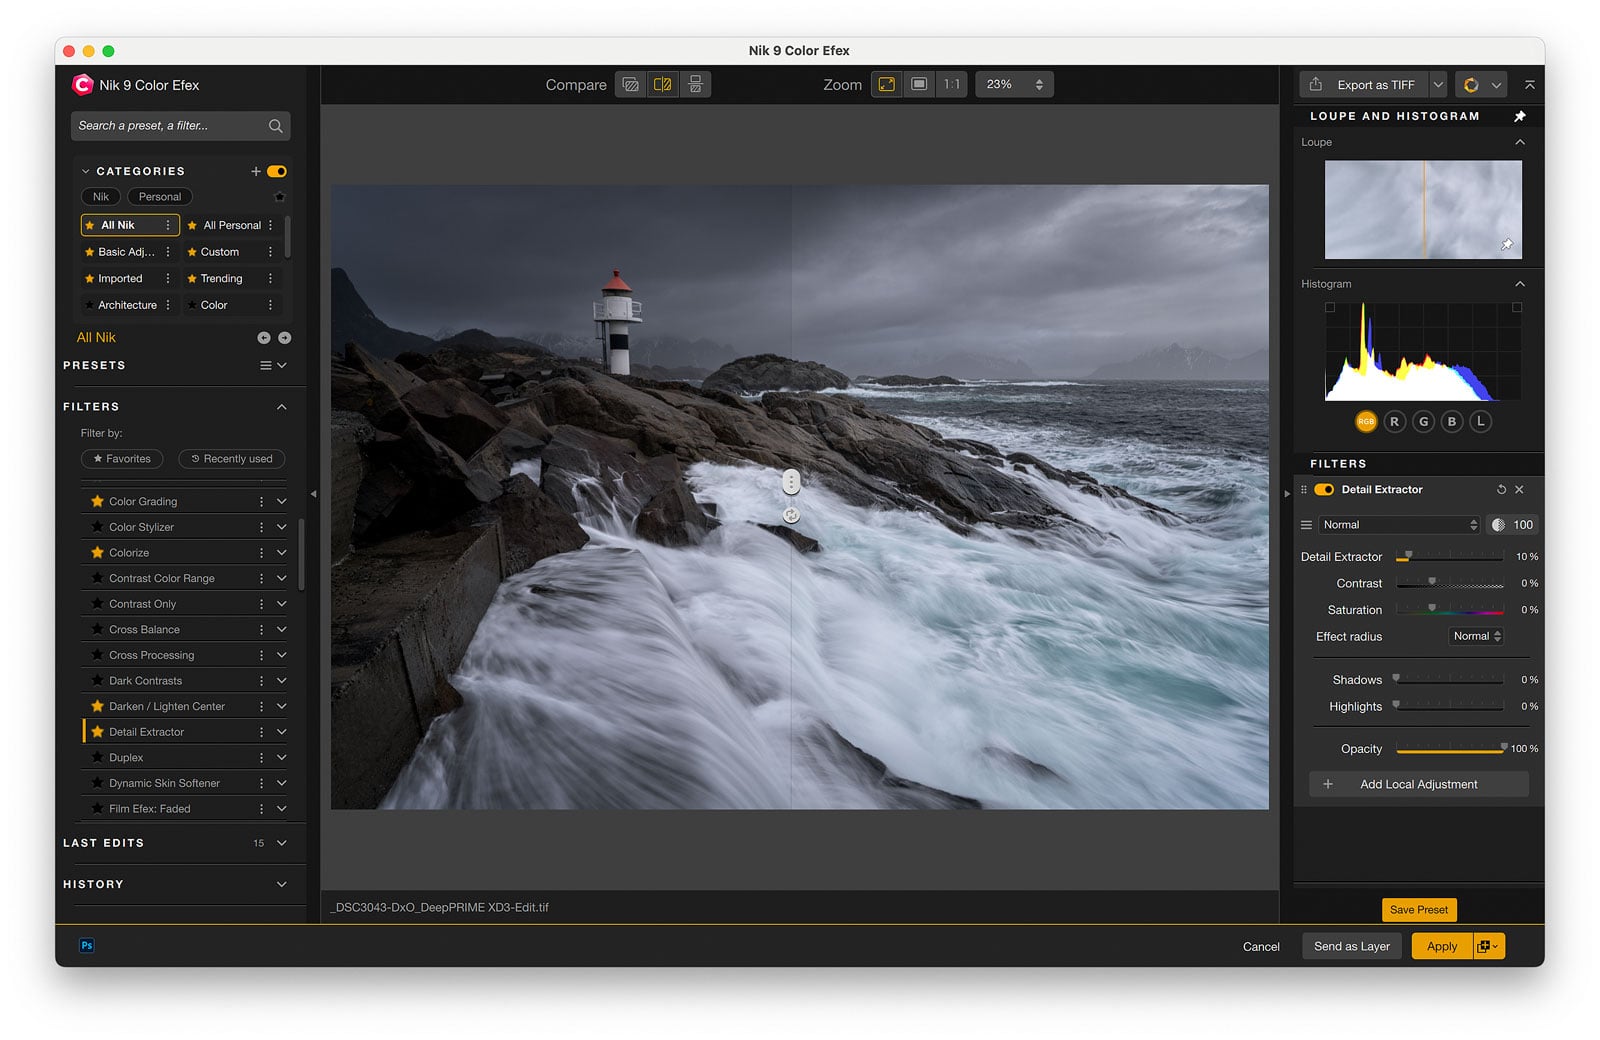
#3 Detail Extractor
The Detail Extractor is a filter you should be very careful with. Not because it’s a bad filter, but because it’s very sensitive. Pulling the slider a little too far will make the image look… crunchy.
That being said, applied at a lower percentage, it’s a great tool for extracting detail and balancing light.
Pulling the slider to the right will extract details, brighten shadows, and darken highlights. The best range is between 5 and 20.
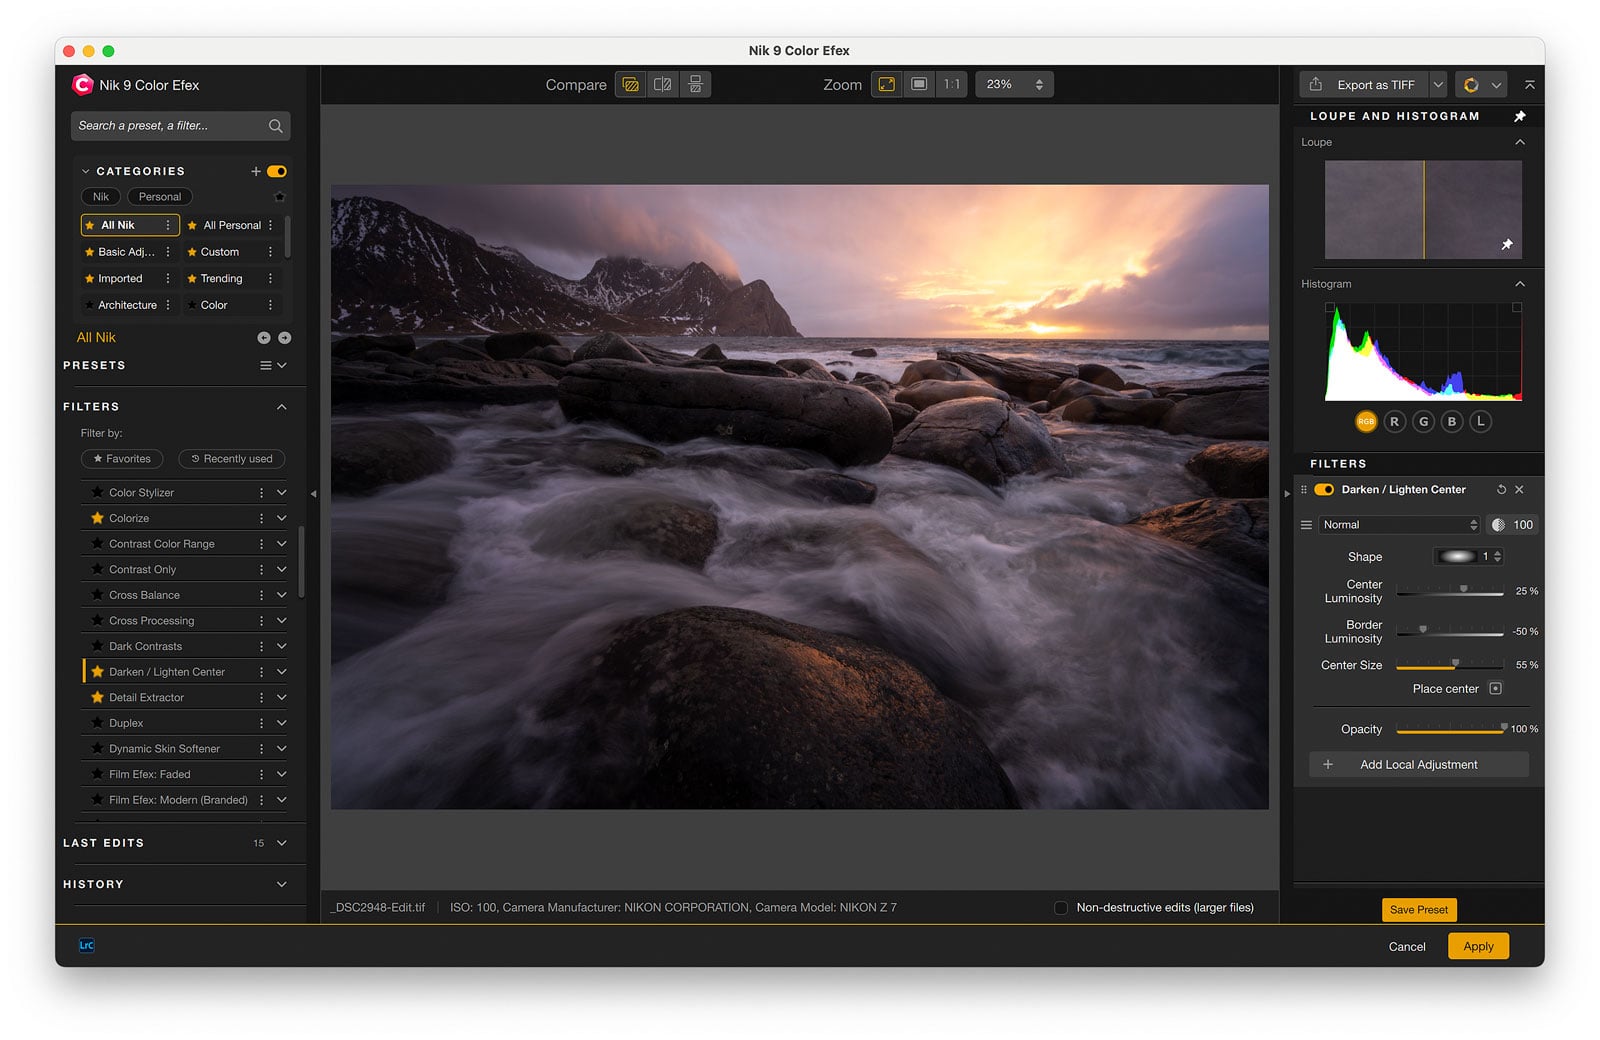
#4 Darken/Lighten Center
I’m generally not a fan of basic vignette tools such as the one found in Lightroom. They lack customization possibilities, making it difficult to create a vignette that suits a photo’s specific needs.
The Darken/Lighten Center is a much better method of applying a vignette. This filter gives you great control, as you can place the center, adjust the center and border luminosity, and change the center size. Combine this with Control Points (more on that soon), and you have everything you need to create the perfect vignette.
I find this to be a great filter to use towards the end of a workflow.
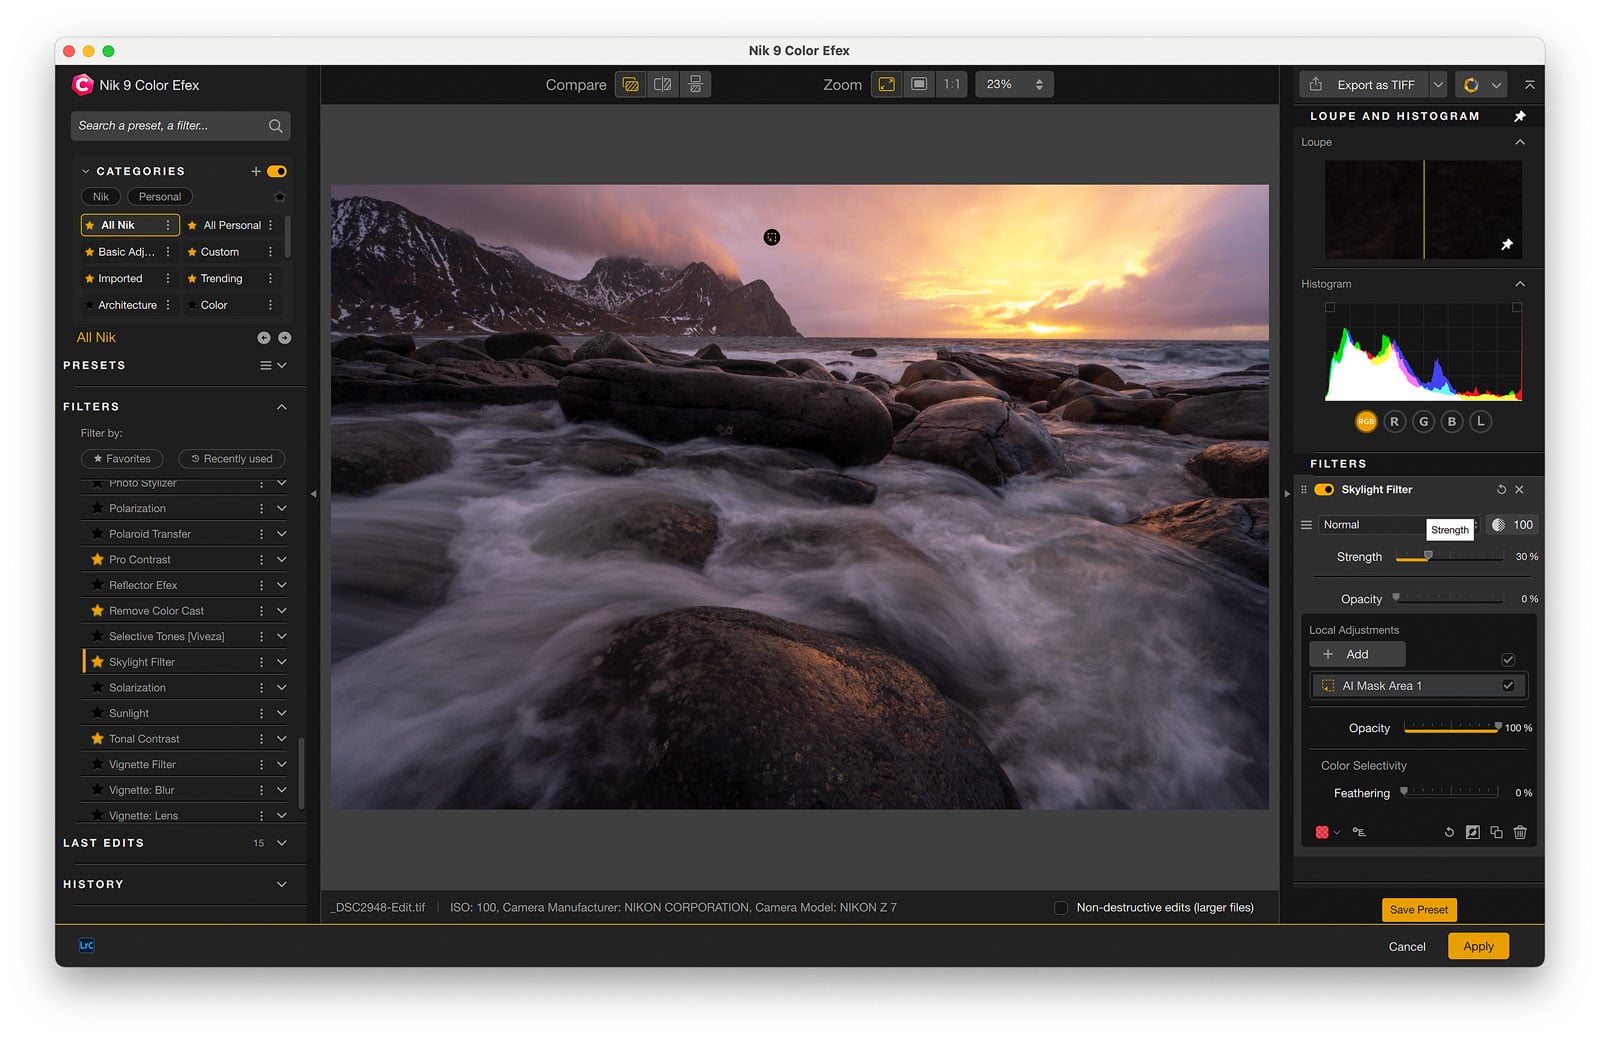
#5 Skylight Filter
Who doesn’t love a nice colorful sunrise or sunset? I think that’s part of what drags many of us outside with our cameras in hand.
The Skylight filter is perfect for these types of photos as it has a similar effect to a warming filter. The further you pull the slider to the right, the more warmth is applied.
This doesn’t work for every photo, and it should be applied with some caution, but it does a lot to enhance the atmosphere for the right image.
Recommended Reading: Sunset Photography: 8 Proven Tips for Great Images
#6 Color Grading
Color Grading is the most significant new addition to Color Efex 9, and one that I think will become a go-to filter for landscape photographers who do serious color work.
The tool gives you independent control over Highlights, Midtones, Shadows, and Global color, all from a single wheel rather than four separate ones. Hold Shift to adjust hue only, or Option (Mac) to adjust saturation only, keeping your changes precise.
For landscape photography, the rule is the same as in Lightroom: subtlety is everything. Small saturation adjustments, a cool push into the shadows, a slight warmth in the highlights, will almost always look more natural than anything aggressive. Where I find the Color Efex implementation particularly strong is that it tends to produce a slightly more natural result than Lightroom’s equivalent, making it easier to avoid over-cooking the look.
If you already use Color Grading in Lightroom, this will feel immediately familiar. And if you don’t yet use color grading at all, this is a good place to start.
Using Presets in Nik 9 Color Efex
It’s no secret that most of us have our habits. This is true when processing our images, too. Even though every image is unique and should be treated individually, most of us follow the same steps and use the same tools during the editing workflow.
This is why many photographers use presets in Lightroom or Actions in Photoshop. It’s a great way to quickly apply a set of adjustments to your images (rather than spending time manually applying each one)
Color Efex (and the Nik Collection) also have a preset function. Just like in other software, presets allow you to apply a series of adjustments with one click. You can create your own presets or import others’ presets.

Adjustments in a preset aren’t locked, which is important to remember. After applying the preset, you have full access to all the filters it uses and can adjust the settings as needed. You can also turn off filters that might not work for that particular photo.
All the preset does is add filters to the right panel with the settings you saved it with.
How to Create Presets in Color Efex
Creating a preset in Color Efex Pro is relatively straightforward. All you have to do is follow these simple steps:
- Apply the filters and settings you want to include in the preset (for example, Pro Contrast, Detail Extractor, and Darken/Lighten Center)
- Click the “Save Preset” button at the bottom of the right panel
- Enter the desired name in the dialogue box. Make sure to give it a name that describes the look it gives or the effects it has.
- Check “Save with Control Points” if you want the control points to be included in the preset.
- Click “Save”
Your new preset can now be found in the Custom section in the left panel. The name can be changed by clicking on the text and writing in the new one. You can also click the star icon to save it as a favorite (which can be handy when you have many filters)
How to Import Presets in Color Efex
Purchasing presets for Lightroom is quite common, and there are many providers (both photographers and companies) out there. This isn’t quite the case for Color Efex. A quick Google search shows that there’s not much on the market.
That being said, importing presets is still an option. It’s just as easy as creating them:
- Locate the “Imported” section in the left panel
- Click on the double arrow icon and select “Import Preset” in the pop-up menu
- Navigate to the preset file in the new window that opens, select it and click “Open”
The imported preset(s) will now be visible in the Imported section. Again, you can change the name and save a preset as a favorite.
Exclusive Reader Offer
DxO has given CaptureLandscapes readers a 15% discount on all new purchases.
You’ll find the full details and your discount code at the end of this review.
How I Use Color Efex in My Landscape Photography Workflow
I’ll be transparent: Color Efex isn’t where my editing begins. Most of the work happens before I ever open it.
My workflow starts in DxO PureRAW for RAW optimization with noise reduction, lens corrections, and getting the file in the best possible shape before anything else. From there I move into Lightroom to set the tone and atmosphere of the image: exposure, white balance, color work, and basic masking. Then it’s into Photoshop for more specific adjustments like midtone contrast, targeted color corrections, dodging and burning.
Color Efex comes in towards the end of that Photoshop workflow. This is where I apply what I think of as the final touch, the adjustments that give the image its finished look.
In most cases, I stack two filters: Colorize and Tonal Contrast. The Colorize filter gives the image a slightly darker, more desaturated feel that suits the mood I’m typically going for in my photography. Tonal Contrast then adds micro-contrast, a subtle increase in local contrast that gives the image depth and presence without feeling heavy-handed. In some cases, I’ll also bring in Darken/Lighten Center to add a touch of vignette.
It’s a simple stack, but it’s consistent, and it’s become a reliable part of how my images look.
Version 9 has made me rethink one part of that workflow. The new Color Grading tool is something I’m actively exploring as a replacement for, or addition to, what I currently do in Lightroom. I use Color Grading in Lightroom on around 95% of my images, and after spending time with the Color Efex implementation, I find it produces results that are slightly more natural and easier to control. Whether it fully replaces my Lightroom color grading or sits alongside it, I haven’t decided yet, but it’s the first time a Color Efex update has genuinely made me reconsider how I work.
Create Masks by Using Local Adjustments in Nik 9 Color Efex
The Nik Collection plugins don’t use Layers and Masks like we are used to from Photoshop and other advanced post-processing tools. Instead, they use something called Control Points. Version 6 introduced big upgrades to this feature, and with the additional masking tools, it’s now known as Local Adjustments. In the latest version, it’s become even better.
In Nik 9 Color Efex, you’ll find Object Selection, Area Selection, Control Points, Control Lines, Control Polygons, Luminosity Mask, Color Mask, and Depth Mask. These work similarly to masks in Photoshop or Lightroom and allow you to apply or remove adjustments (filters) from specific areas in your image.
To find the Control Points, you first need to open a filter. Inside the filter tab in the right panel, you’ll see five icons:
- One for adding a Control Point
- One for adding a Control Line
- One for adding a Control Polygon
- One for creating a Luminosity Mask
- One for creating a Color Mask

Regular Control Points/Lines are used to apply adjustments only to the selected areas while a Neutral Control Point/Line is used to remove adjustments from those areas.
Pro Tip: Option + click on any of these icons to add them as a neutral adjustment.
How Control Points Work
I’m not going to lie. I found Control Points quite confusing in the beginning. I still prefer the way masks work in Photoshop or Affinity, but after a lot of trial and error, I’ve realized that they are more flexible (and intelligent) than they first appear to be.
But how exactly do they work? How can you use them to create local adjustments? Let’s start with the basics:
- Click on the icon to create a Control Point (the adjustment will be applied only to the selected area). Notice that the cursor changes its shape to a little circle when hovering over the image.
- Click on the area of the image where you want the mask to be applied. A circle should now appear on the image. Only areas covered by the Control Point will be affected when making an adjustment. However, the Control Point analyzes the tones, texture, and color and will adjust its selection within the circle accordingly.
- Use the slider within the circle to adjust its size and the affected range
You can always move the Control Point or Control Line after it’s been created. Simply click on its knob on the image and drag it to where you want. It’s also possible to create multiple Control Points (and duplicate the ones you already have)
In fact, the best results often come from using several of them. It’s not uncommon to use a dozen or more to create the perfect selection of one area.

Pro Tip: Turn on “Show/Hide selection for all Control Points” when working on your mask. This turns the image into a black and white preview where you can see exactly what areas are targeted (white areas are adjusted while black is left untouched)
Refining Control Points Using Color Selectivity
As I mentioned earlier, a Control Point doesn’t blindly apply adjustments to everything inside its circle. It analyzes the exact spot you click, considering the tone, texture, and color, before deciding what parts of the image should actually be affected.
Turn on the selection preview, and you’ll see what I mean. You’ll notice that not all areas inside the circle are treated equally. Some parts light up (these are affected), while others stay dark (these remain untouched).
Let’s say you want to boost the saturation of a deep blue sky. You place a large Control Point over the sky, but it also overlaps part of the landscape. Don’t worry, because the Control Point is “reading” the color you clicked on (the blue), it won’t spill over into the land below. Only the blue areas will be affected.
But what if you need even more precision? That’s where Luminance and Chrominance sliders come in.
- Luminance controls the brightness range of your selection. Increasing it narrows the effect to target only similar brightness levels (perfect for working on highlights or shadows). Decreasing it makes the effect cover a wider range of brightness.
- Chrominance controls the color range of your selection. Increasing it targets just the exact hue you clicked on, while decreasing it expands the range to include similar shades.
By combining these three tools, Control Points, Luminance, and Chrominance, you can create incredibly refined masks that target exactly the areas you want to adjust.
It takes a little practice to master, and you’ll often find that using several Control Points gives the best results. But once you get the hang of it, this becomes one of the most powerful ways to make local adjustments in Color Efex.
How the Polygon Tool Works
The Polygon tool was a new addition to version 7. This tool allows you to create the exact shape you need to select your subject. Similar to regular Control Points, adjustments are confined to the area within the polygon, ensuring precise control over localized edits.

Here’s how to use the Polygon tool:
- Apply a filter, then click on the Polygon tool icon.
- Click to set points around the area you wish to adjust. Each click adds a vertex, and lines connect these points to form the polygonal shape.
- To finalize the selection, connect the last point to the first, closing the shape.
- After creating the polygon, you can refine its position and shape by dragging the edges as needed.
Now, with your mask created, apply your desired adjustments.
How Luminosity Masks in Color Efex Work
Luminosity Masks are something I traditionally connect with Photoshop. However, in the later years, more and more photo editors have introduced it in various shapes and forms. Now, you’ll also find this option in the Nik Collection and Color Efex.
These masks are selections made based on the brightness of a pixel. You can use it to target the highlights, midtones, or shadows specifically.
Recommended Reading: An Introduction to Luminosity Masks
Luminosity Masks have, for a long time, been considered a fairly advanced method for selective post-processing. With the Nik Collection, it’s easier than ever before.
Follow the same steps to create the mask as with regular Control Points. The difference now, is that you’ll see some new buttons and sliders appear on the right side. Here you have buttons numbered 0 to 10, and a black-to-white tab beneath. You can use the numbers to target specific areas of the photos, where 0 is pure black, 5 is midtones, and 10 is pure whites.
Use the knobs in the tab beneath to make your selection broader or narrower, depending on how much of the photo you want to affect.

Luminosity Masks can be used for many things. One of my favorite adjustments that includes them, is when wanting to apply a cold color cast only to the shadows. In this case, you can use the Colorize filter, choose a dark blue color with a low opacity, then use a number between 0 and 2 for your Luminosity Mask. By doing this, the cold blue is only applied to the darkest parts of your photo.
How Color Masks Work
This tool lets you create highly targeted masks based on specific colors in your image.
While Control Points, Lines, Polygons, and Luminosity Masks rely on tonal or spatial selection, the Color Mask is all about isolating a particular color range. This makes it perfect for color-specific enhancements, like deepening a sunset sky without touching the rest of the photo.
Here’s how to use the Color Mask tool:
- Apply a filter and click on the Color Mask icon in the Selective Adjustments section.
- Click on the color in your image that you want to target. A mask preview will appear, showing which parts of the image are affected.
- Refine your selection by adjusting the color range handles on the Color Mask panel. You can widen or narrow the color tolerance to include more or less of the surrounding tones.
- Apply your adjustments knowing they will only affect the selected color range.

Color Masks are especially useful for targeted color corrections or creative effects. For example, you might want to boost the greens in a forest scene while leaving the sky and other elements untouched. Or perhaps you’d like to apply a warming filter to only the golden light in your image, enhancing mood without altering the shadows.
It’s a powerful addition that gives you even more control over your selective edits, perfect for fine-tuning your images with surgical precision.
Who is Nik 9 Color Efex for?
This is the million-dollar question. Or, in this case, the $179 question. Let’s get straight to the point:
If you already process your images using Lightroom, Photoshop, DxO PhotoLab, Affinity Photo, or any other photo editor, Nik 9 Color Efex is an excellent addition to your toolbox. Whether you’re looking to speed up your workflow, add creative effects, or make precise local adjustments, Color Efex delivers a lot of value for photographers at all skill levels.
However, if you don’t process your images at all, meaning you use them straight out of the camera without making any adjustments, then Color Efex (and the Nik Collection in general) probably isn’t for you.
These tools are designed to enhance your editing workflow, not replace it. If you’re happy with your images as they are, there’s no need to invest in extra software.
That said, if you’re curious about what creative possibilities editing can unlock, the free 30-day trial is a great risk-free way to see what you’ve been missing.
Should You Upgrade from Color Efex 8 to 9?
If you already own Nik Collection 8, the upgrade to version 9 is priced at $99.99.
For Color Efex specifically, this is the most feature-rich update in recent releases. The combination of Color Grading, AI Masks, and Blending Modes adds three genuinely useful tools, and unlike some version updates where the improvements are incremental, these expand what Color Efex can actually do.
The upgrade makes the most sense if Color Efex plays a central role in your editing workflow. If you use it for building looks, making local adjustments, and doing color work, version 9 gives you considerably more to work with. Color Grading alone is a meaningful addition if you’re doing serious color work, and AI Masks reduce the need to jump out to Lightroom or Photoshop just to create a selection.
If you use Color Efex more as I do, as a final step in a Photoshop-based workflow, the case is more nuanced. The core filters that most landscape photographers rely on haven’t changed. But even from that perspective, I’ve found the Color Grading tool compelling enough that it’s actively changing how I think about my workflow.
There’s also a bigger picture worth acknowledging: with Color Grading, Blending Modes, and AI Masks now in place, Color Efex is taking a meaningful step towards being a stronger standalone creative tool, not just a plugin add-on. Each version has moved it closer to that, and version 9 makes the biggest leap yet.
If you’re coming from version 7 or earlier, the upgrade is straightforward. If you’re on version 8 and Color Efex is core to your work, I’d say it’s worth it.
DID YOU ENJOY THIS ARTICLE? THEN DON’T FORGET TO SHARE!
Conclusion
Nik Color Efex 9 is the most popular plugin in the Nik Collection, and version 9 makes it better than it’s ever been
I won’t sit here and say, “Color Efex will instantly transform average photos into world-class award winners.” That would be a lie. But what it will do is provide you with several customizable filters that can speed up your workflow and make advanced adjustments much easier to apply.
There’s little doubt in my mind that most photographers who process their images will find this a valuable plugin. Probably more as part of your Lightroom, Photoshop, or Affinity workflow than as a standalone tool, although standalone users can develop solid workflows by combining the other Nik Collection plugins as well.
I’ve used Color Efex for almost a decade, and I consider it an essential part of my post-processing toolkit. I’m convinced you will too.
DxO has generously provided CaptureLandscapes readers with an exclusive 15% discount on all new purchases of the Nik Collection, including Color Efex.
To claim your discount, simply use the code capturelandscapes during checkout on the DxO website.
Frequently Asked Questions About Nik Color Efex
Nik Color Efex is a photo editing plugin designed to enhance colors, contrast, and details in your images. It offers more than 50 creative filters that help photographers add professional-quality effects with just a few clicks.
No, you can use Nik Color Efex as a standalone application. However, it works seamlessly as a plugin for popular editors like Adobe Photoshop, Lightroom, DxO PhotoLab, and Affinity Photo.
Yes, Nik Color Efex is one of seven plugins included in the Nik Collection by DxO. It’s not available as a standalone purchase, but you can try it risk-free with the collection’s 30-day free trial.
Nik Color Efex 9 introduces Color Grading with a single unified wheel for Highlights, Midtones, Shadows, and Global color. It also adds AI Masks for pixel-precise subject selection, Depth Masks for distance-based adjustments, Blending Modes for 18 ways to control how filters interact with your image, and several workflow improvements including Preset Hover Preview and copy/paste of local adjustments.
If you regularly process your images in Photoshop, Lightroom, or other editing software, Nik Color Efex is a powerful addition to your workflow. Its creative filters and local adjustment tools can save time and improve your results.
Ready to give Color Efex a try?
Visit the DxO website to download the free 30-day trial and explore all the features for yourself.
And if you decide to buy, don’t forget to use your exclusive 15% discount code: capturelandscapes.
")

