

Ever wondered how photographers make waterfalls look silky smooth or turn night traffic into glowing streaks of light? That’s the magic of long exposure photography.
Long exposure photography is a creative technique that uses slow shutter speeds to capture motion over time, turning flowing water silky, stretching clouds across the sky, and transforming lights into glowing trails.
It’s one of the most impactful ways to add atmosphere, movement, and visual interest to your images, especially in landscape, seascape, and architecture photography.
Whether you’re new to photography or looking to expand your creative toolkit, this guide will walk you through everything you need to know to get started with long exposure photography. You’ll learn how it works, what gear you need, how to set up your shot, and how to avoid common mistakes.

Jump to Section:
- What is Long Exposure Photography?
- What is Shutter Speed?
- Quick Tip: Practical Excercise to Understand Shutter Speed
- Why Use Long Exposure Photography?
- Essential Equipment for Long Exposure Photography
- How to Capture Long Exposure Images (Step-By-Step Field Guide)
- Long Exposure Photography Examples and Ideas
- Common Mistakes in Long Exposure Photography (and How to Avoid Them)
- Conclusion
- Frequently Asked Questions About Long Exposure Photography
What is Long Exposure Photography?
Long exposure photography is a technique that uses slow shutter speeds to capture motion across time. Instead of freezing a moment, your camera records movement, turning rushing waterfalls into silky ribbons, cloud formations into soft streaks, or nighttime traffic into glowing trails of light.
But what exactly qualifies as a “long” exposure?
While there’s no fixed threshold, most photographers agree that a long exposure begins when the shutter speed is too slow to shoot handheld without introducing motion blur, typically slower than 1/60th of a second. With a tripod, exposures can range from one second to several minutes (or even hours) depending on your creative intent.
Though commonly associated with landscape photography, long exposure techniques are widely used in architecture, street photography, urban scenes, and fine art. It’s a versatile style that helps create dramatic, dreamlike visuals you can’t achieve through conventional photography alone.
What is Shutter Speed?
To truly understand long exposure photography, you first need to understand shutter speed, one of the most important camera settings for controlling both light and motion.

Shutter speed refers to the amount of time your camera’s shutter stays open when taking a photo. It’s measured in seconds or fractions of a second, such as 1/1000s (very fast) or 1/4s (much slower). The longer the shutter stays open, the more light reaches your camera sensor, and the more motion gets captured in your image.
In long exposure photography, we intentionally use slow shutter speeds to capture movement over time. This creates visual effects like silky water, stretched clouds, or glowing light trails.
Recommended Reading: An Introduction to Shutter Speed in Photography
Quick Tip: Try This to Understand Shutter Speed
Want to see shutter speed in action?
Here’s a simple exercise you can do right now, no fancy gear required:
- Grab your camera or smartphone with manual mode.
- Take a photo of moving water (a sink, faucet, or small stream works great) at 1/1000s. Notice how the motion is frozen.
- Now take the same photo at 1/2s or even 1 second. You’ll see how the water turns smooth and blurred.
This is the heart of long exposure photography: using slow shutter speeds to turn motion into mood.
Why Use Long Exposure Photography?
So, what are the benefits of long exposure photography, and why do so many landscape and fine art photographers rely on this technique?
The answer lies in its unique ability to capture the passage of time.
Where a typical photo freezes a split-second moment, long exposure photography reveals movement; clouds drifting, water flowing, light trailing, and turns it into something visual, expressive, and often surreal.
This approach allows you to:
- Create visual contrast between motion and stillness
- Simplify busy scenes, by blurring or removing distracting elements
- Add mood or atmosphere to otherwise flat or static compositions
- Express time in a single frame, not just a moment
It’s especially effective in landscape photography, but also widely used in architectural, urban, and abstract work. Whether you’re photographing seascapes or city streets, long exposure adds a creative dimension that standard exposures can’t replicate.
While the effects can feel dramatic, the process is often the opposite: quiet, deliberate, and meditative. It encourages patience and rewards it with striking results.
In short, long exposure photography isn’t just a technique, it’s a way of seeing.
Essential Equipment for Long Exposure Photography
You don’t need a studio full of gear to get started with long exposure photography, but a few key tools are essential if you want sharp, well-exposed images.
Whether you’re photographing silky waterfalls or streaking clouds, the right camera equipment will make a big difference in both technical quality and creative control.
#1 A Camera with Manual Controls
You don’t need the latest or most expensive camera to capture long exposures. However, your camera must give you complete manual control over shutter speed, aperture, and ISO.
Bulb Mode or Time Mode is also useful, especially if you plan to shoot exposures longer than 30 seconds. These modes let you keep the shutter open for as long as you need without being limited by the camera’s default settings.
Whether you’re using a DSLR, mirrorless, or even a smartphone with manual camera apps, if you can control your exposure, you’re ready to get started.
#2 A Sturdy Tripod
This is non-negotiable. A tripod is essential for Long Exposure Photography.
You’ll be working with slow shutter speeds; sometimes 30 seconds, sometimes 5 minutes. Without a tripod, your images will be blurred from even the slightest movement.

While you don’t need the most high-end model on the market, avoid going with the cheapest option. Lightweight, flimsy tripods struggle in wind and uneven terrain, and often wear out quickly.
Tripod I use: I personally use the Leofoto LN-364C for heavy setups and the Fotopro X-Aircross 3 when hiking longer distances.
Recommended Reading: How to Choose Your Next Tripod
#3 Neutral Density (ND) Filters
Even using the lowest ISO and narrowest aperture won’t slow the shutter enough to create a true long exposure during daytime. That’s where Neutral Density filters come in. They are darkened filters that reduce the amount of light reaching your sensor.
ND filters allow you to use slow shutter speeds during the day by darkening the scene. The darker the filter (measured in “stops”), the slower the shutter speed can be.
They aren’t always necessary at night, but essential for daytime long exposures, including waterfalls, cloud streaks, and seascapes during golden hour.

Types of ND Filters
- Screw-on/magnetic circular filters: Easy to use and portable.
- Square/drop-in systems: These are more flexible for stacking filters but require a holder and adapter ring.
My recommendation: I’ve used NiSi Filters for years and consistently get high-quality results. The Gobe ND Filters offer a great budget-friendly option if you’re just getting started.
How Dark Should Your ND Filter Be?
ND filters come in different strengths:
- 3-Stop: Perfect for “quick” long exposures, where you want some slight movement in your foreground.
- 6-Stop: Great for golden hour or overcast light, slows shutter speed enough to blur water or clouds.
- 10-Stop: Ideal for bright daylight or very long exposures, allows shutter speeds from 30 seconds to several minutes.
These terms describe how dark the filters are and how much you need to extend the exposure time to achieve the same exposure you would without a filter.

For example, a 10-Stop Neutral Density filter requires you to use a shutter speed that is 10 Stops, or 1000 times, slower. That means an original shutter speed of 1/60th second becomes 16,7 seconds.
Avoid ultra-light filters like 1- or 2-stop for long exposure work. They rarely have the effect you aim for, unless you’re photographing in dim conditions like blue hour.
Note: While Neutral Density Filters are essential, it’s possible to achieve long exposures without filters, too, but at the cost of image quality and complete creative control.
Recommended Reading: Why Neutral Density Filters Will Improve Your Photography
#4 Remote Shutter Release (or Delay Timer)
A remote shutter release helps eliminate camera shake when triggering your exposure. Pressing the shutter button can cause subtle vibrations, especially at longer focal lengths or lightweight tripods.
There are two major benefits:
- Prevents vibration from touching the camera.
- Allows exposures longer than 30 seconds when using Bulb Mode.
A remote isn’t strictly necessary for exposures under 30 seconds; you can use your camera’s 2-second delay timer instead. But it’s a helpful tool for exposures over 30 seconds or for seascape photography.
Recommended Gear Summary (Optional Styled Box)
- Camera: Manual settings and Bulb Mode recommended
- Tripod: Leofoto LN-364C (heavy-duty), FotoPro X-Aircross 3 (travel/hiking)
- ND Filters: Gobe (entry-level), NiSi Square Filter System (advanced)
- Remote Shutter: JJC Intervalometer (or camera’s built-in delay timer)
These four items are all you need to start capturing beautiful long exposure images. You can always expand your kit later, but with these basics, you’re ready to begin.
How to Capture Long Exposure Images (Step-By-Step Field Guide)
Now that you know the gear and settings involved, it’s time to put it all into practice. This section walks you through the exact steps of capturing long exposure photos, from composition to shutter calculation and final adjustments.
Follow these steps closely to avoid common mistakes and come home with images you’re proud of.
Step 1: Find a Strong Composition
Good composition still matters, maybe even more when using slow shutter speeds. Don’t let the allure of silky water or dramatic skies distract from the fundamentals.
Start by identifying a clear subject. Then, use moving elements like water or clouds to support that subject, not compete with it. Movement should complement the scene.
Recommended Reading: Composition in Landscape Photography: The Complete Guide
Once you’ve framed your composition, mount your camera on a sturdy tripod and connect your remote shutter release. Take a moment to ensure your tripod is stable; even minor movement can ruin your shot at long exposures.
Note: If the scene doesn’t include motion (like clouds or flowing water), a long exposure will have little visual impact.

Step 2: Set ISO, Aperture, and Shutter Speed
With your composition locked in, it’s time to apply your base camera settings:
- ISO: Keep it low, typically ISO 64 or 100.
- Aperture: f/7.1 to f/13 is ideal for most scenes.
- Shutter Speed: Use the histogram or exposure meter to find a well-balanced exposure.
At this stage, you can use Manual Mode or Aperture Priority, depending on your comfort level. What matters is noting the shutter speed used for your test image; you’ll need it to calculate your final exposure once the filter is applied.
Recommended Reading: Learn more about camera settings in our article, The Exposure Triangle in Photography [Comprehensive Guide]
Step 3: Take a Test Shot
Take a normal (unfiltered) exposure with your base settings. This gives you a reference exposure to calculate from and confirms that the focus, composition, and exposure are correct.
Use image preview to zoom in and double-check sharpness.
Step 4: Switch to Manual Mode and Manual Focus
If you used a semi-automatic mode or autofocus earlier, now is the time to go fully manual.
- Switch to Manual Mode and input the same ISO and aperture used in the test shot.
- Switch to Manual Focus to lock in your focus point.
This step is crucial. Once your ND filter is on, the camera’s autofocus won’t work properly. Manual focus ensures your image stays sharp even after the scene darkens through the filter.
Recommended Reading: Manual Focus vs. Autofocus in Landscape Photography
Step 5: Mount Your ND Filter
Carefully attach your Neutral Density filter. Be gentle, you don’t want to bump your lens or shift your focus.
If you’re using a square filter system, double-check that there are no light leaks between the filter and the holder. Even a small gap can ruin a long exposure.
Reminder: The darker the filter, the longer your shutter speed will need to be.

Step 6: Calculate Your New Shutter Speed
Now that your filter is in place, your original shutter speed is no longer valid. You need to compensate for the light reduction caused by the ND filter.
There are two ways to calculate the correct shutter speed:
Option A: Use a Long Exposure Calculator App
The easiest method is to use a smartphone app like LE Calculator or PhotoPills. Just input your original shutter speed and ND filter strength, and the app will calculate the new exposure time. Bonus: Most apps include a timer function for exposures longer than 30 seconds.
Bonus: Most apps include a timer function for exposures longer than 30 seconds.
Option B: Do It Manually
The second method is a bit harder, yet it’s an important part of understanding what’s happening. It’s OK to depend on apps, but it is beneficial to also learn how to calculate the appropriate shutter speeds. This will help you determine which shutter speed to use based on the outside brightness.
Here’s a quick cheat sheet:
| ND Filter Strength | Stops of Light Reduced | Shutter Speed Multiplier |
| ND0.3 | 1 Stop | 2x |
| ND0.6 | 2 Stops | 4x |
| ND0.9 | 3 Stops | 8x |
| ND1.8 | 6 Stops | 64x |
| ND3.0 | 10 Stops | 1000x |
Based on this, we know that a 10-stop filter reduces light by 1,000 times. So if your base shutter speed was 1/30 sec, you’ll now need to expose for roughly 32 seconds.
Step 7: Apply the New Shutter Speed
Set the new shutter speed manually. If the required time exceeds your camera’s limit (often 30 to 60 seconds), switch to Bulb Mode or Time Mode.
Some cameras allow you to tap once to start and once to stop in Time Mode. Others require you to hold the shutter, in which case a locking remote is essential.

Step 8: Take the Shot, Then Fine-Tune
With everything set up, take your long exposure image.
Check the histogram and preview closely. Is the exposure accurate? Are there any hotspots or shadows that need adjustment?
ND filters aren’t always perfectly accurate in strength, and scenes can change in light. Be ready to adjust and re-shoot if needed.
Long Exposure Photography Examples and Ideas
Long exposure photography isn’t about one “perfect” shutter speed; it’s about creative intent. The same scene can look dramatically different depending on whether you use a 0.5-second or a 5-minute exposure. That’s where artistry comes in.
While the technical side of long exposure photography is relatively easy to learn, the creative side takes time to develop. Start experimenting, follow what excites you, and over time, you’ll begin to shape a style that’s uniquely yours.
Here are some popular long exposure photography ideas to get you inspired, including real-world examples and camera settings so you can see how different shutter speeds affect the result.
Waterfalls and Mountain Streams
Long exposures are popular for smoothing water movement, especially in mountain streams and waterfalls. Depending on the flow, even 0.3–1 second can create silky textures while retaining some motion detail.

A faster exposure retains texture while softening movement in the foreground water.
Tip: Try different shutter speeds to balance detail vs. blur in fast-moving water.
Coastal Seascapes and Waves
The coast is one of the best places to experiment with long exposures. Use 1–2 seconds to create dynamic, crashing waves, or go up to 30+ seconds for misty, dreamlike ocean scapes.
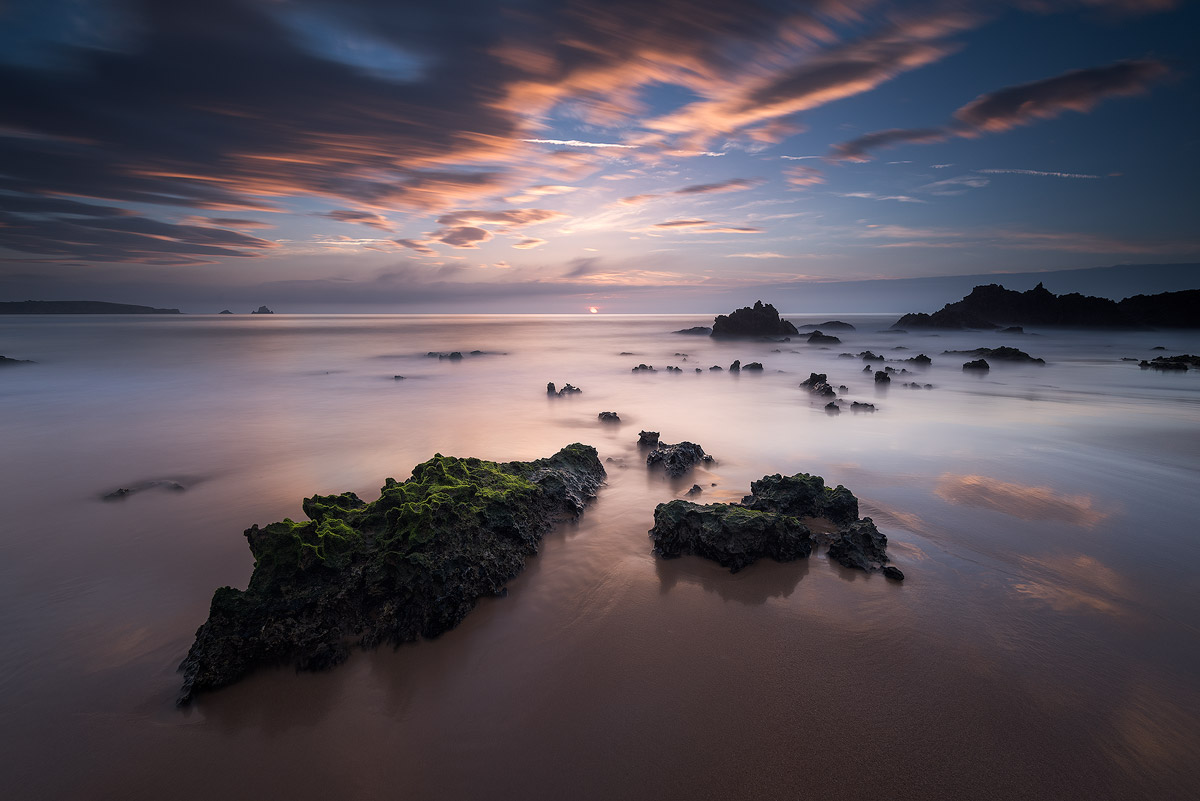
Slower shutter speed creates a tranquil surface and softens any motion in the clouds.
Moving Clouds in Landscapes
Use long exposures to stretch cloud movement across the sky and add motion to static compositions. You’ll often need 30 seconds or longer for this to become visible — which is where ND filters shine.

Long exposures during golden hour enhance atmosphere and drama in the sky.
Tip: Low, fast-moving clouds often produce more dramatic streaks than high-altitude wisps.
Light Trails in Urban Settings
Cityscapes at night offer perfect conditions for long exposure photography. Use shutter speeds between 5 and 30 seconds to turn moving traffic into colorful light trails that add depth and energy to your images.

Minimalist Motion and Stillness
Long exposures are perfect for reducing distractions and simplifying scenes. Try photographing lakes, docks, boats, or lone subjects with exposures of 1–3 minutes to flatten water and isolate your subject in a calm, abstract setting.

Creative Blur and Abstract Motion
Push your creativity by using long exposures in unconventional ways. Intentional camera movement (ICM), panning, or zooming during the exposure can create artistic motion blur and abstract effects.

Vertical camera movement turns a forest scene into painterly streaks.
Recommended Reading: Want to go deeper? Read our ICM Photography Guide for creative blur techniques.
Common Mistakes in Long Exposure Photography (and How to Avoid Them)
Even with the right gear and settings, it’s easy to make small mistakes that ruin a long exposure photo, especially when you’re just starting out. Here are some of the most common issues (and how to fix them):
1. Light Leaks
If you notice strange streaks or washed-out corners in your long exposure, light might be leaking into the camera body, often from the viewfinder or around the filter mount.

Fix: Cover the viewfinder (if shooting with a DSLR), ensure filters are properly sealed, and avoid touching the lens mid-exposure.
2. Unintentionally Blurred Focus
Many beginners forget to switch to manual focus after setting up. With a dark ND filter on, the camera struggles to autofocus, and ends up hunting or missing the subject.
Fix: Lock in focus before adding filters, then switch to manual focus mode.
3. Underexposed or Overexposed Results
Even when using an app, exposure may not be perfect, especially with slight variances of ND filters.
Fix: Check your histogram, and bracket exposures if needed, and take test shots until the exposure looks correct.
4. Vibration and Camera Movement
Even a slight breeze or pressing the shutter can introduce blur when using longer shutter speeds.
Fix: Use a sturdy tripod, a remote shutter release or timer, and disable image stabilization (IS/VR/IBIS).
Want a deeper dive into these and other common issues?
Read our full article: Common Long Exposure Photography Mistakes (and How to Avoid Them)

Conclusion
Long exposure photography is one of the most rewarding techniques in landscape photography. It invites you to slow down, experiment, and see the world differently, not just as it is, but as it could be.
Whether you’re photographing silky waterfalls, misty oceans, or dramatic skies, this technique offers endless creative possibilities. But it does take planning. With shutter speeds that stretch into minutes, even small mistakes can cost you time, or the shot.
Here’s a quick recap of the key steps to capturing a great long exposure photo:
- Compose the image as you normally would
- Dial in your base settings without any filters
- Take a test shot to confirm focus and exposure
- Switch to manual mode and manual focus
- Mount your ND filter carefully
- Calculate the new shutter speed (manually or with an app)
- Apply the new exposure time without changing other settings
- Take the shot, then adjust if necessary
If you stick to this process and take your time, you’ll start producing consistently sharp, well-exposed long-exposure images.
Above all, remember: there’s no single “right” way to use long exposures. The best results come from experimenting, developing your eye, and finding the visual style that speaks to you.
Ready to take your editing to the next level? Check out our Post-Processing Guide for Landscape Photography. It’s packed with tips to help you bring your long-exposure images to life.
DON’T FORGET TO SHARE THIS ARTICLE!
Frequently Asked Questions About Long Exposure Photography
A long exposure typically starts when the shutter speed is too slow to shoot handheld without blur, usually around 1/30th of a second or slower. In practice, long exposure photography often involves shutter speeds of several seconds or even minutes.
Not always. ND filters are essential during the day or golden hour when there’s too much light to use a slow shutter speed. But at night or in very low light, you can often shoot long exposures without filters.
There’s no single “best” shutter speed; it depends on your subject and creative goal. For soft water effects, you might use 0.5–5 seconds. To stretch clouds or blur crowds, 30 seconds to several minutes may work best.
Most modern cameras (and even some smartphones) can be used for long exposure photography as long as they allow manual control of shutter speed, aperture, and ISO. Cameras with Bulb mode are helpful when working with exposures longer than 30 seconds.
Use a long exposure calculator app or multiply your base shutter speed by the filter’s stop value. For example, a 1/30s base exposure with a 10-stop ND becomes approximately 30 seconds. Always check your histogram to fine-tune.


As always… instructive and great article! Thanks for sharing. I made a few nice long exposure shots of the ocean because of your inspiration, thank you!
Thank you so much, Lorenz! I’m happy you found it useful. Feel free to share the images here 🙂
Thank you for the answer. Here one example of the atlantic at Lanzarote (10s,f8):
Great article! Leefilter launched an app for calculate exposure time base on the test photo without filter. Here is a 1950 sec photo I did make Saturday. 1950 sec equals 32,5 min exposure. Used the 15 stop SuperStopper from Leefilters.
Thank you Bjørn Magne! I will have to take a look at that app, sounds like it’s the same as NDCalc which I used in the beginning.
I would love to see such a long exposure with more contrast in the skies too! That 15 stopper can be a beast.
True, 15 stop require good day light. Think the afternoon light was too weak. Here is another shot with the 6 stop Littlestopper from same location and same afternoon.