

White balance is one of those camera settings that’s easy to leave on automatic and never think twice about. For a long time, that’s exactly what I did.
The problem is that automatic white balance gives you no control over the mood and atmosphere of your images. Once you understand how white balance works and how to set it deliberately, you’ll find it becomes one of the most powerful creative tools you have.
In this guide, I’ll explain what white balance is and how it works, walk you through the different in-camera modes, share how I set white balance in the field for different conditions, and show you how to refine it in Lightroom as part of a wider color workflow.

What is White Balance in Photography?
The short answer is that white balance controls the overall color cast of an image.
The longer answer is that the color of light changes constantly depending on the time of day, the weather, and your light source. Our eyes adapt to these changes automatically. A white piece of paper looks white whether you’re reading it under a tungsten lamp or in open shade. A camera sensor doesn’t adapt in the same way; it records whatever color of light is actually hitting it. White balance is how we tell the camera what kind of light we’re shooting in, so it can render colors correctly.
Take indoor photography as an example. You’ve probably noticed that indoor images often have a strong orange cast. Your eyes compensate for this without you realizing it, but the camera records it faithfully. Adjusting the white balance neutralizes that cast.
That said, the purpose of white balance isn’t only to neutralize color. It’s also one of the most effective ways to set the mood and atmosphere of an image. A slightly warmer white balance on a stormy day changes how the image feels entirely, and that’s a creative decision, not a technical correction.
The Relation Between Color Temperature and Kelvin
Color temperature is described using the Kelvin (K) scale. In most digital cameras, the Kelvin range runs from around 2500K to 10,000K.
Here’s where it gets counterintuitive: a low Kelvin setting in your camera produces a cool, blue image. A high Kelvin setting produces a warm, orange image. This is the opposite of what most people expect when they first encounter the scale.
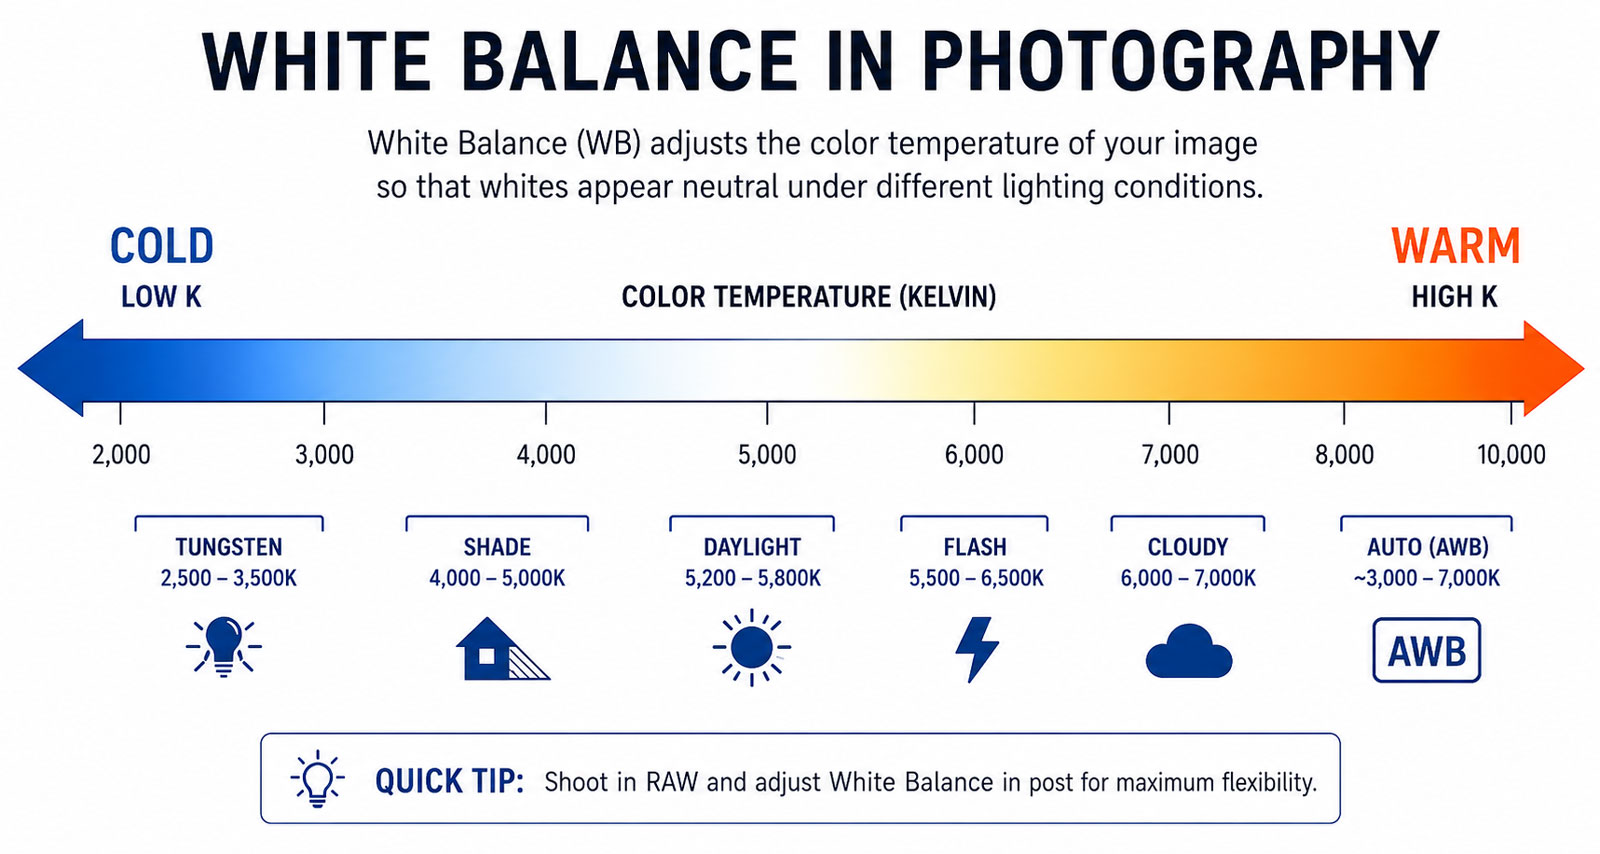
The reason is that the camera applies the opposite color cast to compensate for the surrounding light. If you’re shooting in warm tungsten light (which has a low color temperature in physical terms), the camera adds a cool cast to neutralize it, so setting a low Kelvin value produces a cooler image. If you’re shooting in cool open shade, the camera adds warmth, so a high Kelvin value produces a warmer image.
How to Change White Balance in Camera
How you access white balance settings depends on your specific camera body. Most cameras have either a dedicated WB button or a white balance option in the shooting information menu. Entry-level cameras typically have it buried in the main menu. Check your camera manual if you’re not sure where to find it.
Once you’re in the white balance settings, you’ll find a similar set of options across most cameras: an automatic mode, a set of semi-automatic presets, and one or two manual modes.

Automatic White Balance Mode (AWB)
When you use Automatic White Balance, the camera analyses the scene and applies the color temperature it calculates to be correct.
Modern cameras handle AWB considerably better than older models. For most standard daytime outdoor shooting, AWB will give you a reasonable result, and if you’re shooting RAW you can always refine it in post. If you’re happy leaving that decision to the camera, AWB is a perfectly functional option for casual shooting.
That said, AWB has real limitations worth knowing about. It struggles in low light, where it often applies an unnatural warm cast to night scenes. It can shift between frames when shooting panoramas or focus stacking, which creates color inconsistency that takes time to fix in post-processing. And it removes any deliberate control you might want over the atmosphere and mood of the image.
For these reasons, I recommend learning how to set white balance manually, even if you don’t use it for every shot.
Semi-Automatic White Balance Presets
Most cameras offer a set of semi-automatic white balance presets designed for specific lighting conditions. These are a good starting point for understanding how different color temperatures affect an image.
Tungsten (~3200K) — designed for warm indoor tungsten lighting. Applies a cool cast to counteract the orange glow of incandescent bulbs.
Fluorescent (~4000K) — used in cool fluorescent light. Adds a slight warmth to counteract the bluish-green cast of fluorescent tubes.
Flash (~5500K) — adds a slight warmth to compensate for the cool light that a flash typically produces.
Daylight (~5600K) — a neutral setting for outdoor photography in direct sunlight. One of the most natural-looking presets for landscape work.
Cloudy (~6000K) — adds a slightly warmer cast than Daylight, which suits overcast conditions where the light tends to feel slightly flat and cool.
Shade (~7000K) — the warmest of the presets, used in shaded environments where the ambient light is noticeably cooler.
Exploring these presets is a good way to build an understanding of how color temperature changes the feel of an image before moving on to manual Kelvin control.

Manual White Balance Modes
There are two main manual white balance options: Custom White Balance and Kelvin Mode.
Custom White Balance
Custom white balance uses a neutral reference, typically a white or 50% grey card, to set an accurate color temperature based on the exact light in your scene. You photograph the card, tell the camera to use that image as a reference, and the camera calculates the correct white balance from it.
This is most commonly used in studio photography where color accuracy is critical. For outdoor landscape work, it’s rarely practical; the light changes too quickly to recalibrate constantly, and the Kelvin mode gives you more than enough control.
Kelvin Mode (K)
Kelvin Mode is what I use for the vast majority of my photography. Rather than choosing a preset, you dial in a specific Kelvin value and have complete, continuous control over the result.

How I Set White Balance in the Field
Since this is a landscape photography site, it’s worth being specific about how I approach white balance in practice rather than just describing what the settings do.
I use Kelvin Mode for around 90% of my photography. The main reason is control; I want the image to look as close to the finished result as possible in camera, which makes post-processing faster and more intuitive. It also gives me a consistent starting point rather than leaving the color temperature decision to the camera.
Here’s how I think about the Kelvin value for different conditions:
Night photography and aurora (~3200–3500K) — a low Kelvin keeps the night sky looking naturally cool and dark. This is especially important for Northern Lights photography, where a higher Kelvin temperature would add warmth that counteracts the cool blues and greens of the aurora. I use around 3200K for most night work.
Stormy, overcast, or dramatic conditions (~4000–5000K) — on days with heavy cloud cover, moody skies, or dramatic weather, I’ll typically set the Kelvin somewhere between 4000K and 5000K. This preserves the cool, muted atmosphere of the scene rather than unnecessarily warming it up.
General daylight outdoor photography (~5500–6000K) — for most standard outdoor shooting in normal light, this range gives a neutral, natural result that reflects the scene accurately.
Sunset and golden hour (~6500–7500K) — for warm evening light, I’ll push the Kelvin up to around 7000K. This enhances the existing warmth of the light rather than fighting against it, and gives me a file that’s already close to the mood I want before any Lightroom adjustments.
One practical reason I always use Kelvin Mode that often gets overlooked: consistency across frames. When shooting panoramas, focus stacking, or any technique that requires blending multiple exposures, a fixed Kelvin value ensures every frame has exactly the same color temperature. If you’re shooting on AWB or a semi-automatic preset, the camera can shift slightly between frames, which creates color inconsistency that takes extra time to correct in post.
Recommended Reading: Ultimate Focus Stacking Guide
When to Use Manual White Balance
Beyond the creative reasons for using Kelvin Mode, there are specific shooting scenarios where a manual white balance setting is important for technical reasons:
- Night photography — AWB often applies an unnatural orange cast to dark scenes. A manually set Kelvin of around 3200–3500K keeps the image looking natural.
- Panoramic photography — consistent white balance across all frames is essential for a seamless blend.
- Focus stacking — same reason as panoramas; any shift in color temperature between frames creates work in post.
- Bracketed exposures — when blending multiple exposures for dynamic range, matching color temperatures makes the process significantly smoother.
- Timelapse photography — AWB shifting across hundreds of frames creates noticeable color flicker.

White Balance when Photographing in RAW
If you shoot RAW, which you should be, white balance isn’t permanently embedded in the file the way it is with JPEG. It’s stored as metadata that your RAW editor reads and applies, but it can be changed completely in post-processing without any quality loss.
This means you could technically set any white balance in camera and correct it entirely in Lightroom later. Some photographers work this way.
My preference is still to get the white balance right in camera. The closer the raw file looks to the finished image, the easier and more intuitive the post-processing becomes. A RAW file that already has the right atmosphere is a better starting point than one you need to completely recolor.
How to Adjust White Balance in Post-Processing
Even when you set the white balance carefully in the camera, some refinement in post-processing is usually needed. Here’s how I approach it and how the different tools work.
How to Adjust the White Balance in Adobe Lightroom
Lightroom’s white balance controls are in the Basic panel at the top of the Develop module. There are three ways to adjust it.

#1 The White Balance Selector (Eyedropper Tool)
Click on an area of the image that should be a neutral color, such as a grey rock, a white cloud, or a neutral surface, and Lightroom uses that as a reference to calculate a neutral white balance. It adjusts both the Temperature and Tint sliders simultaneously. This is useful when you want a technically accurate neutral starting point.
#2 Using White Balance Presets
The dropdown at the top of the white balance section gives you the same preset options as your camera. “As Shot” applies the Kelvin value you set in the camera. The other presets apply fixed values. These are quick but less precise than manual adjustment.
#3 Temperature and Tint Sliders
This is the most common method. The Temperature slider shifts the image between blue (left) and yellow/orange (right). The Tint slider corrects for green or magenta casts. Moving Temperature to the right warms the image; moving it left cools it.
In my workflow, I typically make small adjustments to the Temperature slider based on the settings I used in-camera. These are not dramatic changes, just fine-tuning. The Kelvin value I dial in on location gets me close; Lightroom gets me the rest of the way.
The important thing to understand is where white balance fits in the wider color workflow. The Temperature and Tint sliders set the base color temperature, a technically accurate or creatively chosen starting point. The Color Mixer then lets you make targeted adjustments to individual color channels. And Color Grading adds atmosphere and tonal color work across highlights, midtones, and shadows. These three tools work in sequence, each building on the one before it.
How to Adjust the White Balance in Adobe Photoshop
Photoshop’s white balance tools are less straightforward than Lightroom’s but offer more flexibility.
#1 Use Adobe Camera RAW
This is the simplest method. Go to Filter -> Camera RAW Filter to open a panel very similar to Lightroom’s Basic panel, with the same Temperature and Tint sliders. Make your adjustments and click OK.

#2 Use ‘Match Color’ to Neutralize Colors
This isn’t strictly a white balance tool, but it’s useful for removing strong color casts. Go to Image -> Adjustments -> Match Color and click Neutralize. This automatically removes the dominant cast and gives a more neutral result.
#3 Use a Color Balance Layer
This is the most powerful but most complex method. It lets you independently adjust the Cyan, Magenta, and Yellow tones in the Highlights, Midtones, and Shadows. Combined with a Luminosity Mask, this gives precise control over specific areas of the image.
Using White Balance Creatively for Atmosphere
Understanding the technical aspect of white balance is one thing, but using it as a creative tool is where it becomes genuinely interesting.
The way I think about it: white balance sets the foundation of the image’s mood, and everything else builds on top of it.
A stormy day shot at 4000K feels cold, heavy, and dramatic. The same scene shot at 6500K would feel warmer and softer, a completely different image. Neither is more “correct” than the other; they’re creative choices.
For landscape photography specifically, a few approaches I find consistently useful:
- Lean into the existing light. Rather than neutralizing the color of the light, set the Kelvin to enhance it. At golden hour, push the Kelvin up rather than pulling it back to neutral. In stormy conditions, set it lower to deepen the drama rather than warming the scene.
- Use white balance to separate your landscape work. Many photographers default to a neutral white balance and rely entirely on post-processing for color. Setting a deliberate Kelvin in-camera means your RAW files already carry the mood of the scene, making the whole workflow more intentional.
- White balance is the foundation; Color Grading builds on top. Once the white balance sets the base temperature, the Color Grading tool in Lightroom, or now in Nik Color Efex 9, lets you push the atmosphere further by adding color to specific tonal ranges. A warm white balance combined with a golden highlight grade and a slightly cool shadow grade gives you a rich, cinematic look that feels cohesive rather than processed.
If you want to go deeper into how these color decisions fit together as a complete creative workflow, Edit With Intent covers the full post-processing philosophy behind my landscape work, from the first adjustments through to the finished image.
The Best White Balance for Landscape Photography
There’s no single correct white balance for landscape photography. The right setting depends entirely on the light and the mood you’re going for. That said, here are some useful starting points:
3200–3500K is ideal for most night photography, whether you’re shooting the Milky Way, the Northern Lights, or cityscapes at night. This range keeps the sky looking naturally cool and eliminates the unnatural warmth that AWB tends to add in dark conditions.
4000–5000K works well for stormy, overcast, or dramatic conditions. It preserves the cool atmosphere of the scene and gives a more muted, considered result.
5500–6000K is the neutral range for most standard outdoor photography. A slight warmth without looking processed.
6500–7000K enhances the warmth of golden hour and sunset light. Rather than neutralizing the existing color of the light, this range works with it.


Conclusion
White balance is one of the few camera settings that works simultaneously as a technical control and a creative one. Getting it right in-camera gives you a better starting point for post-processing; using it deliberately gives your images a consistent, intentional look.
The automatic and semi-automatic presets are a good place to start, but Kelvin Mode is worth the small learning curve. Once you’re used to dialing in a specific value for different conditions, it becomes second nature, and the consistency it brings to your shooting, especially when blending multiple exposures or stacking frames, is genuinely valuable.
In post-processing, white balance is the first step in a color workflow, not the last. The Temperature slider sets the foundation, the Color Mixer refines individual color channels, and Color Grading adds the final atmosphere. Each layer builds on the one before it.
For a complete overview of how color editing fits into the wider post-processing workflow, the post-processing guide covers the full sequence from RAW optimization through to export. And if you’re looking for a practical starting point for your Lightroom color workflow, the Lightroom Toolbox includes presets for landscape photography that build on consistent, intentional use of white balance as the foundation of each edit.
DON’T FORGET TO SHARE THE ARTICLE



Nice and informative article, Christian! I found it very useful.
Hi Ken,
Thanks for your comment. I’m happy to hear that you found it useful 🙂