


Photographing the Northern Lights is one of the most unforgettable experiences a photographer can have. Few natural phenomena are as breathtaking as watching the night sky erupt in shifting ribbons of green, purple, and red light. Capturing that magic in a photograph is just as rewarding.
But it’s far from straightforward.
Every winter, eager photographers travel north to destinations like Norway, Iceland, and Alaska with the hope of not just seeing the aurora, but photographing it. Yet many are surprised by how challenging it can be.
Misleading advice online often oversimplifies the process, and even skilled night photographers can struggle when the lady in green begins her dance. Unlike stars, the aurora moves, pulsates, and changes intensity within seconds, demanding a different approach in the field.
Living in the Lofoten Islands, one of the world’s prime Northern Lights destinations, I’ve spent countless nights under the aurora and learned what works (and what doesn’t).
In this guide, I’ll share the exact camera settings, gear recommendations, and field techniques you need to capture stunning Northern Lights photos, along with practical planning tips to improve your chances of success.
Jump to Section (Click to Expand)
- The Best Camera Settings for Northern Lights
- How and Where to See the Aurora Borealis
- Essential Camera Gear for Aurora Photography
- Compositional Techniques for Northern Lights Photography
- Post-Processing for Northern Lights Images
- Common Mistakes in Northern Lights Photography
- Frequently Asked Questions About Photographing Northern Lights

The Best Camera Settings for Northern Lights
One of the most common questions I get is: What camera settings should I use for photographing the aurora? The truth is, there’s no single “correct” recipe. The best settings for Northern Lights photography depend on how bright and fast the aurora is moving. That said, there are reliable starting points you can use, then adjust based on the conditions in front of you.
In general, I recommend starting with:
- Aperture: f/2.8 (or wider if your lens allows)
- ISO: around 3200
- Shutter Speed: 8 seconds
From there, tweak each setting depending on the intensity of the display. Below is a breakdown of each setting and how to handle it in the field.
Best ISO for Photographing the Aurora Borealis
Photographing the Northern Lights requires a high ISO to capture enough light in the dark Arctic night. For most situations, an ISO between 1600 and 6400 is ideal.
- On particularly bright nights, or under a full moon, you may get away with lowering it to ISO 600–1200.
- On darker nights, you may need to push ISO 6400 or higher.
Keep in mind that your camera’s performance matters. Professional full-frame cameras can handle high ISO values with less noise than entry-level models. Digital noise is inevitable, but knowing your camera’s limits helps you avoid ruining a great image.
Personally, I usually start at ISO 3200, then adjust after a quick test shot.
Recommended Reading: ISO in Digital Photography [A Comprehensive Guide]
Best Aperture for Northern Lights Photography
The aperture is the one setting that should be constant. You should always use the widest aperture possible on your lens (such as f/2.8). This allows more light to reach the sensor, meaning we can use a quicker shutter speed and lower ISO.
The wider the aperture, the better it is. The perfect aperture for photographing Northern Lights is between f/1.4 and f/2.8.
You can still get good aurora photos with f/4, but this means you need to either increase the ISO or extend the exposure time. Both of these options come with their drawbacks.
In short: open your lens as wide as possible and leave it there.
Recommended Reading: Mastering Aperture in Photography [An Essential Guide]
Best Shutter Speed for Aurora Photography
Shutter speed is the trickiest setting because it changes constantly with aurora activity. The brighter and faster the lights move, the shorter your exposure should be.
Some of you might be familiar with the 500 Rule, an easy formula to calculate the ideal shutter speed for night photography. While this is handy for regular astrophotography, it serves little purpose for aurora photos.
The reason is that the intensity of the Northern Lights is constantly changing. I’m not lying when I say that it can go from being barely visible to being so bright you don’t need a headlamp in one minute.

- As a rule of thumb, avoid exposures longer than 15 seconds, or you’ll risk blurring the aurora into a washed-out smear.
- When the aurora moves quickly, try 2–5 seconds. This keeps details crisp and prevents blown highlights.
- When the aurora is faint and slower, you can extend to 8–10 seconds without losing detail.
For context, I’ve captured some of my favorite displays at just 1–2 seconds because the aurora was racing across the sky. Those short exposures preserved all the fine structure and color.
Remember: the faster the aurora dances, the quicker your shutter should be.
Recommended Reading: What is Shutter Speed in Photography? [Comprehensive Guide]
How to Adjust Camera Settings Based on Aurora Activity
Knowing the starting point for Northern Lights photography is one thing. The real challenge is adapting your settings in the field as conditions change. The aurora can shift from faint streaks on the horizon to a sky-filling explosion of light in just a few minutes, and your settings need to follow along.
A good rule of thumb is simple:
- Fainter aurora, no moonlight: Start with around ISO 6400 and a 15-second exposure. This helps draw out detail in dim light.
- Brighter, fast-moving aurora: Shorten your shutter speed to 8 seconds or less. If the lights are really dancing, you may need to go as fast as 2–5 seconds to keep their shape crisp.
The aperture should stay fixed at its widest setting (such as f/2.8 or wider), so the balance is always between ISO and shutter speed. If your test image looks too dark, increase the ISO. If highlights are blowing out, shorten the shutter speed.
This constant fine-tuning might feel frustrating at first, but it’s part of the process. Even after hundreds of nights under the aurora here in Lofoten, I still check my preview and histogram often and adjust on the fly. The key is to react to what’s happening above you; that’s how you come home with sharp, vibrant images of the Northern Lights at their best.
White Balance for Northern Lights Photography
If you’re photographing in RAW (and you should be), you can always fine-tune white balance later in Lightroom, Photoshop, or another photo editor. Still, I strongly recommend setting it correctly in-camera as this helps you judge the scene more accurately in the field and keeps your results consistent.
For the most natural aurora colors, the best white balance for Northern Lights photography is around 3500K. This setting keeps the greens crisp, the purples rich, and avoids the yellow/orange tint that warmer white balances often introduce.
To set this manually, switch your camera to Kelvin Mode in the white balance menu and dial in your chosen temperature.
A few things to keep in mind:
- Avoid Auto White Balance. It often shifts toward warmer tones, which makes the aurora look washed out.
- Stay consistent. By using a fixed Kelvin value, all your images from the night will match in tone, making editing much easier later.
- Experiment slightly. Depending on moonlight, light pollution, or colorful auroras, you may prefer adjusting within the 3000–3800K range.
Getting white balance right in-camera won’t just save editing time; it helps you see the aurora more accurately while shooting, which, in my experience, leads to better creative decisions in the field.
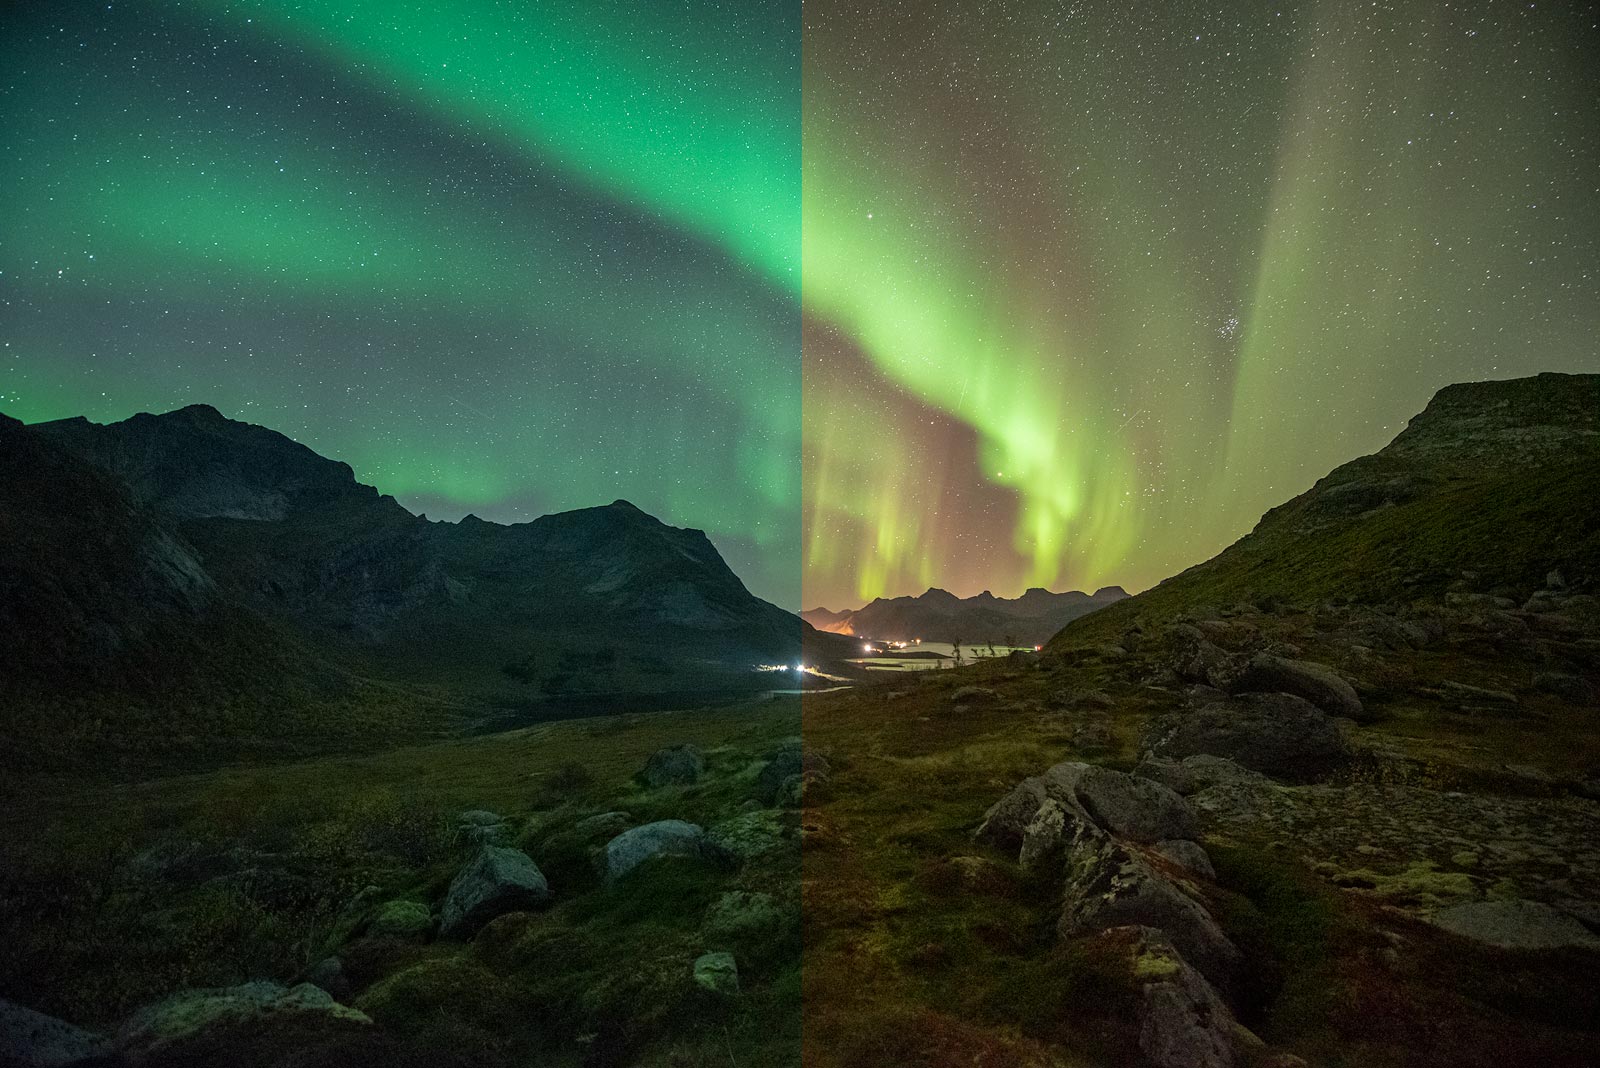
Example: Auto White Balance vs. 3500K Kelvin
Here’s the same aurora photographed with a fixed 3500K setting (left) and Auto White Balance (right). Notice how the Auto WB shifts toward warmer tones, making the aurora look washed out, while the fixed Kelvin preserves the natural cooler tones.
How to Focus for Northern Lights Photography
Getting sharp stars and auroras is one of the biggest challenges at night. Autofocus rarely works in the dark, which is why learning to use manual focus is essential for Northern Lights photography.
Here’s a simple workflow I recommend:
- Optional: Start before it’s fully dark – If possible, set your focus while there’s still some light. Focus on a distant object (like a mountain or the horizon) and then switch to manual focus to lock it.
- Use Live View and magnify – Point your camera toward a bright star or a distant light source. Zoom in as far as possible on the screen and slowly rotate the focus ring until the point of light becomes as small and crisp as possible.
- Take a test shot – Always zoom in on the image preview after shooting. Even small focusing errors are obvious when you magnify the photo.
- Tape or mark your lens – Once you’ve found the “sweet spot”, you can mark it with tape or note where the focus ring sits. This saves time on future outings.
Many lenses have an “infinity mark”, but it’s important that you don’t trust it blindly. Infinity often isn’t perfectly calibrated, so always double-check with test shots.
Note: Some newer cameras (like high-end mirrorless systems) have improved low-light autofocus. Even if yours manages to lock on, it’s smart to switch back to manual focus once you’ve got it sharp. That way, the lens won’t start hunting again when you recompose.
Recommended Reading: How to Focus in Night Photography
Using the Histogram for Aurora Photography
The histogram is one of the most valuable tools you have for photographing the Northern Lights, yet it’s often overlooked. At night, your LCD preview can be misleading; it might look fine on the back of the camera, but only the histogram tells the real story.
Because you’re shooting in near darkness, the histogram will naturally lean toward the left (shadows). That’s normal and nothing to worry about. What you do need to watch closely is the right side: bright auroras can easily blow out highlights, even in the middle of the night. Once that detail is gone, it’s impossible to recover in post-processing.

Also, don’t just check the overall histogram. Switch to the individual color channels and pay attention to the green channel, since that’s where most of the aurora’s intensity lies. If you see clipping there, you’ll know your settings are too bright.
Regularly take test shots, zoom in on your preview, and use the histogram as your safety net. It’s the best way to ensure your Northern Lights photos retain detail and color without unwanted blown-out areas.
Recommended Reading: Mastering the Histogram: An Essential for Better Photography
How and Where to See the Northern Lights
Knowing your camera settings is only half the story; you also need to be in the right place at the right time. The Northern Lights are unpredictable, and seeing them often requires more than just stepping outside.
Auroras are visible in the northern hemisphere whenever the sky is dark enough. That means you’ll be disappointed if you plan a Northern Lights photography tour for the summer months. The best season for Northern Lights photography is September through late March, with the darkest winter months offering the highest odds.

Popular destinations include Norway, Iceland, Finland, Alaska, and Canada. But remember: even in these regions, not all areas are equally good. In Norway, for example, the southern half of the country rarely sees auroras.
Here are four key factors that determine your chances:
Step 1: Escape City Lights
Light pollution is the enemy of aurora photography. The darker your surroundings, the stronger the display will look. Head away from towns and streetlights; even a short drive can make a big difference.
Step 2: Watch the Clouds
Clear skies are essential. Even if the aurora activity is strong, heavy clouds will block the view. Check both the weather forecast and the aurora forecast, and don’t give up if the sky is partly cloudy. Some cloud cover can actually add depth and drama to your images.

Planning Step #3: You Need Good Solar Activity
A clear night doesn’t guarantee an aurora. You also need solar activity.
The simplest metric is the KP Index: the higher the number, the stronger the lights. At high latitudes, you can see auroras even at KP 1, while stronger storms (KP 5+) may light up the entire sky. For more detailed forecasting, I recommend looking at solar wind data, things like Bz, Bt, and speed.
My go-to resource for this is SpaceWeatherLive.

Step 4: Choose a Strong Foreground
Even the brightest aurora photos need an interesting composition. Look for mountains, lakes, trees, or man-made subjects like cabins to anchor your frame. Reflections in water can be especially powerful. And ideally, choose a scene facing north, where the aurora most often appears.
Useful Apps for Northern Lights Photography
Planning for the aurora is a lot easier when you have the right tools at your fingertips. Here are a few of the apps I rely on when preparing for a night under the Northern Lights:
- Aurora Forecast – A straightforward app that gives you the KP index and activity forecasts. Great for quickly checking the odds of a display.
- SpaceWeatherLive – My go-to resource for real-time solar data (Bz, Bt, speed, density). It’s more advanced but gives you the most accurate picture of what’s happening.
- Yr.no – A weather app from the Norwegian Meteorological Institute. Great for quickly checking the expected weather conditions.
- Windy – Reliable for predicting cloud cover, which is just as important as solar activity.
- PhotoPills – While not aurora-specific, it’s excellent for planning your compositions, checking the moon phase, and scouting how the night sky aligns with your location.
These apps won’t guarantee clear skies or strong activity, but they’ll give you the best possible chance of being in the right place at the right time.
Essential Camera Gear for Northern Lights Photography
I don’t often say that gear is a deciding factor in photography, but for the Northern Lights, it makes a big difference. Low-light conditions, fast-moving auroras, and long nights in the cold require equipment that can withstand the harsh environment.
Here’s what I consider must-have gear for photographing the Aurora Borealis:
#1 Camera With Manual Functions
Any modern DSLR or mirrorless camera with full manual controls will do the job. You’ll need to set shutter speed, aperture, and ISO yourself; automatic modes won’t cut it at night.
A camera with strong high-ISO performance will give you the cleanest results. Yes, you can capture the aurora with a smartphone or entry-level DSLR. But the reality is those images often turn out very grainy. If you want consistent results, a camera with solid ISO performance is worth the investment.
Note: If your files show too much digital noise, tools like Topaz DeNoise AI or DxO PureRaw can help clean them up in post-processing.

#2 A Wide-Angle Lens With a Fast Aperture
When the aurora explodes across the sky, you want to capture as much of it as possible while still including the surrounding landscape. A wide-angle lens between 14–24mm is ideal for framing both sky and foreground.
Equally important is the aperture. The wider your aperture (f/2.8, f/2, or even f/1.4), the more light reaches the sensor, letting you use lower ISOs and faster shutter speeds to freeze aurora detail.
- Sony 14mm f/1.8 – Exceptional sharpness and speed.
- Sigma Art 14mm f/1.8 – A reliable choice for night skies.
- Nikon Z 14-24mm f/2.8 – The best wide-angle zoom for Nikon mirrorless users.
- Canon RF 15-35mm f/2.8 – A great all-rounder for Canon shooters.
- Rokinon 14mm f/2.8 – The best budget lens for aurora photography.
- Venus Optics 15mm f/2 – A sharp, lightweight option.
#3 A Solid Tripod
A tripod isn’t optional for aurora photography; it’s essential. Long exposures demand absolute stability, and even the smallest vibration can ruin your shot.
Choose a tripod that can:
- Support the full weight of your camera and lens.
- Handle wind and uneven terrain.
- Extend high enough without becoming shaky.
- Has a removable center column to go super low.
Cheap, lightweight tripods are often unstable in Arctic conditions, leading to blurry photos. Investing in a solid carbon-fiber tripod will pay off for years.
MY CURRENT SETUP FOR AURORA PHOTOGRAPHY
Nikon Z6II – Nikkor Z 14-24mm f/2.8 – Leofoto LN-364C – Black Diamond Storm Headlamp
Composition Techniques for Aurora Borealis Photography
I get it. The Northern Lights are amazing. It’s an incredible feeling watching them vividly dance above your head. I still get excited, even after seeing them hundreds of times.
But here’s the thing: a dramatic aurora display isn’t automatically a great photo. Pointing your camera straight up at a green explosion can give you fun memories, but the images often lack impact without a thoughtful composition. As with any other genre of photography, composition is essential to creating an impactful image.
Just like with sunrise or sunset, I treat the aurora as an element in a larger landscape. The lights should complement the scene, not completely dominate it. That’s where composition comes in.
Scout your location before dark. Walk around, test frames, and note potential compositions. When the aurora appears, you’ll be ready to capture it as part of the bigger story.
Here are some of the compositional techniques I rely on for aurora photography:
Foreground Interest
A strong foreground grounds your photo and gives the aurora context. Mountains, rivers, trees, or even a cabin can transform your image from a snapshot of the sky into a deeper, compelling story.
Reflections
If you’re lucky enough to find calm conditions, reflections on lakes, fjords, or even tidal pools create natural symmetry. These moments are rare in the windy north, but when they happen, they’re unforgettable.
Leading Lines
Look for natural shapes that guide the viewer into the frame, such as a frozen river, a snowy path, or a jagged ridgeline. Leading lines work just as well at night as during the day, and they help direct attention toward the aurora overhead.

Visual Balance
Balance the dynamic aurora with other elements in the frame such as the moon, mountains, or even silhouettes of people. When the foreground and sky complement each other, the result feels intentional and complete.
Post-Processing for Northern Lights Images
Bringing your Northern Lights photos to life doesn’t stop in the field. The RAW files are often darker, flatter, and noisier than what you actually saw. But that’s normal. Post-processing is where you can fine-tune the atmosphere and mood, control noise, and make the aurora look the way it felt when you were standing there.
I prefer using Lightroom and Photoshop for most of the work, with DxO PureRAW or Topaz Photo AI for dedicated noise reduction.
This is the exact workflow I’ve developed after editing hundreds of aurora shots, from faint glows to sky-filling explosions.
Start with RAW and Basic Adjustments
Aurora displays vary from faint glows to explosions so bright you barely need a headlamp. Because of this, no two frames need the same treatment. I might lift shadows to reveal foreground detail or pull back highlights to recover blown-out areas. I always keep an eye on the histogram, especially the green channel, since it’s easy to clip aurora highlights without noticing on the LCD preview.

These are the first steps I follow:
- White Balance – I usually cool the temperature down to around 3500K. Sometimes I’ll add a subtle green tint if the RAW file feels too magenta. Getting this right in the field helps, but I often refine it here.
- Exposure & Contrast – Aurora exposures vary wildly, so I’ll bring up shadows if the foreground is too dark, or pull down highlights if parts of the aurora are blown out. This is about balancing the exposure.
- Histogram Check – Don’t just trust the preview on your camera or computer screen. Watch the histogram and make sure the highlights (often the green channel) aren’t clipped.
Tackle Noise Early
High ISO and dark conditions mean noise is unavoidable in aurora photography. Lightroom’s new AI denoise is surprisingly good, but I often run files through DxO PureRAW for even better control. Topaz Photo AI is another solid option if you want a quick one-click fix.
Either tool can save images that would otherwise be too noisy, especially if you’ve had to push ISO into the 6400 range or higher.
Recommended Reading: Noise Reduction in Photography: In Field & Post-Processing
Work on Colors With Care
The Northern Lights are already dramatic, so the trick is not to go too far. Oversaturated aurora shots look fake in seconds. Instead, you can use Lightroom’s Color Mixer panel to make subtle adjustments: cooling the greens slightly, pulling down yellows if they look muddy, or bringing out purples or reds that were faint in the raw file.
I also like to use Color Grading. Adding a touch of coolness to shadows and a slight green global cast can give depth and a three-dimensional feel. This step is subtle but powerful, it can make the difference between a flat image and one that feels alive.
Remember, it’s better to make several small adjustments than one big.
Move Into Photoshop for Refinements
Once I’m happy with the global edits, I open the file in Photoshop. Here’s where I do the finer work:
- Dodging & Burning – I’ll brighten certain parts of the image to emphasize movement or flow, and darken areas that distract from the main display.
- Local Adjustments – Sometimes the sky is perfect but the foreground needs extra attention. Selective masks let me balance the two without compromising either.
- Sharpening – A light touch of sharpening helps stars pop, but don’t go overboard or you’ll create halos.
Advanced Techniques (Optional)
Once you’re confident with single exposures, techniques like exposure bracketing and focus stacking open up even more possibilities. These take practice, but they’re game-changers.
If you want to learn more about this, I go through them step by step in my Northern Lights Photography Made Easy course.
Final Step: Keep It Natural
The most important part of aurora post-processing is knowing when to stop. The Northern Lights often don’t need heavy editing, they’re spectacular on their own.
My goal is always the same: correct exposure, reduce noise, refine colors, and then step back. If it looks overcooked, I’ve gone too far.
For more on editing workflow, see my Noise Reduction in Photography guide and the full Post-Processing Guide.

Common Mistakes in Northern Lights Photography
Even experienced night photographers can run into trouble when the aurora starts to dance. Over the years, I’ve made many of these mistakes myself, and I’ve seen them repeated countless times on my workshops. The good news is that once you know what to watch out for, they’re easy to avoid.
1. Overexposing the aurora highlights
The Northern Lights can look faint to your eyes, but the camera sensor picks up much more light. It’s easy to blow out the brightest parts of the display without realizing it. Always check your histogram, especially the green channel, to make sure the highlights aren’t clipped.
2. Using too slow of a shutter speed
When the aurora is moving quickly, a 20-second exposure will turn those sharp destinct shapes into a blurry green mess. As a rule of thumb, the faster the aurora moves, the shorter your shutter speed should be. I often shoot between 2 and 10 seconds for crisp detail. Occasionally even quicker!
3. Shooting only the sky
It’s tempting to aim straight up and fill the frame with swirling colors. The problem is, those photos rarely have impact on their own. Strong aurora photos need a good composition; mountains, trees, reflections, or other elements that tell the story of the place as well as the sky.
4. Relying on Auto White Balance or Auto Focus
Both are unreliable at night. Auto White Balance often shifts towards warm tones, washing out the greens. Auto Focus usually fails completely. Switch to Kelvin mode (around 3500K is a good starting point) and manual focus for the best results.
5. Forgetting to enjoy the show
If it’s your first, and perhaps only, chance to see the Northern Lights, don’t spend the whole night glued to the LCD screen. Remember to look up, take it in with your own eyes, and enjoy the experience. The aurora is magical, and it deserves more than just a technical checklist.

Frequently Asked Questions About Photographing Northern Lights
Yes, many modern smartphones (like the latest iPhone, Samsung, or Google Pixel) can capture the aurora if they have a dedicated night mode or manual camera settings. You’ll still get the best results with a DSLR or mirrorless camera, but a phone on a tripod can capture decent aurora photos.
A wide-angle lens with a fast aperture (f/2.8 or wider) is ideal. Wide angles (14–24mm range) let you include both the sky and the landscape in your frame, which makes for stronger compositions.
It depends on the strength of the aurora and the moonlight. A common range is ISO 1600–6400. Start around ISO 3200, take a test shot, and adjust from there.
Yes. Long exposures are required to capture the aurora, and it’s impossible to hand-hold your camera at shutter speeds of several seconds. A sturdy tripod is one of the most important pieces of gear for aurora photography.
Not in the far north. During summer, the midnight sun means it never gets dark enough. The best time to see and photograph the aurora is between September and late March, when nights are long and dark.
No. In fact, filters are not recommended. Instead, focus on using the right settings and keeping your lens clean and dry.
Conclusion
Photographing the Northern Lights is one of the most rewarding experiences in landscape photography, but it can also be challenging. The aurora changes quickly, and the settings that worked for one shot might leave the next one overexposed or blurry. That’s part of the magic, but it also means you need to stay adaptable.
The key takeaways are simple: know your camera, keep an eye on your histogram, and don’t forget to think about composition. The best aurora images don’t just show green skies, they combine the lights with an interesting landscape that tells a bigger story.
With the right preparation, gear, and post-processing, you can come home with photos that reflect the awe you felt under the dancing lights.
And remember: it’s not only about the photos. Take a few moments to look up and enjoy the show with your own eyes, it’s an experience you’ll never forget.
If you want to dive deeper, including advanced techniques like focus stacking, exposure blending, and detailed editing workflows, you’ll find it all inside my course Northern Lights Photography Made Easy.
DID YOU ENJOY THIS ARTICLE? THEN DON’T FORGET TO SHARE!


Very nice article, thanks for the detailed information.
Hi Ravi,
I’m glad you found it useful. Happy shooting!
I got an aurora photo in southern Arizona awhile back. It was all red. There was no way I was going to get anything but the color. I focused on the moon before it set, and placed a piece of tape on the lens from front to back so I wouldn’t move it inadvertently. I couldn’t find my tripod or my cable release, so I set the camera on a concrete block and activated a 2 second delay. That worked well. I had a cactus in the foreground; it was slightly out of focus, and the exposure had to be long. The aurora wasn’t even visible to the naked eye. The long exposure was the only reason I got anything at all. And to get the cactus in the foreground, I had to stop down the lens a bit. In southern Arizona, the challenges are unbelievably greater than where you live.
Hi Pat,
That’s fantastic – I’m assuming it’s a rare thing to photograph the Northern Lights in Arizona, so you must have gotten some unique photos. Aurora and cactus aren’t two words I often hear in the same sentence.
Sounds like you did everything right in the field, though, and adapted to the different challenges you faced. Good job!