It’s no secret that modern cameras have come a long way when dealing with digital noise. You don’t have to go many years back since we laughed at the idea of achieving noise-free images at ISOs such as 6400 and up. Today, that’s normal.
While camera sensors can handle digital noise better than ever, we still have to deal with it occasionally. High ISOs still introduce more grain to your photos.
The good news is that noise reduction isn’t as complicated as you think. By following a few simple guidelines in-field and performing a couple of simple techniques in post-processing, you don’t have to worry about digital noise.
Read on, and I’ll show you how to reduce digital noise in your photography and compare some of the best noise reduction software available.
Jump to:
How to Reduce Digital Noise in Camera
Limiting digital noise in photos begins already in the field. Certain precautions should be taken when taking a picture. By following a few simple guidelines, you’ll set yourself up for success and save a lot of headaches trying to save the image in post-processing.
Step #1: Use a Lower ISO
The higher the ISO, the more noise will be introduced to your photos. As a simple rule, you should always use the lowest ISO possible.
The lowest ISO possible doesn’t always mean the lowest ISO your camera can use. It depends on what you photograph and how much available light there is.
For example, when photographing birds in flight, you need a quick shutter speed, such as 1/2000th of a second. You’ll most likely need to increase the ISO to achieve such a fast shutter speed. Keeping an ISO of 100 when using 1/2000th of a second will, in most cases, lead to severely underexposed photos.

To overcome this, you need to increase the ISO. It could be 800, 2500, 6400, or even more. The most important thing you can do to limit noise is to use the lowest ISO possible for your current situation.
That means using an ISO of 2500 is unnecessary when you’re not dependent on freezing motion. You can use an ISO of 100 for most landscape photography.
Recommended Reading: ISO in Digital Photography [A Comprehensive Guide] & The Best ISO for Landscape Photography
Step #2: Use a Tripod
It’s often said that the tripod is a landscape photographer’s best friend. The main reason is that it allows you to use slower shutter speeds without a camera shake.
Using slower shutter speeds means you’re not as dependent on higher ISO values as you are when photographing handheld.
With a tripod, you can photograph in dim conditions while still retaining an ISO of 100. It just means you’ll have to use a slower shutter speed instead.

Using a slow shutter speed isn’t always a bad thing, either. Learning the long exposure photography technique can create some quite interesting images.
Step #3: Turn In-Camera Noise Reduction Off(!)
While it might be tempting to turn on the in-camera noise reduction, I’m here to tell you that you shouldn’t.
There are a few critical problems with in-camera noise reduction that argue against the use of it:
- It may harm the image quality as you can lose fine details that are important for the shot.
- You have zero control over how and where noise reduction is applied.
- In-camera noise reduction can double the time it takes to capture a photo, which is problematic when doing long exposures.
The advantage of applied noise reduction in post-processing is that you have much more control over how and where it is applied. You don’t have to worry about losing fine details. We will get back to this later on in this article.
Important: All Camera Models Deals With Digital Noise Differently
It’s important to understand that every camera handles noise slightly differently. The higher the ISO, the more noise is introduced. This is a fact. However, ISO values that leave no grain in one camera might be unusable with another.
I often emphasize that the camera you use isn’t so important. Especially when you’re just getting started. Good photos can be created with any camera (some of my personal favorites were shot with my entry-level DSLR 15 years ago)
ISO performance is one of the major differences between low- and high-budget cameras. Professional-grade cameras tend to be significantly better.
For example, an ISO of 3200 is almost unusable on a Canon EOS Rebel T7, while it barely affects the Canon R6 Mark II.
This brings us back to the crucial step of using the lowest ISO possible. The camera you use should also be considered when setting the ISO.
A camera that doesn’t handle high ISO values well requires more noise reduction in post-processing. In worst cases, using a too-high ISO can damage the image to an extent that’s near impossible to rescue.
Best Noise Reduction Software for Photography
Now that we’ve looked at the best practices for in-camera noise reduction, it’s time to move into the digital darkroom. As technology evolves, the possibilities are better than ever. It almost feels like cheating when you see how well specific software removes noise.
Below, I’ll introduce you to the best noise reduction software and briefly compare them. To best compare the performance, I’ll use one night photo with ISO51200 and one evening photo with ISO1000:


In addition to using the same two photos, I’ll only use each software’s default noise reduction settings. In other words, I won’t be fine-tuning the results (which I generally recommend doing)
So, let’s compare the best noise reduction software for photography:
Topaz PhotoAI
Over the past few years, Topaz Labs has become well-known for its noise reduction software. When I first tried their Topaz DeNoise, I called it “annoyingly good.”
Today, Topaz Photo AI has replaced earlier software. Here, you can sharpen, denoise, and enlarge in the same place. It’s easy and intuitive to use, and like the other software we’ll look at today, it requires minimum effort from the user.
Let’s begin with our ISO1000 puffin photo. There’s not much noise in this image, but I’m interested in how the different tools handle a ‘medium-ISO’ photo.
Interestingly, when I opened this image in Topaz Photo AI, the default settings didn’t include noise reduction, only subject sharpening. So, since this is a noise reduction comparison, I turned Denoise on and subject sharpening off. Besides that, I didn’t make any changes to the denoising settings.
Here are the results:

When it comes to noise reduction, Topaz Photo AI did a good job. The background looks much cleaner, and we haven’t lost much detail in the puffin. For a ‘quick fix,’ I think it’s done a decent job.
Looking at it critically, I would’ve preferred to keep a little more sharpness and texture in the bird. However, this could’ve easily been fixed by tweaking the denoise settings slightly, so I’ll give this a pass.
Now, what about a more complicated night photo? This was shot at ISO51200 to push the noise reduction software to the limit. Can the photo be ‘saved’?

In this case, the default settings are pretty aggressive, as expected when dealing with an ISO51200 image. The image is a lot less grainy than before, but I’m seeing a lot of issues with the output.

First of all, the night sky has lost many details. We’re missing many stars, as the software has mistaken them for digital noise.
Second, we’re seeing a lot of “smudges” or “soft spots” in various places (such as the areas around the rocks, multiple spots in the sky, and some places around the bushes)
Finally, some of the stars have small black spots and strange lines around them.

Is it better than the original? Yes. It certainly has a lot less noise, and the foreground does look better than before, but the sky does not look good, especially when zooming in.
Recommended Reading: Topaz PhotoAI: Is it Worth the Money?
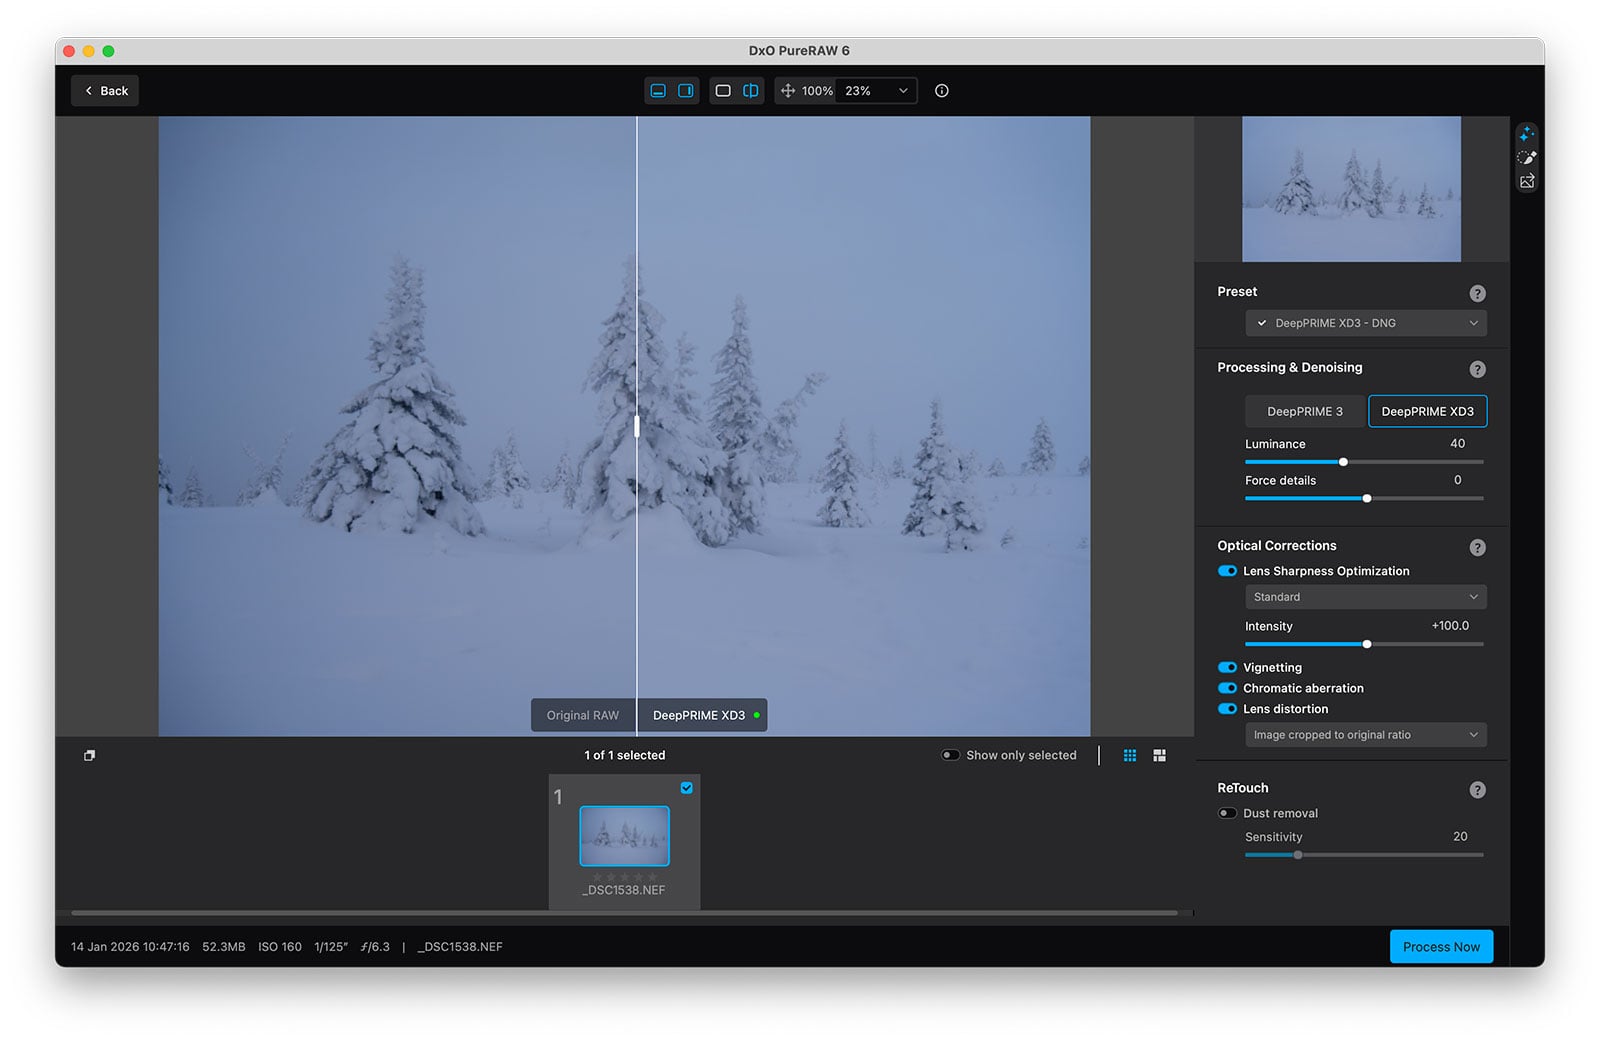
DxO PureRAW 6
DxO is another well-known name among photographers, perhaps mostly for its Nik Collection, which has been considered a must-have for over a decade now.
While they also offer noise reduction software in the collection (Nik Dfine), they have a much better and more powerful tool: DxO PureRAW 6.
PureRAW 6 is an easy-to-use software for enhancing RAW files. It allows you to perform optical corrections (lens softness, vignetting, chromatic aberration, and lens distortion) and noise reduction.
For this comparison, we’ll turn off all other settings besides the DeepPRIME XD3 denoising. This is a newer algorithm than DeepPRIME and will be the one you’ll use most frequently.
Note: I also highly recommend using DxO PureRAW 6 for its optical corrections.

Using DxO PureRAW 6 is as easy as it gets. It can be used as a standalone software or as a Lightroom plugin. Both options work the same and can output a DNG file when the corrections are applied.
I prefer the Process with Preview option, which allows you to turn the settings on and off or fine-tune them.
When ready, click Process Now. Depending on the file size and your computer, this may take some seconds.
Here are the results of our puffin photo:


DxO PureRAW 6 has done a great job reducing noise in this image. It also preserves the perfect amount of details in the puffin, particularly in the head. Compared to Topaz Photo AI, I find PureRAW’s results better.
After using the software on many images, I find that it works great for medium-high ISO images (ranging from ISO1000 to 6400). But what about the more complicated night photos?


With the default settings applied it immidiately looks significantly better than what we achieved with Topaz Photo AI. There are some minor scratch-like artifacts in the sky, only noticable when looking carefully.
At first glance, it looks pretty good. However, when examining it closer, we encounter similar issues as with Topaz Photo AI; there are several ‘soft spots’ in addition to scratch-like artifacts in the sky. With a little fine-tuning and optical corrections, we’d get an even better result. In this case, I would’ve reduced the luminance slightly and added some force details.
Note: Unsure whether DxO PureRAW 6 is right for you? Then download it for free and use the 14-day free trial (and use the code capturelandscapes to claim 15% off if you like it)
Adobe Lightroom Classic / Adobe Camera RAW
Just a few years ago, it would have seemed ludicrous to include Lightroom on a list of the best noise reduction software. But times have changed. With recent updates, Lightroom is becoming more powerful, and its Denoise tool has become increasingly better.
An advantage of using Denoise in Lightroom (or Adobe Camera RAW) is that you don’t have to leave your RAW editor for this process. Everything is kept within the same software, and the enhanced file is saved as a new DNG and stacked with the original file.
But how good is noise reduction in Lightroom? Let’s continue our comparison and find out. Lightroom’s noise reduction tool is named Denoise… and can be found in the Detail tab. Click the Denoise… button, and the Enhance Preview window opens:

We will use the default settings to stay consistent. As with most software, I recommend fine-tuning the exact amount based on each photo.
Click Enhance, and Lightroom begins the noise reduction process. Once finished, you’ll be presented with a new DNG file containing the “-Enhanced-NR.DNG” extension to the filename.
So, how did Lightroom handle our ISO1000 shot? Let’s zoom in 200% and see:


The Lightroom noise reduction successfully removed the most distracting noise while preserving most of the critical details in the puffin. This has done a good job, but I would’ve liked to see more detail in the bird and a little more noise removed from the background. All in all, this is a result you can be happy with.
What about the ISO51200 photo? Can it handle such extreme amounts of grain?


I’m not going to lie. When I first saw these results, I had to rub my eyes. This has gone from an extremely grainy photo to a “normal” night photo. At ISO51200, this photo is still completely usable (keep in mind we’re zoomed in 100% here!).
Removing noise from night photos is among the most complicated aspects of night photography, especially when using the software’s default settings.
Lightroom has succeeded in reducing noise while maintaining details in both the land and sky. It hasn’t removed many stars, and we don’t see any weird smudges. It looks clean and natural.
Conclusion
It’s fair to say that all software did an excellent job of removing noise from our puffin photo. I’d be happy with all the results, and it would’ve required minimal fine-tuning from our end.
That being said, one stood out as the winner: DxO PureRAW 6. It did the best job of removing noise but keeping details in the puffin, especially around the chest and head of the bird.
Regarding the night photo with an ISO of 51200, I think we can all agree that there’s one obvious winner: Adobe Lightroom. I was surprised to see how big of a difference it was between the software for this photo.
What surprised me about Lightroom was that it reduced noise in the night sky without removing stars or adding strange artifacts to them. It also didn’t add any smudges or soft spots. It took an ISO51200 photo and made it look like ISO3200. I’m impressed.
DxO PureRAW 6, Topaz Photo AI, and Adobe Lightroom are all excellent noise reduction software for photography. You won’t go wrong with either. Some simply need a little more fine-tuning than others.
Personally, I use PureRAW in my workflow. It has the best noise reduction algorithm, but it also has unbeatable optical corrections that improves your RAW files.
But, first and foremost, you must take certain steps already in the field to limit the amount of digital noise introduced to your photographs. Start by lowering the ISO and using a tripod if necessary, then deal with digital noise in post-processing.
DID YOU ENJOY THIS ARTICLE? THEN DON’T FORGET TO SHARE!


![Essential Landscape Photography Gear [Complete Guide]](https://www.capturelandscapes.com/wp-content/uploads/2015/11/trollstigen-sunset-glow-218x150.jpg)


In your LRC NR example it shows a setting of 20. The default is 50, so what do you recommend?
благодарен за инфо
My pleasure!
Can’t post a pic, but recent test shots @ISO 40000 and 50000 (that’s 40/50 with 3 zeroes!) from my Q3 using Lightroom Classic NR were remarkable. It’s a Brave New World!
It sure is. I feel that with every update I keep getting more and more surprised how good it works.