
Composition is the foundation of every great landscape photograph. It’s how you arrange the elements within your frame to create balance, interest, and meaning, a silent language that guides the viewer’s eye and evokes an emotional response.
In many ways, it’s what transforms a photo from a snapshot into a story.
You can have perfect light and a stunning subject, but without a strong composition, the image can still fall flat. On the other hand, a well-composed image can elevate even the most ordinary scenes.
This guide will walk you through both the timeless principles and modern techniques of composition in landscape photography. You’ll learn how to build depth, create visual flow, and use elements like light, color, and atmosphere to your advantage. Whether you’re just getting started or looking to refine your eye, the goal is to help you become more intentional and confident in the way you frame the world.
Let’s dive in.
Jump to Section (Click to Expand)
Key Principles of Composition
Before diving into specific compositional techniques, it’s important to understand the core principles that shape how we see and respond to a photo. These principles aren’t rules, but rather guiding ideas that help you create images that feel balanced, intentional, and emotionally resonant.
It doesn’t matter if you’re standing in front of a dramatic mountain vista or a subtle woodland scene; these concepts will influence how viewers interact with your image. By learning to recognize and apply them, you’ll be better equipped to make creative choices that strengthen your compositions and tell a more compelling story.
#1 Balance
Balance refers to the visual weight of elements within your frame, specifically how they’re distributed and how they interact with one another. A well-balanced image feels stable and intentional, while an imbalanced one might feel awkward or chaotic (though that can sometimes be used creatively).

In landscape photography, balance doesn’t mean everything has to be symmetrical. You can create balance by offsetting a large object on one side with several smaller elements on the other, or by using negative space to counterbalance visual weight.
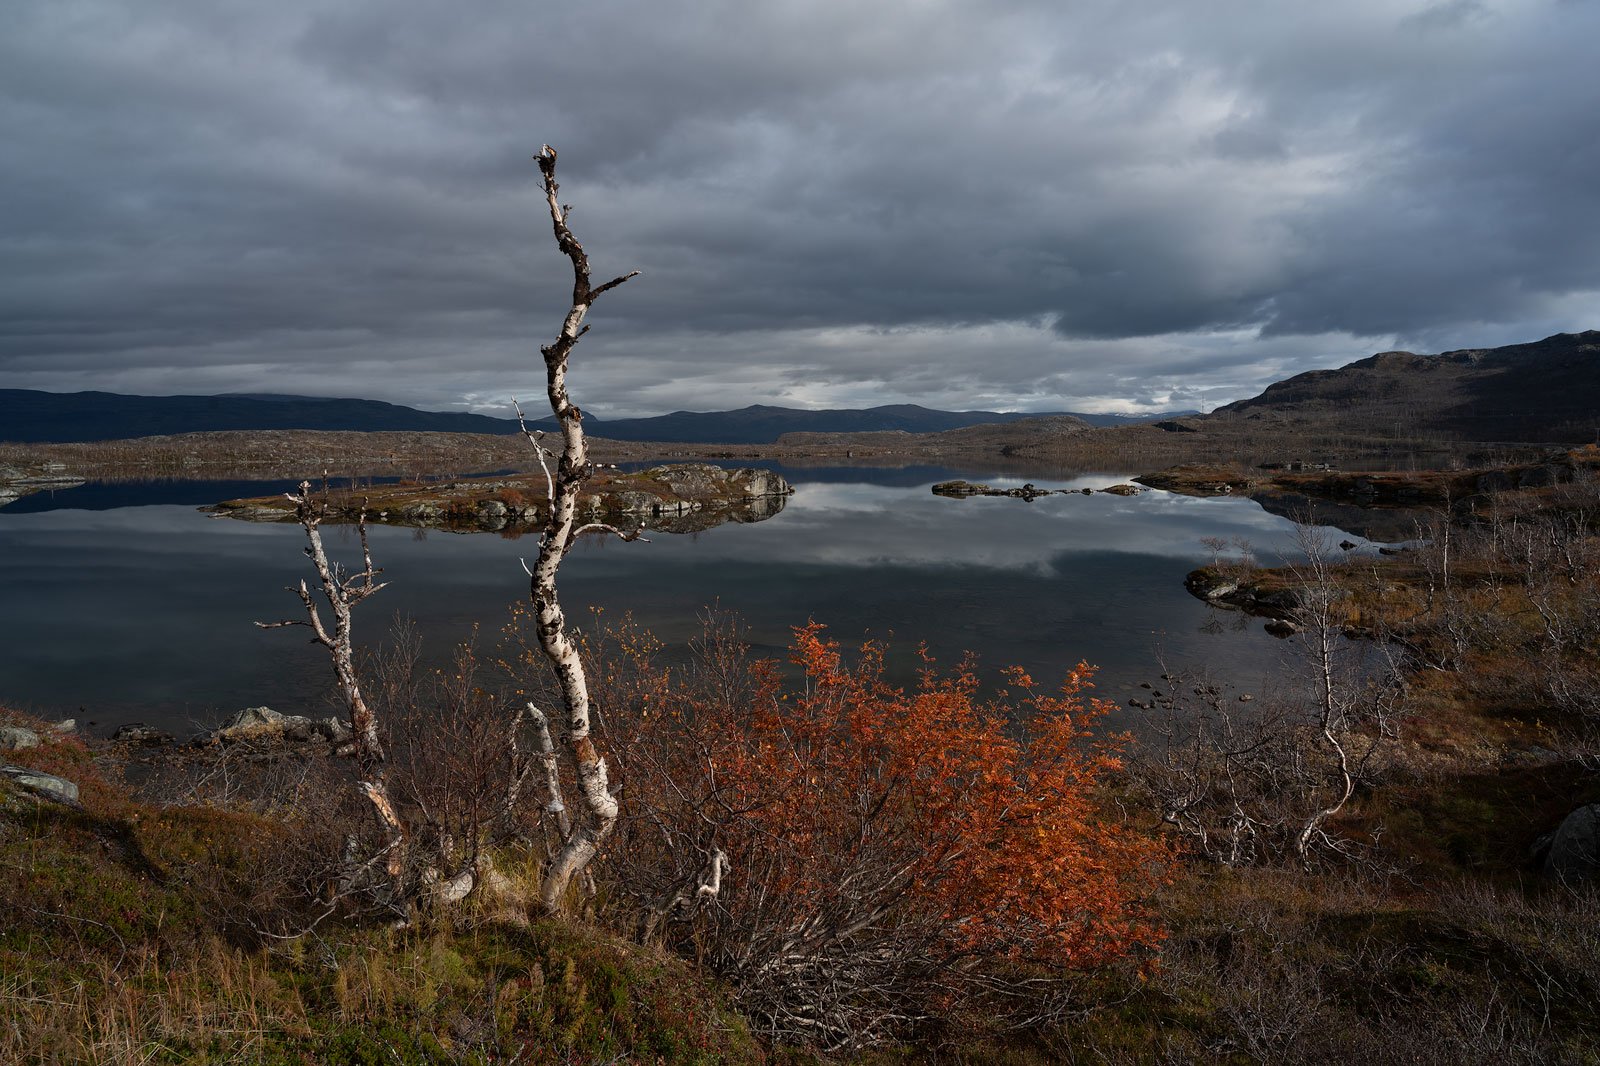
For example, a lone tree on the left side of your frame can be balanced by soft light or textured clouds filling the right. Foreground rocks can balance a bright sunset. Even tonal contrast, such as dark areas balancing bright highlights, contributes to the overall feel of an image.
Balance is less about rigid symmetry and more about guiding the viewer’s eye in a way that feels natural and satisfying.
#2 Simplicity
Simplicity is often the key to stronger, more impactful images in landscape photography. It doesn’t mean your compositions need to be empty or minimalist (though they can be); it simply means that the visual message should be clear.
Our eyes are naturally drawn to order, structure, and clarity. If your image contains too many competing elements, the viewer might feel unsure where to look. This weakens the emotional and visual impact of your photo.
That’s why simplifying the scene is such a powerful tool. Whether you’re photographing a wide vista or a small detail, your goal should be to eliminate anything that doesn’t support your main subject or message. That could mean adjusting your composition slightly to remove distractions, changing your angle, zooming in, or waiting for better light.
Simplicity isn’t always about including less. It’s about ensuring that what you include truly matters.

One of the most effective ways to practice this is to consciously scan the edges and background of your frame before pressing the shutter. Ask yourself: Is everything in this photo helping the composition, or is something detracting from it?
Sometimes, you’ll encounter distracting elements you simply can’t remove in the field, like a distant signpost, an oddly placed branch, or a patch of bright foliage. In those cases, thoughtful post-processing can be a valuable tool for subtly cleaning up the frame and reinforcing your visual message without compromising the scene’s integrity.
#3 Depth and Layers
Depth is one of the most powerful tools in landscape photography. It helps transform a flat, two-dimensional image into something that feels immersive and three-dimensional, drawing the viewer into the scene and guiding their eye through it.
One of the most effective ways to create a sense of depth is by incorporating multiple layers into your composition. These layers often fall into three categories: foreground, midground, and background. By placing visual interest in each of these zones, you provide the viewer with a clear path to follow through the image, making it more engaging and dynamic.
Foreground elements, such as rocks, flowers, or puddles, help anchor the image and give it a sense of place. The midground connects the viewer to the heart of the scene, while the background, often the mountains, sky, or a distant subject, completes the visual journey.
Another technique that enhances depth is using a wide-angle lens combined with a low camera position. This exaggerates the distance between elements and stretches the space in your frame, making foregrounds appear larger and more impactful.

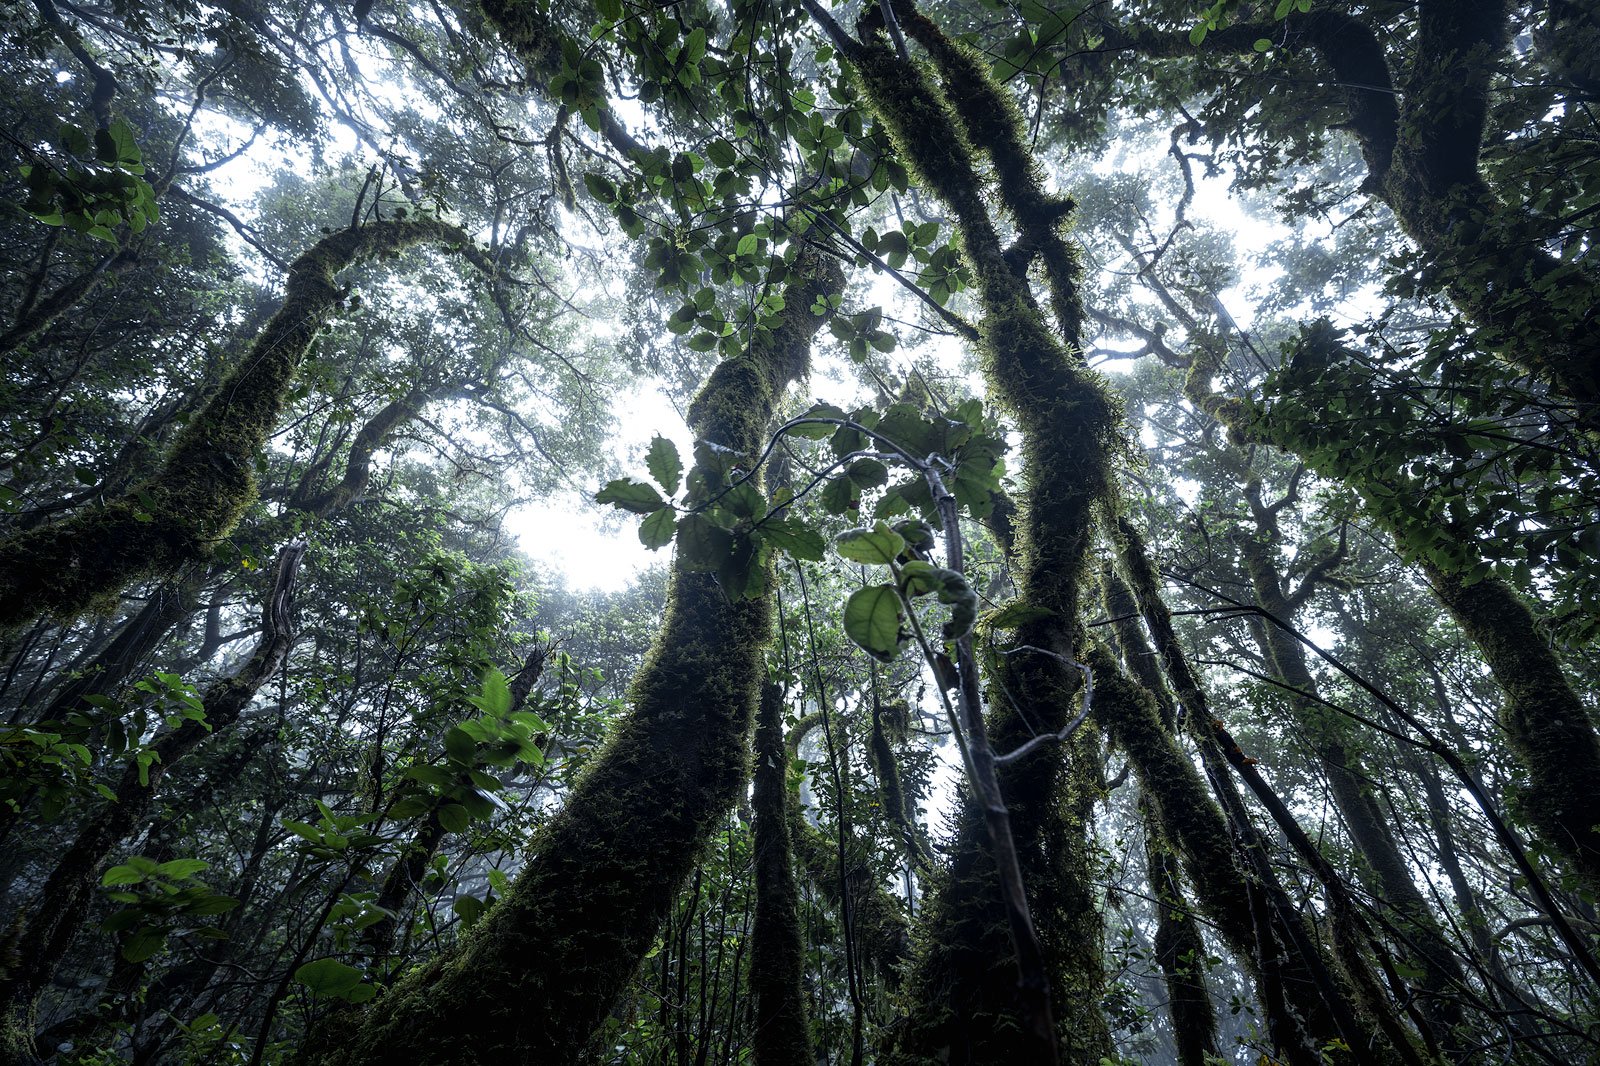
Atmospheric conditions can also add depth. Mist, haze, and backlight naturally create separation between layers, helping subjects stand out and adding a sense of scale and dimension. This is especially effective in forest scenes or mountain landscapes where light and shadow help define space.
In short, images with clear visual layers tend to feel more immersive and thoughtfully composed. Practice looking for natural foreground elements and consciously placing them in your frame to strengthen the depth of your photos.
#4 Visual Flow
Visual flow is the path your viewer’s eye takes through an image. A strong composition doesn’t just place elements in a pleasing arrangement; it actively guides the viewer through the frame, creating a journey rather than a glance.
Our eyes are naturally drawn to elements of contrast, brightness, sharpness, and directional features such as lines and curves. Understanding how these elements interact allows you to shape the way your image is experienced.
One of the most common tools for controlling visual flow is the use of leading lines, such as roads, rivers, fences, or patterns that point toward your subject. But lines aren’t the only way. Curves, shapes, and even light can create a sense of movement. A well-placed patch of light in the background, for example, can subtly pull attention through the frame.

It’s also important to consider entry and exit points. Where does the viewer’s eye enter the frame? Where does it go from there? And, crucially, does it stay within the composition or get pulled off the edge? Images with strong flow often have a natural rhythm that loops the eye back into the scene, creating a sense of cohesion and harmony.
Watch out for “dead zones”, areas with no visual interest or awkward space that stops the eye. These can break the flow and cause the viewer to disengage. Likewise, distracting elements on the edge of the frame can pull attention away from your intended subject.
When composing in the field, pause to ask yourself: where is the eye going first? What path will it follow next? This habit alone can dramatically improve your compositions.
#5 How Camera Settings Influence Composition
Composition isn’t just about where you place elements in the frame; it’s also about how those elements appear, and that’s directly shaped by your camera settings. Shutter speed, aperture, and ISO don’t just affect exposure; they influence motion, depth, and mood, all of which play a critical role in how a composition is perceived.
Shutter Speed and Motion
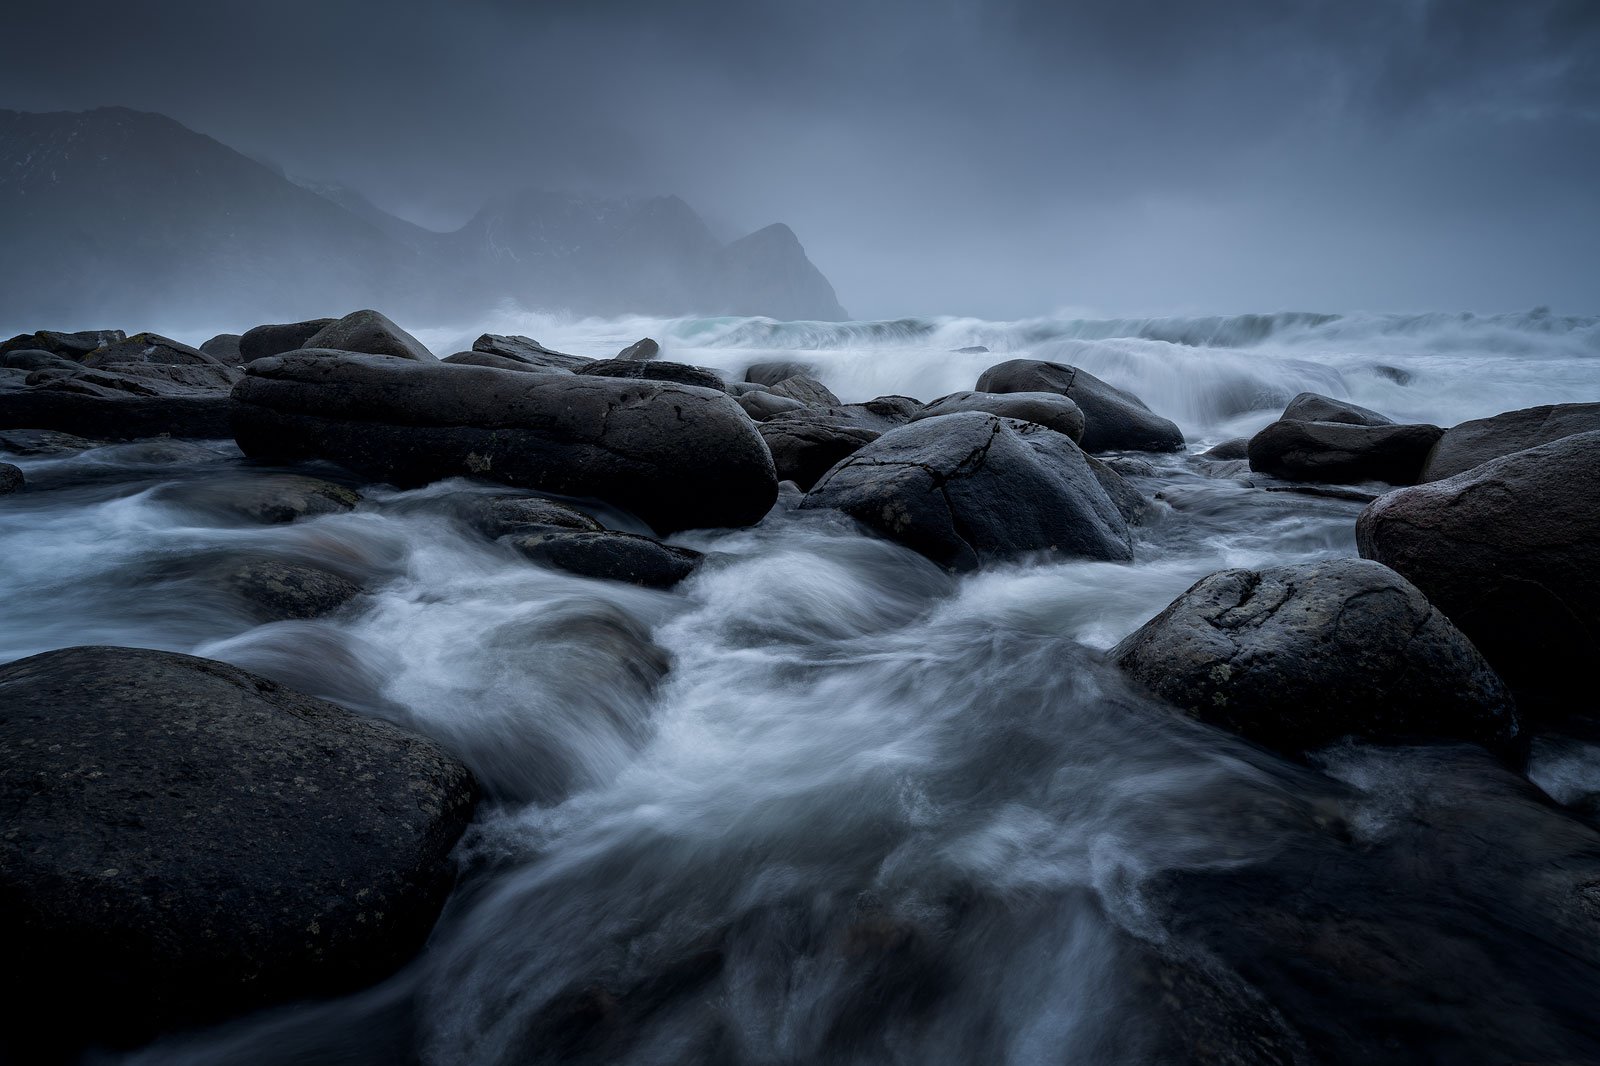
Shutter speed has a profound impact on visual flow, particularly when photographing moving elements such as water, clouds, or grass swaying in the wind. A faster shutter speed (like 1/500s or higher) freezes motion, preserving crisp detail and giving the scene a sense of stillness or clarity. But slowing down the shutter, even to something modest like 1/4s or 1 second, allows you to introduce movement and energy into the frame.
In landscape photography, this technique is often used to create a sense of leading motion. Waves retreating from the shore can form streaks that draw the eye into the distance. Waterfalls blur into soft ribbons that contrast with sharp surroundings. Even a gentle breeze in tall grass can introduce rhythm. This use of motion isn’t just technical, it’s compositional. It helps guide the viewer’s eye and adds life to static scenes.

Of course, longer shutter speeds often require a tripod and careful planning. You may need to use ND filters or wait for low-light conditions. But when used intentionally, shutter speed becomes one of the most expressive tools you have for shaping how a viewer experiences your composition.
Aperture and Depth
Aperture controls depth of field, the range of focus from the foreground to the background, and therefore plays a direct role in how layered or isolated your subject appears. In landscape photography, narrow apertures (like f/11 to f/16) are often used to keep the entire scene sharp from front to back, which helps reinforce depth and detail across layers. This works especially well when your composition includes strong foreground interest, leading the eye toward a sharp background.
But there are also times when a shallow depth of field is more effective. Using a wider aperture (like f/2.8 or f/4) can help isolate a subject, such as a flower, a rock, or even a person in the landscape, by softening the background. This separation creates focus, mood, and simplicity, particularly when your composition relies on minimalism or contrast.

Choosing your aperture should be more than just a technical decision. Think about how much detail you want to include. Consider how background blur or front-to-back sharpness supports the story your composition is telling.
#6 Color as a Compositional Tool
Color plays a powerful role in how we perceive and connect with a photograph. Beyond being a visual element, it can guide the eye, create mood, and add structure to a composition. In landscape photography, thoughtful use of color can elevate an ordinary scene into something memorable.
One of the most effective ways to use color in your compositions is by understanding color contrast. Warm colors (reds, oranges, and yellows) naturally draw attention and tend to advance in the frame, while cool colors (blues, greens, and purples) tend to recede. This creates a natural sense of depth. A warm-toned subject against a cool background, for instance, will immediately stand out and feel more dimensional.
You can also use color to create visual flow through the image. Repeating colors, such as scattered autumn leaves or similar hues in the sky and foreground, can create a sense of harmony and lead the eye from one part of the frame to another. In contrast, complementary colors (like blue and orange or green and red) can create visual tension that makes a scene more dynamic.

Consider also how color temperature transitions, from cold to warm or bright to dark, can direct attention and set a mood. A sky transitioning from cool twilight to warm sunrise tones might naturally guide the viewer toward the brightest, warmest part of the image.
While it’s ideal to recognize and use these color relationships in the field, post-processing can help refine your palette. You might subtly shift colors for better balance, reduce distractions by toning down overpowering elements, or enhance harmony by unifying hues.
Being mindful of color doesn’t mean chasing the most dramatic sunset; often, it’s about recognizing how subtle shifts in light and tone can shape the mood and message of your image. The more you train your eye to notice and use color with intent, the more powerful your compositions will become.
#7 Contrast as a Compositional Tool
Contrast plays a crucial role in how we perceive and navigate an image. Our eyes are naturally drawn to the brightest parts of a scene, especially when they’re surrounded by darker elements. This makes contrast a powerful tool for guiding the viewer’s attention and establishing visual hierarchy.
One of the most effective ways to use contrast in your compositions is by ensuring that the brightest areas are placed on or near your main subject. A bright mountain peak against a shadowed valley, or sunlight breaking through storm clouds onto a lone tree, are examples where contrast helps emphasize your point of interest.

It’s equally important to avoid unintentional distractions. Bright highlights along the edges of the frame, such as snow patches, blown-out skies, or reflective rocks, can easily pull the eye away from the main subject. Keeping the edges of your frame darker or less contrast-heavy helps keep the viewer’s attention where it belongs.
Post-processing gives you additional control over contrast. You can subtly darken bright elements that compete with your subject or increase contrast where you want to strengthen visual flow. Dodging and burning, vignette adjustments, and selective exposure tweaks are excellent tools for this purpose; not to change the story of the image, but to help tell it more clearly.
Recommended Reading: Post-Processing for Landscape Photography: The Complete Guide
Foundational Techniques
Composition in landscape photography isn’t just about seeing, it’s also about knowing what to look for and how to arrange it within the frame. While principles like balance and simplicity guide your overall vision, foundational techniques are the hands-on tools that help you build strong images in the field.
These compositional building blocks, like the Rule of Thirds, Leading Lines, and Foreground Interest, are often taught to beginners for a reason: they work. They help create structure, guide the viewer’s eye, and add impact to an otherwise flat or unbalanced scene.
In this section, we’ll take a closer look at the most essential compositional techniques, each with real-world application for landscape photographers. Mastering these guidelines will enhance the strength and clarity of your images, providing a solid foundation to start breaking the rules with confidence.
Rule of Thirds
The Rule of Thirds is one of the most widely known compositional guidelines in photography. It’s simple, effective, and often one of the first tools beginners are introduced to, for good reason.
The idea is to divide your frame into a 3×3 grid, placing key elements of your composition along the lines or at their intersections. This helps create balance and avoids the static, less dynamic feel that often comes from centering your subject.

In landscape photography, this might mean placing the horizon along the top or bottom third, rather than dead center. A lone tree, mountain peak, or person in the scene might be placed at one of the “power points” where the lines intersect. This placement naturally draws the viewer’s eye and creates more engaging tension than a centered composition.
But like all compositional tools, the Rule of Thirds is not a law. It’s a starting point, not a destination. Some scenes benefit from centered symmetry. Others may require breaking the grid entirely to emphasize space, minimalism, or emotion. The key is to use this technique intentionally, not automatically.
Recommended Reading: The Rule of Thirds Explained
Leading Lines
Leading lines are one of the most effective tools for guiding the viewer’s eye through a landscape photograph. They help create depth, connect elements within the frame, and draw attention to your main subject, often without the viewer even realizing it.
A leading line can be almost anything: a river winding into the distance, a trail disappearing into the mountains, patterns in the sand, cracks in ice, or even the direction of light and shadows. What matters is how that line moves the eye from one part of the image to another, ideally toward your point of interest.

These lines can be bold and obvious, or subtle and suggestive. Diagonal lines tend to create a sense of motion or energy. Curves (like an S-curve in a river) add elegance and rhythm. Converging lines can create dramatic perspective, especially when shooting wide-angle scenes.
As with any compositional tool, it’s important to use leading lines with intention. Not every image needs them. In fact, sometimes a strong line can accidentally pull attention away from your subject if it leads out of the frame or clashes with the overall flow of the image.
Look for natural lines in the environment and experiment with your position. Often, simply moving a few steps left or right can transform how a line interacts with the rest of the scene. Over time, you’ll start to see these compositional anchors more intuitively and use them to strengthen your images.
Framing
Framing is the art of using elements within your scene to draw attention to your subject, much like placing a physical frame around a painting. It helps focus the viewer’s eye, adds visual depth, and can turn a simple subject into something much more compelling.
In landscape photography, framing often comes in the form of overhanging tree branches, rock formations, cave entrances, archways, or even a break in the clouds. These elements create a natural border around your subject and help separate it from the rest of the image. A well-used frame can also add context or tell a story, suggesting that the viewer is peering into the scene.
Framing isn’t always about fully enclosing your subject, though. Even partial frames, like the edge of a cliff or a foreground boulder, can help guide the viewer’s attention and create a more layered composition.
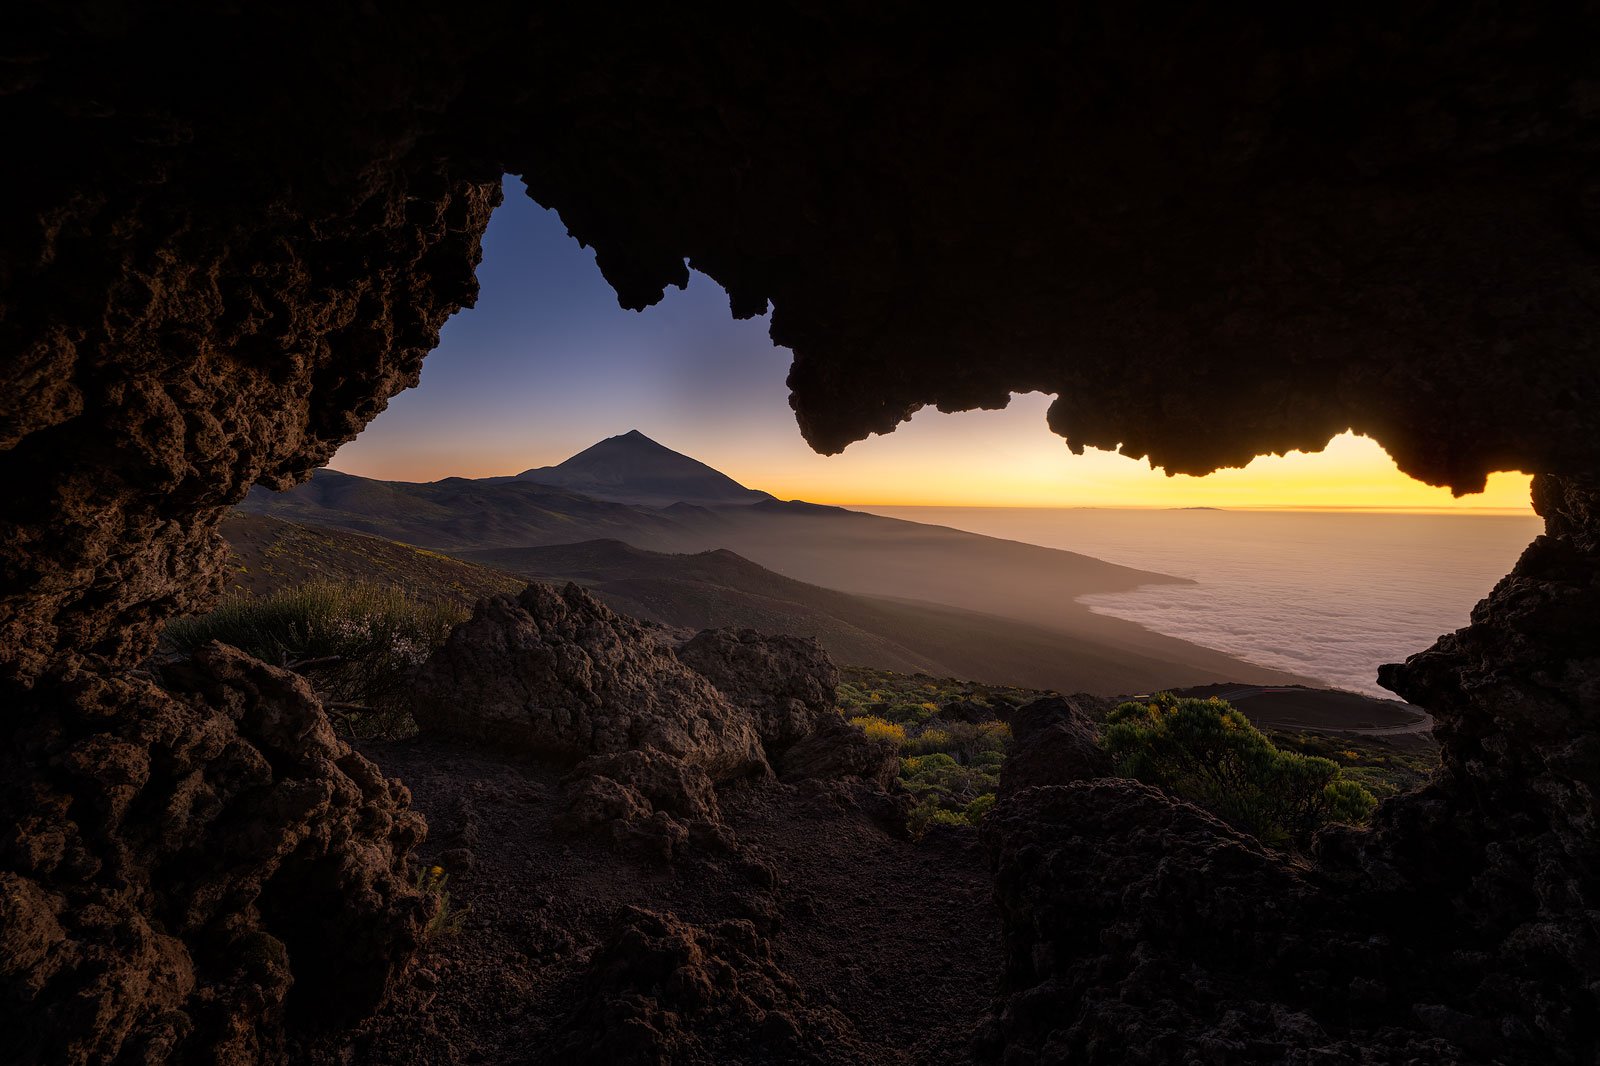
It’s also a technique that invites creativity with perspective. You may need to crouch down, move behind an object, or shoot through something (such as a cave or an opening in a tree) to find the most effective frame. The key is to ensure that your framing elements add to the image, rather than becoming distracting or dominant.
Done well, framing can turn a good scene into something more immersive, something that pulls the viewer in and holds their gaze.
Recommended Reading: Get Better Images Using Natural Framing in Landscape Photography
Foreground Interest
Foreground interest is one of the most powerful ways to create depth in a landscape photo. By placing a strong visual element close to the camera, you create a sense of three-dimensional space that draws the viewer into the scene.
This can be just about anything: a patch of wildflowers, textured rocks, driftwood, ice patterns, or even leading lines like cracks or trails. The goal isn’t to steal attention from the main subject, but to anchor the viewer in the landscape, giving them a starting point and inviting their eye to move deeper into the frame.
Wide-angle lenses are particularly helpful when working with foregrounds. They exaggerate the sense of space between near and far elements, making your composition feel more expansive. But they also make camera placement critical; a few centimeters up or down can completely change how your foreground aligns and whether it feels intentional or awkward.

When used thoughtfully, foreground elements can also help with balance and visual flow. They can mirror shapes in the background, echo the color palette, or simply add texture and interest to an otherwise empty space. And when the light is right, like warm side light grazing across rocks or moss, they can become some of the most beautiful parts of the image.
Of course, not every scene needs a strong foreground. But when one is available, especially in grand landscapes, it’s often the difference between a flat image and one that feels alive and immersive.
Scale
Conveying a sense of scale in landscape photography helps communicate the true grandeur or intimacy of a scene. Mountains feel taller, cliffs feel steeper, and the landscape as a whole becomes more relatable when the viewer has something to compare it to.
One of the most effective ways to convey scale is to include a familiar object in the frame, such as a person, a cabin, or a tree. These relatable elements act as visual reference points, helping the viewer grasp the size and distance of other features in the image.
This is especially important when photographing large, open scenes. A snow-covered mountain might look impressive in person, but without something to compare it to, a photo can feel flat and underwhelming. Adding a small figure standing on a ridge, or a tent glowing in the distance, can immediately give context and emotional impact.

But scale doesn’t always need to come from people or manmade objects. Even natural elements, like a foreground flower contrasted against a towering peak, can help establish a sense of proportion and space.
As always, be intentional. Ask yourself whether including a scale reference strengthens the composition or if it distracts from your subject. In scenes meant to evoke a sense of vastness or isolation, the presence of a person can add depth to the storytelling and invite viewers to imagine themselves in the scene, or it might make the landscape feel smaller. It all depends on the image you want to create.
Perspective
Perspective is all about where you place the camera, and in landscape photography, even a small change in height or angle can dramatically alter how a scene feels.
By shifting your perspective, you can exaggerate depth, minimize distractions, create stronger relationships between elements, or entirely change the mood of an image. Low angles, for example, can make foreground details feel more immersive and dominant, while high angles may simplify a chaotic scene or reveal interesting patterns in the landscape.
Moving closer to your foreground subject and using a wide-angle lens will stretch the space between near and far objects, emphasizing depth. On the other hand, stepping back and using a longer focal length compresses the scene, making distant layers appear more stacked and intimate. Both are valid; the right choice depends on the story you want to tell.
It’s also worth noting that perspective affects how lines behave in your frame. Tilting your camera upward can make vertical elements like trees or cliffs converge dramatically, while keeping it level preserves a more natural look.
The key is to explore. Take the time to move around your subject, left, right, high, and low, and pay attention to how the relationship between elements changes. Often, your first instinct won’t be the most effective composition. Slowing down and experimenting with different perspectives is one of the most effective ways to improve your compositions and develop your own unique visual style.
Creative Approaches to Composition in Landscape Photography
Once you’ve learned the fundamental principles and compositional techniques, it becomes easier and more rewarding to start breaking them.
Creative composition is where landscape photography becomes truly personal. It’s not about rules or formulas, but about using the tools you’ve learned to express how a place feels, not just how it looks. This might mean embracing negative space, simplifying a scene down to its essence, or deliberately placing the subject dead center.
These approaches often rely less on structure and more on intuition, emotion, and storytelling. They can help you create images that stand out, not because they follow compositional “rules,” but because they reflect your perspective as a photographer.
In the next sections, we’ll explore some of the more creative and unconventional ways to compose landscape photos, along with tips for how and when to use them effectively.
Breaking the Rules
Once you’ve developed a solid understanding of compositional principles, you earn the freedom to bend and break them. And in many cases, that’s exactly what leads to the most interesting, memorable images.
Rules like the Rule of Thirds, balance, or foreground-background structure exist for good reason, they work. But rigidly following them can sometimes lead to safe or predictable compositions. By intentionally breaking the rules, you open the door to creativity, surprise, and expression.

Take placing your subject dead center, for example. While it often creates a static feel, it can also add a sense of symmetry, strength, or isolation, particularly when working with reflections, minimalist scenes, or powerful leading elements. The same applies to tilting your frame to introduce tension or allowing important subjects to break traditional boundaries, such as edge space or framing.
The key is intent. Breaking a rule should never feel like a mistake; it should feel like a choice. And that choice should serve the story or mood you’re trying to convey. Ask yourself: Does it feel right? Does it make the image stronger or more personal? If the answer is yes, don’t be afraid to go for it.
Creativity doesn’t come from blindly following rules. It comes from understanding them deeply enough to know when, and why, to ignore them.
Minimalism
Minimalism in landscape photography is the art of doing more with less. It’s about stripping away distractions and focusing on the essential, a single subject, a strong shape, a striking contrast. In a world filled with visual clutter, minimalistic images often feel calm, deliberate, and timeless.
This approach works especially well in wide-open environments like snow-covered landscapes, coastal scenes, or foggy forests, where the atmosphere naturally simplifies the frame. But minimalism isn’t only about the subject; it’s also about negative space. Allowing large areas of sky, water, or texture to dominate the frame can add elegance and visual breathing room, helping the viewer focus more deeply on what matters.
Minimalism also encourages careful use of color and light. A single burst of color against a neutral background can have a tremendous impact. A lone tree bathed in soft light can feel more powerful than an entire forest.
To compose minimalist images effectively, you often need to work slowly and intentionally. Look for scenes that feel quiet and balanced. Ask yourself what can be removed without weakening the image, and what happens when you leave only the essentials.
Minimalism isn’t about being empty. It’s about being purposeful.
Negative Space
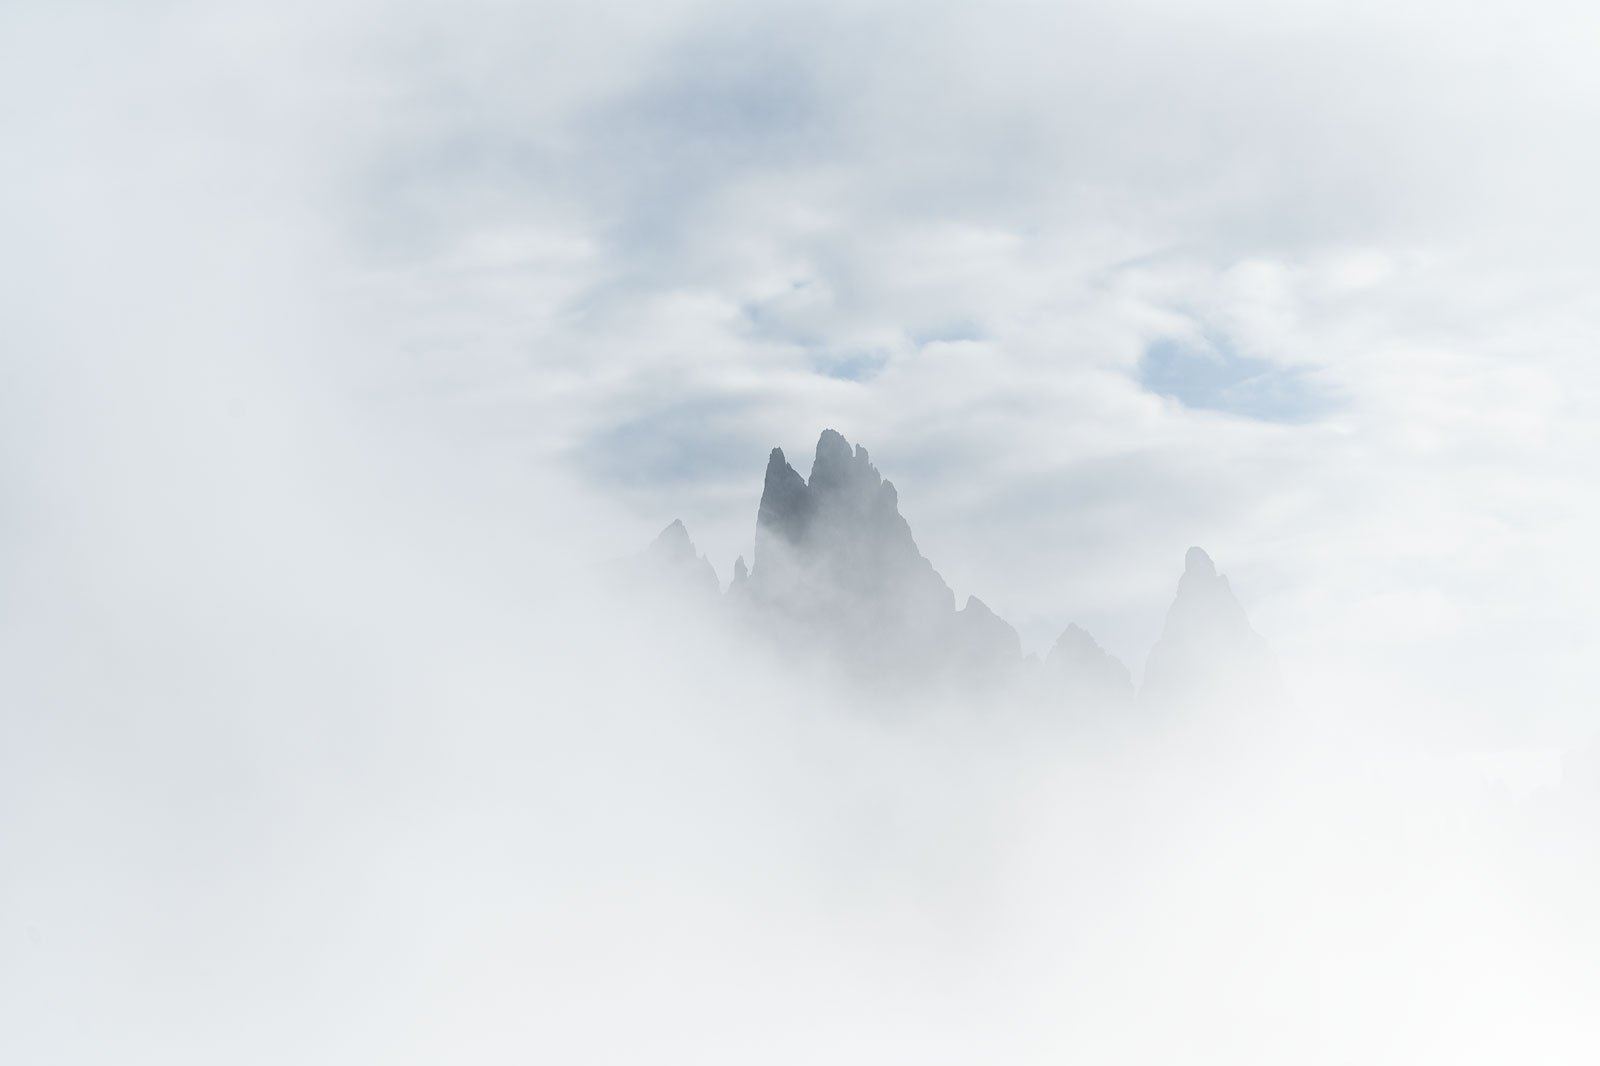
Negative space is the area in your image that surrounds or separates your main subject. It’s the empty sky, the calm water, the snow-covered field, the places where “nothing” is happening visually. And yet, when used intentionally, negative space can be one of the most powerful tools in your compositional toolbox.
In landscape photography, negative space serves several important purposes. It creates a sense of simplicity and calm. It gives your subject room to breathe. And it draws the viewer’s attention precisely where you want it, by reducing visual clutter and isolating key elements within the frame.
Negative space is especially effective when you want to emphasize solitude or scale. A single tree in a snowstorm. A lone mountain under a vast sky. A small figure walking across a dune. These are all compositions where the emptiness becomes just as important as the subject itself.

This technique doesn’t require a minimalist mindset, either. Even in more complex scenes, you can use negative space to balance the frame, direct visual flow, or create contrast between busy and calm areas.
When composing, look for opportunities to include large areas of open space, and don’t feel the need to fill every part of the frame. Sometimes, what you leave out says just as much as what you include.
Symmetry and Asymmetry
Symmetry in landscape photography is naturally pleasing to the human eye. It creates a sense of order, balance, and calm. Think of a mountain perfectly mirrored in a still lake, or a tree standing exactly at the center of the frame. These kinds of compositions are powerful because they feel stable and harmonious, almost meditative.
But not every image needs to be symmetrical to be strong. Asymmetry is just as valuable, especially when you want to create a more dynamic or tension-filled composition. By placing your subject off-center or distributing visual weight unevenly, you can guide the viewer through the image in a more engaging, story-driven way.
The key is knowing why you’re choosing one over the other.
- Use symmetry when you want to emphasize peace, perfection, or reflection. It works beautifully in calm conditions or when shooting scenes with strong architectural or geometric elements.
- Use asymmetry when you want to lead the eye, create movement, or add energy. It often works best in more dramatic weather or rugged terrain, where a perfectly centered image might feel too controlled.
Both approaches are valid, and often, the most compelling images contain elements of both. A symmetrical reflection with a lone tree off to one side. A chaotic storm balanced by a calm patch of sky.
The secret is balance. Whether you’re working with symmetry or asymmetry, your image should feel intentional, not accidental.
Light as a Compositional Tool
Light doesn’t just illuminate a scene, it shapes it. In landscape photography, the way you use light can be just as important as how you frame your subject. It affects mood, depth, contrast, and focus, and ultimately, how the viewer experiences your image.
Using light as a compositional tool means paying attention to how it interacts with the landscape. Side light can create texture and depth, casting long shadows that add dimension. Backlight can highlight edges, create glow, or turn a scene into a silhouette. Even flat, overcast light has its purpose; softening contrast and bringing out color and detail in subtle, quiet scenes.

Where the light falls, and where it doesn’t, is one of the most natural ways to guide the viewer’s eye. Our attention is instinctively drawn toward brightness, so areas lit by golden hour sunlight or a break in the clouds become instant focal points. Similarly, you can use shadow and shade to draw attention away from less important parts of the frame.
In post-processing, you can further reinforce this. Brightening your subject slightly or darkening the corners of the frame (a technique known as vignetting) can help direct attention without being overt.
Light is never just a technical setting. It’s a storytelling tool, and the more intentionally you use it, the more impact your composition will have.
Weather and Atmosphere
Weather is one of the most powerful and unpredictable compositional elements in landscape photography. While many photographers wait for blue skies and golden hour, the truth is that atmosphere often makes the difference between a good image and a truly compelling one.
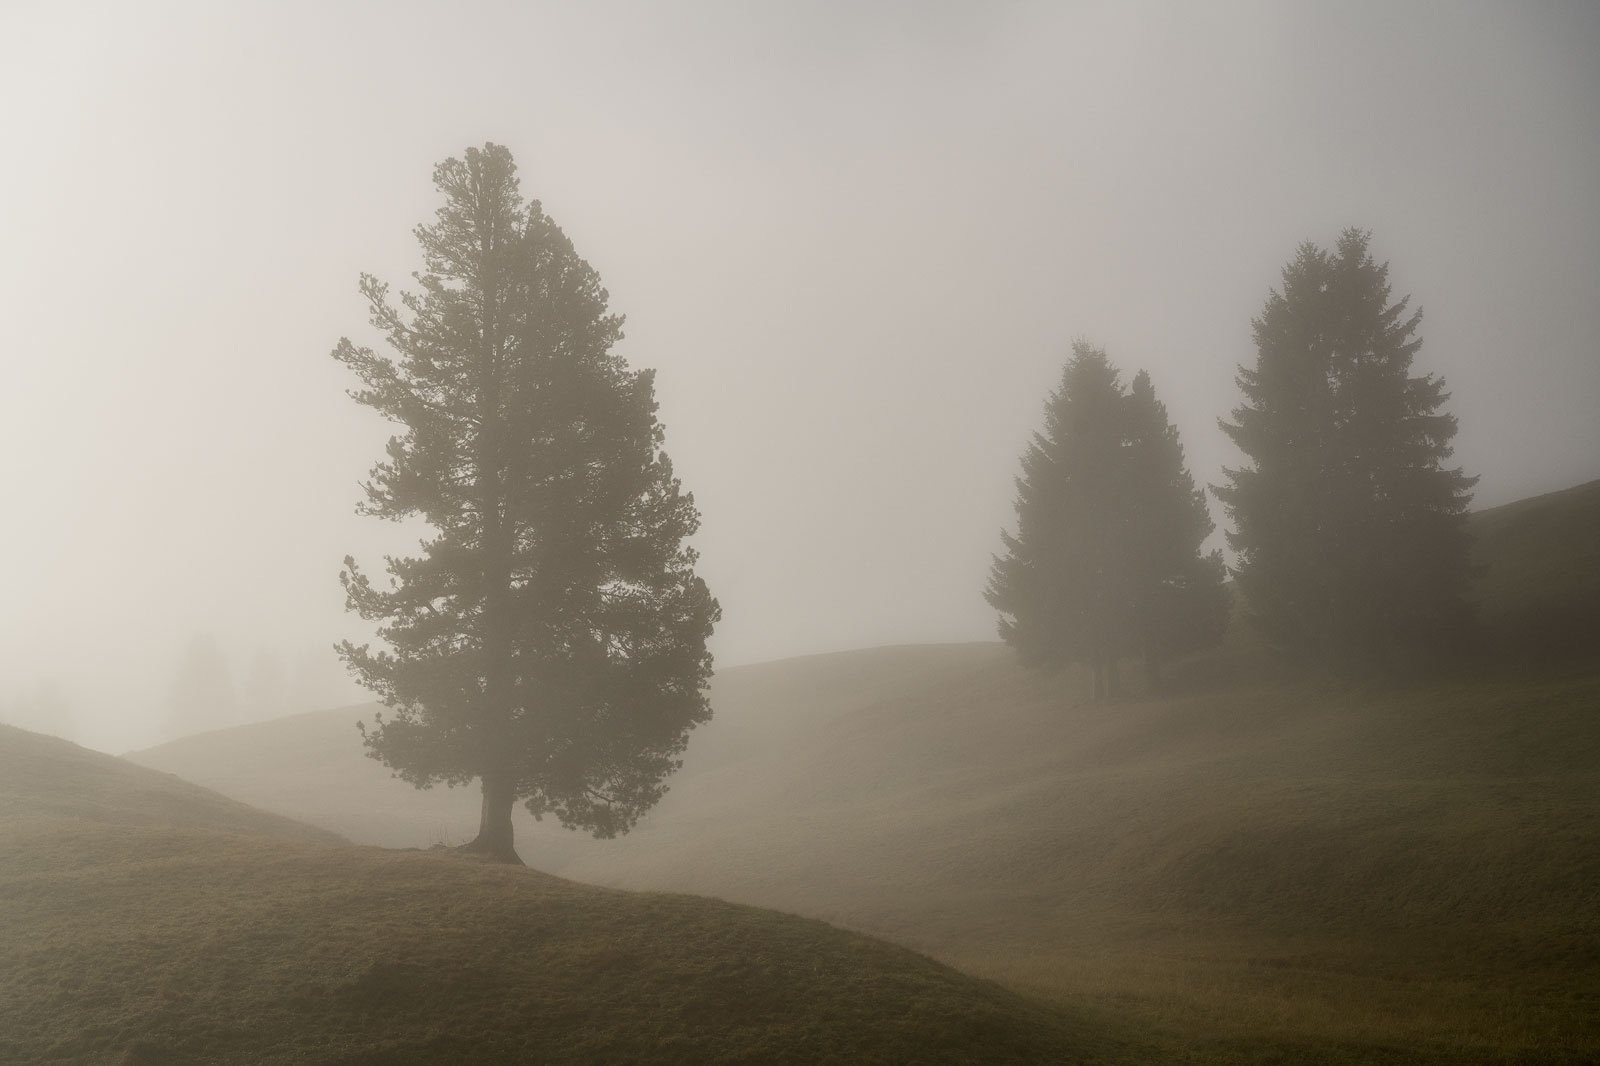
Fog, mist, rain, snow, and storm clouds all have the ability to transform an ordinary scene into something dramatic or mysterious. They simplify complex backgrounds, separate elements through layers, and add a mood that’s impossible to fake. A forest covered in mist becomes about shape and silhouette. A clearing storm over a mountain range introduces contrast, light shafts, and a sense of scale.
Recommended Reading: Fog Photography: How to Capture Atmosphere and Mood in the Mist
Weather also enhances the storytelling aspect of your image. A moody sky can create tension or drama. Falling snow can evoke peace and solitude. Even a light drizzle on a rocky coastline can add a sense of movement and texture to the frame.
From a compositional perspective, weather helps create depth and dimension. Atmospheric haze between foreground, midground, and background elements adds a natural sense of layering. And when paired with directional light, such as sunlight breaking through storm clouds, it can result in truly spectacular scenes.
Rather than avoiding “bad” weather, learn to work with it. Some of the most impactful images come from embracing unpredictable conditions. Bring the right clothing, protect your gear, and stay flexible, and you’ll often be rewarded with moments no clear blue sky could ever match.
Recommended Reading: There’s No Such Thing As Bad Light – An Exploration of Creatively Using Midday Light
Mistakes to Avoid in Landscape Photography Compositions
Even experienced photographers can fall into certain compositional traps, especially when working quickly or reacting to unexpected lighting conditions. While every scene is different and many “rules” can be bent or broken, being aware of common mistakes helps you avoid distractions that weaken an otherwise strong photo.
This section isn’t about rigid dos and don’ts. Instead, it highlights a few habits that can unintentionally hold back your compositions and offers suggestions on how to approach them more thoughtfully.
Being mindful of these pitfalls will help you create cleaner, more intentional, and more compelling landscape photos.
#1 Centering Everything
One of the most common habits in early landscape photography is placing the main subject or horizon directly in the center of the frame. While this approach can be effective in certain situations, such as when aiming for symmetry, it often results in static, less dynamic compositions.
Centering the horizon, for example, tends to divide the image in half, making it unclear whether the sky or the landscape is the main focus. Likewise, placing the subject squarely in the middle can remove tension and leave the viewer’s eye unsure of where to look next.
That’s why compositional techniques like the Rule of Thirds exist; not to limit creativity, but to help create balance and movement in the frame. Placing your subject off-center often leads to a more engaging and story-driven image.
That said, centering isn’t always wrong. In fact, when used deliberately, such as in minimalist scenes or with strong reflections, it can emphasize calm, symmetry, or strength. The key is to do it with intention, not by default.
#2 Ignoring Distractions
When you’re caught up in beautiful light or a compelling subject, it’s easy to overlook the small things that creep into the edges of your frame: bright rocks, tree branches, distant buildings, or even your own tripod leg. However, these minor distractions can divert the viewer’s attention away from the main subject and weaken the overall composition.
It helps to pause before pressing the shutter, and scan the frame corner to corner. Ask yourself: Does everything in this photo support the image I want to create? If not, consider reframing, adjusting your position slightly, or changing focal length.
Sometimes, distractions are unavoidable, especially in busy or natural environments. In these cases, don’t be afraid to plan for a little cleanup in post-processing. Removing a stray twig or patch of litter doesn’t compromise the integrity of the image; it helps the viewer stay focused on what matters.
Being aware of visual clutter and taking steps to reduce it is one of the fastest ways to elevate your compositions.
#3 Overcomplicating the Frame
When faced with a beautiful scene, it’s tempting to include everything: the dramatic sky, the mountain, the lake, the trees, the wildflowers, the rocks, the trail. But when too many elements compete for attention, the image can quickly feel chaotic or unfocused.
Strong compositions often have a clear visual hierarchy, a sense of what the photo is about, and what supports that idea. If everything carries equal weight, the viewer’s eye has nowhere to settle.
Simplifying doesn’t mean removing interest. It means being intentional about what stays in the frame. That might involve changing your focal length, moving your position, or even waiting for different light to highlight the subject more clearly.
One useful trick is to ask yourself: What is this image really about? Once you’ve answered that, make sure everything in the frame contributes to that idea, and consider removing anything that doesn’t.
As you grow more experienced, you’ll find a balance between richness and clarity, and your compositions will feel stronger because of it.
How to Practice and Improve Your Compositional Skills
Composition isn’t something you master by just reading about it; it’s something you develop by doing. The more time you spend actively composing images, the more natural it becomes to recognize balance, flow, and strong visual structure in the landscape.
Still, it’s easy to fall into autopilot mode when out shooting, relying on familiar approaches instead of pushing your creativity. That’s why a more intentional approach to practice can make a real difference.
In this section, we’ll look at a few ways to sharpen your eye, stay creative in the field, and accelerate your growth through hands-on experience and reflection.
Field Tips for Building Compositional Awareness
When you’re in the field, it’s easy to get fixated on the light or subject and overlook the underlying composition. But building awareness is exactly what helps turn a nice scene into a strong photograph.
Here are a few practical compositional tips:
- Slow down: Don’t rush to take the shot. Take a moment to scan the scene with your eyes or through the viewfinder. Ask yourself what the image is about, and how you can lead the viewer’s eye through the frame.
- Work the scene: Instead of firing one shot and moving on, try multiple compositions. Change your height, your angle, your focal length. Sometimes the best composition reveals itself only after exploring a few options.
- Use your tripod deliberately: Once you’ve found a promising composition, setting up the tripod can help slow things down and force you to be more intentional.
- Shoot with and without the obvious subject: If a dramatic peak or striking light is drawing your eye, try a few frames that exclude it entirely. You’ll train yourself to see alternative compositions.
- Zoom in using your camera’s preview: After taking a photo, use the image preview to zoom in and carefully inspect your frame. This helps spot distractions or small mistakes, like bright edges or unwanted objects, that are easy to miss at first glance.
Compositional awareness grows over time, but it builds more quickly when you’re actively reflecting in the field, rather than just reacting.
Sketching and Visualizing Compositions
Sketching might sound like something reserved for painters or illustrators, but it can be a powerful exercise for photographers, too. You don’t need to be good at drawing; the point isn’t to create art, but to simplify what you see and understand how elements interact in the frame.
By loosely sketching out the shapes and flow of a scene, you’ll start to recognize the core structure of your composition. This can help clarify what’s working, what isn’t, and where you might adjust your position or framing.
You can also visualize compositions mentally. Before lifting your camera, pause and scan the landscape: Where does your eye go first? What’s pulling attention? How do elements connect?
This kind of pre-visualization leads to more intentional photographs, and over time, it sharpens your ability to “see” strong compositions even before setting up your gear.
Learning from Other Photographers
One of the most effective ways to improve your composition is by studying the work of others. Take the time to really look at photographs you admire, not just scrolling past them, but asking why they work.
Where does your eye go first? How does it move through the image? What’s included, and what’s left out?
Don’t limit yourself to only landscape photography. You can learn just as much from architecture, portrait, or documentary photography when it comes to balance, tension, or use of space. But when studying landscapes specifically, try to observe how the photographer uses light, scale, and framing to guide your attention.
You can even go a step further by recreating similar compositions in your own practice, not to copy, but to train your eye to recognize what makes a composition effective.
Learning from Paintings
Photographers aren’t the only visual artists who think about composition; painters have done it for centuries. And because a painter starts with a blank canvas, every single element in the frame is placed with intention. That’s what makes studying paintings so valuable.
When you look at landscape paintings, you begin to see how color, light, and shapes are used to guide the eye and tell a story. You’ll notice how foreground interest is arranged, how atmosphere is suggested, and how tension is created through placement and contrast.

Personally, I’ve always found visiting galleries to be a source of inspiration. Artists like Albert Bierstadt and other painters from the Hudson River School are particularly instructive for landscape photographers. Their works are rich in atmosphere, featuring leading lines and luminous light that echo the very goals many of us have in our photography.
So don’t be afraid to step outside photography for inspiration. There’s a lot to learn by seeing how others approach the same visual language, even with a brush instead of a lens.
Summary
Composition is one of the most powerful tools in landscape photography. It’s how we give shape to the scene, guide the viewer’s eye, and create images that feel intentional and expressive, not just snapshots of beautiful places.
In this guide, we’ve explored everything from the foundational principles of balance and simplicity to more creative tools, such as color, light, and atmosphere. We’ve looked at both time-tested techniques and more intuitive approaches that evolve with experience. And we’ve discussed not only what to do, but what to avoid.
But most importantly, remember this: composition isn’t about following rules. It’s about learning to see. The more you practice, reflect, and experiment, the more your eye will develop, and the more natural and strong your compositions will become.
Keep your curiosity alive. Learn from your successes and your mistakes. And above all, spend time in the field. That’s where the real growth happens.


Thanks, Christian!
Really valuable and beautifully illustrated. So funny to realize that every element that you mention is kind of ‘do-able’ but combining them all (or most of them) together… Lot of things to learn ?…
Hi Hein,
Thank you for your kind words. I’m glad to hear that you find it valuable. You are absolutely right, it can be easy to apply one of this techniques, but combining them to make the picture flow best, takes more practice.
Thank you for sharing your “Composition in Landscape Photography: The Complete Guide”. As someone who has studied and worked hard for decades to master the critical role of composition in landscape photography, you have given me and others much to think about and consider as we try to master landscape photography. Your generous contribution to our passion for photography is greatly appreciated.
Hi Ben,
I appreciate your kind words and am happy to hear that you found it useful! 🙂
Great article that is opening the eyes and will cause to take better pictures
thanks
Hi Mort,
Thanks for the kind words – I’m glad you found it helpful 🙂