

Filters remain one of the most powerful tools in a landscape photographer’s kit. While modern cameras and editing software have made huge advances, there are still certain effects that can’t be replicated in post-processing. Whether it’s controlling reflections, balancing exposure in high-contrast scenes, or creating silky, long exposures, the right filter can take an image from ordinary to extraordinary.
But with so many types, brands, and systems available, knowing which filters you actually need can feel overwhelming. Should you invest in screw-on filters, a square holder system, or one of the newer magnetic kits? And once you’ve chosen a system, which filters are worth the investment?
In this guide, we’ll break it all down. You’ll learn which filters matter most for landscape photography, the pros and cons of different systems, and the exact filters professionals rely on in the field.
By the end, you’ll know exactly which filters to start with, which ones can wait, and how to choose a setup that fits your photography style and budget.
Why Use Filters in Landscape Photography
Filters give you a level of control and creativity that’s difficult, or sometimes impossible, to achieve without them. They allow you to shape light, overcome technical limitations, and open the door to creative effects that elevate an ordinary scene into something extraordinary.
Neutral Density (ND) filters are perhaps the most transformative. By reducing the amount of light entering the lens, they allow you to extend your shutter speed and control motion with precision, whether you want to add a gentle flow to water, blur moving clouds, or create surreal long exposures. This makes them one of the most versatile and expressive tools in landscape photography.

Graduated ND (Neutral Density) filters have traditionally been used to balance high-contrast scenes, such as when the sky is significantly brighter than the foreground. Although improved sensor technology, bracketing, and post-processing techniques like HDR have reduced their necessity, some photographers still prefer using GNDs in the field to capture a more balanced exposure in a single frame.
Recommended Reading: Graduated ND Filters or Multiple Exposures: Which is Best for Landscape Photography?
Polarizing (CPL) filters are a staple for daytime photography. They reduce glare and reflections on water or wet surfaces, deepen the blue of the sky, and enhance contrast in foliage. The effect is difficult to replicate convincingly in post-processing, which is why CPLs remain essential for many outdoor photographers.
In short, filters enable you to fully unleash your creativity and capture stronger images in the field.
Essential Types of Filters for Landscape Photography
Not every filter you see in a camera store is worth adding to your bag. Some are essential tools that can elevate your images, while others are largely unnecessary with today’s digital workflows. Below is an overview of the best filters for landscape photography.
| Filter Type | Primary Purpose | How Essential Is It? |
| Neutral Density (ND) | Extends shutter speed to capture motion (water, clouds, light trails) | Must-have for creative long exposures |
| Graduated ND (GND) | Balances bright skies with darker foregrounds | Useful, but less critical due to bracketing/post-processing |
| Polarizer (CPL) | Reduces glare, deepens skies, enhances color contrast | Essential for daytime shooting |
| Other (UV, IR, creative) | Protection or niche effects | Optional, often unnecessary |
Neutral Density Filters
If you could only pick one filter to transform your landscape photography, this would be it.
ND filters reduce the amount of light entering your lens, allowing you to slow down the shutter speed even in bright conditions. This opens a world of creative possibilities:
- Smooth water into soft, flowing textures.
- Blur moving clouds to add drama and mood.
- Remove distractions, such as people or cars, from busy scenes.
They come in different strengths (commonly 3-stop, 6-stop, and 10-stop), which give you control over just how much you want to lengthen the exposure time. Even subtle adjustments, like extending an exposure from 1/10s to half a second, can transform the mood of a waterfall or wave. Push further, and you can create surreal, minimalist images where time itself feels stretched.
This versatility is why many photographers consider ND filters the best filters for landscape photography, especially when you want to master long exposures.
Recommended Reading: What is an ND Filter?
Graduated Neutral Density Filters
GND filters are darker at the top and clear at the bottom, designed to balance high-contrast scenes where the sky is much brighter than the foreground.

For years, they were considered essential. Today, improved sensors and post-processing (bracketing or HDR blending) mean many photographers achieve the same results without them. Still, some prefer GNDs for minimizing time in post and capturing a balanced exposure in a single frame.
Strengths:
- Capture balanced exposures straight out of the camera.
- Reduce editing time and keep files simpler.
Limitations:
- Works best with square filter systems.
- Less effective with uneven or jagged horizons.
Recommended Reading: Introduction to Graduated Neutral Density Filters
Polarizing (CPL) Filters
The circular polarizer is one of the most important filters for daytime landscape photography.
A CPL works by cutting glare and reflections, which instantly makes colors look richer and more defined. On water, it reveals what’s beneath the surface, on foliage, greens become more vibrant, and on a clear day, it deepens the blue of the sky for added drama.

Unlike GNDs, the effects of a polarizer are almost impossible to replicate convincingly in post-processing. Keep in mind, though, that the effect is strongest when shooting at a 90° angle to the sun.
Recommended Reading: Why You Should Use a Polarizer for Landscape Photography
Other Filters (Optional)
While ND, GND, and CPL filters cover almost everything you’ll ever need, a few others exist:
- UV / Protective Filters – Once used on film cameras to cut haze, they serve little purpose with digital sensors. Some use them for lens protection, but many photographers avoid them since they add an extra layer of glass that can reduce image quality.
- Infrared Filters – Block visible light and allow only infrared light to pass through, creating surreal and experimental results. Niche, but creative.
- Special Effects Filters – Starbursts, color tints, and soft focus effects. Fun for experimentation but rarely part of a serious landscape photographer’s toolkit.
Choosing the Right Filter System
Finding the best filters for landscape photography isn’t only about deciding between ND, GND, or polarizers. Just as important is choosing the system you’ll use to mount them. Screw-on, square, and magnetic filters each have their strengths and weaknesses, and the right choice depends on how you like to work in the field.
Screw-On Filters
Circular screw-on filters are the simplest and (generally) most affordable option. They attach directly to the thread on the front of your lens, making them compact and easy to carry. This also means fewer problems with light leaks, which can occasionally happen with poorly sealed square filter holders.

However, screw-ons have some limitations. Since every lens has a different thread size, you’ll either need step-up rings or multiple filters to cover your kit. They’re also less versatile when it comes to stacking or using specialized filters. Graduated ND filters, for example, don’t work well in this format. Personally, I have a set of screw-ons as a backup, but I haven’t touched them in a long time. They do the job, but they’re not my first or second choice for serious landscape work.
Square / Rectangular Filter Systems
Square and rectangular systems have long been the standard for professional landscape photographers. They require a filter holder that attaches to your lens, into which you can drop multiple filters, often up to three, without introducing vignetting. This makes them ideal if you want to combine a Neutral Density filter, a Graduated ND, and a Polarizer in one setup.

The trade-off is bulk and complexity. A square system takes up more space in your bag, adds time to your setup in the field, and can be prone to light leaks if the holder isn’t well-designed.
But for a decade, this was the system I relied on, and it served me extremely well for all types of landscapes.
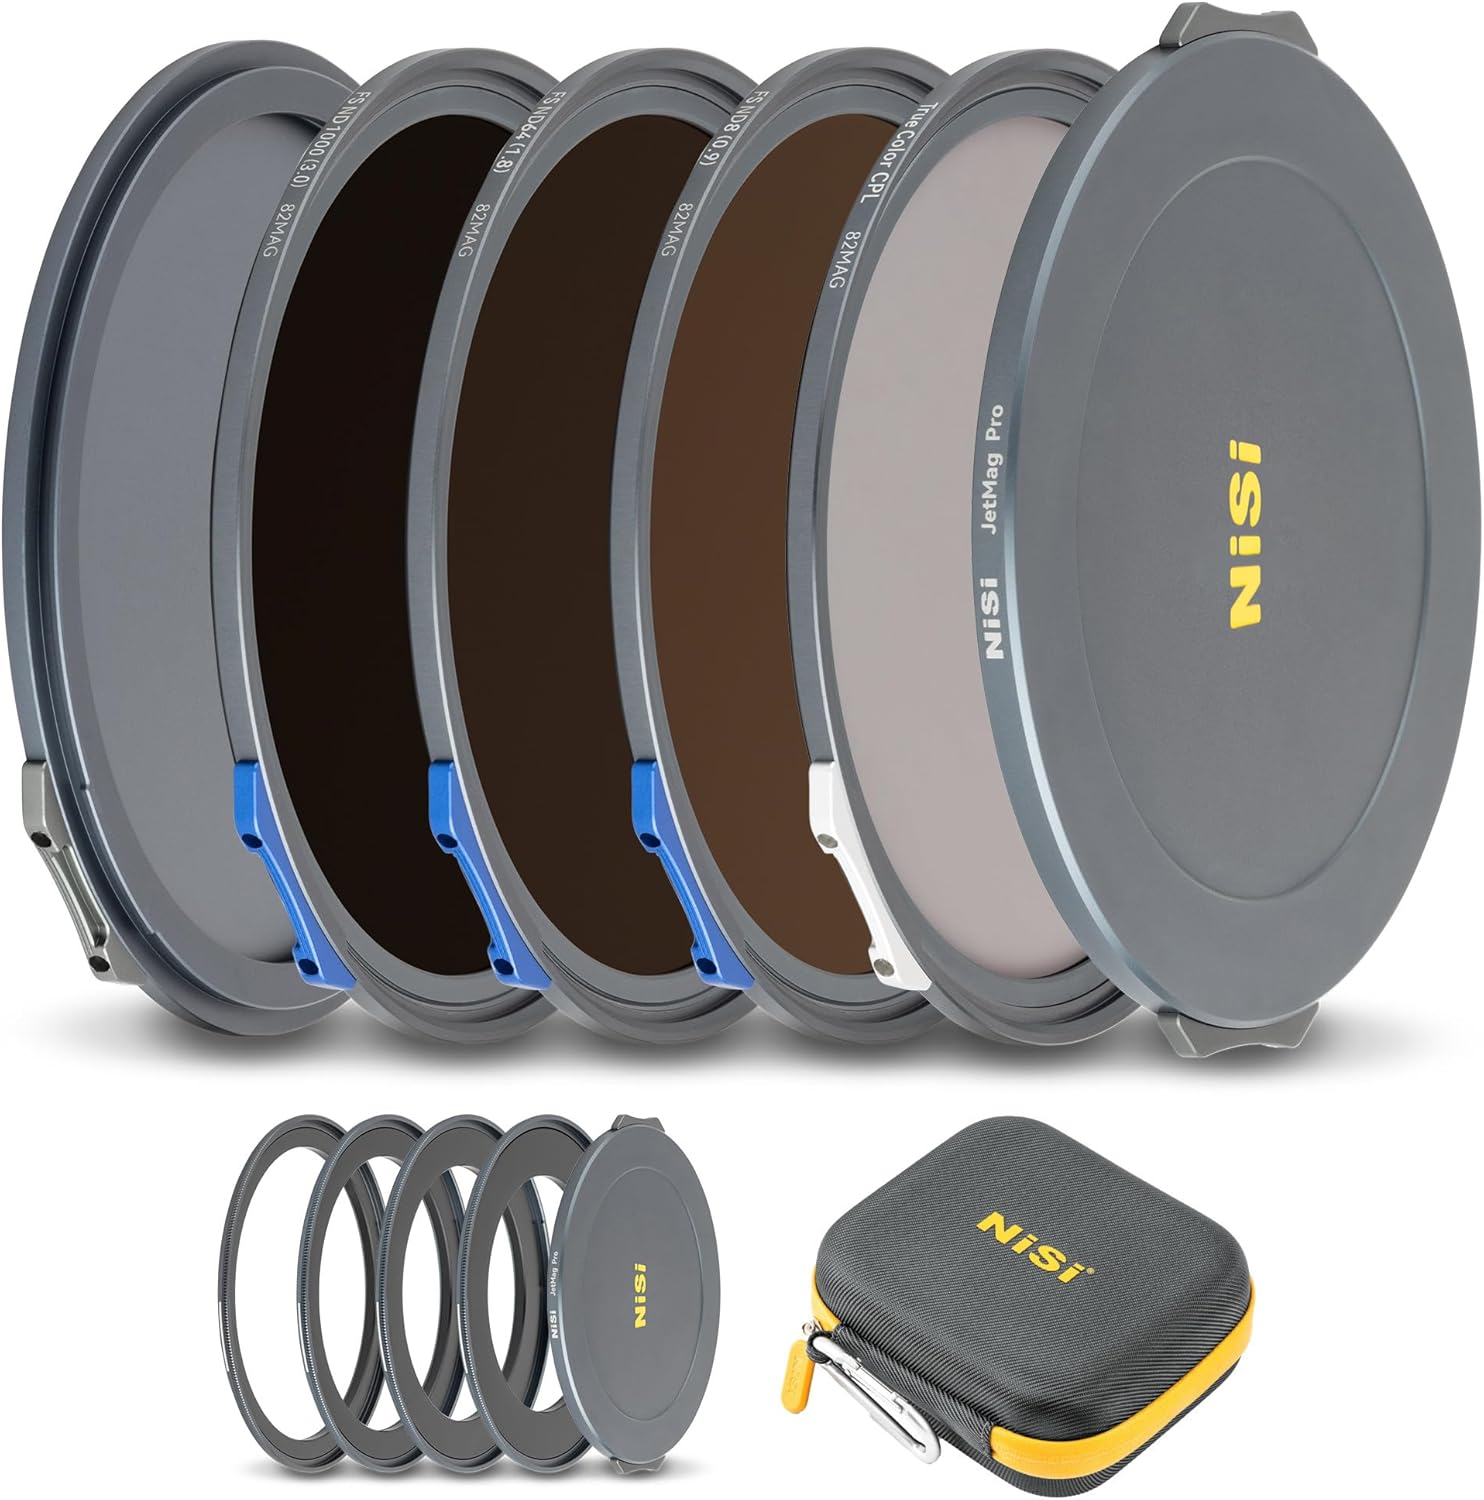
Magnetic Filters
Magnetic systems are the newest addition, and they’ve quickly gained popularity. Instead of threading or slotting filters, you snap them onto a magnetic adapter ring. Premium versions, such as the NiSi JetMag Pro, include a twist-lock mechanism that keeps filters secure, which is a crucial feature. Without it, I’ve seen filters fall off and shatter during workshops.
Magnetic filters are thin, lightweight, and easy to stack without vignetting. They’re also compact, making them excellent for travel and long hikes. Like screw-ons, they don’t play well with Graduated ND filters, but for ND and circular polarizers, they’re hard to beat.
After more than a decade using square systems, I’ve now transitioned to magnetic filters as my main setup; they’re more convenient without sacrificing quality.
Important Note: Some magnetic filters can detach too easily. If you go this route, look for a system with a twist-lock design for security. I use the NiSi JetMag Pro for this reason.
What’s the Best Filter System for Landscape Photography?
So, the million-dollar question is: which filter system is right for you?
The truth is, there isn’t a single correct answer. Each system has its strengths, and the best choice depends on your priorities.
Weight and size: If you value traveling light, such as when hiking long distances or want filters that slip easily into your pocket, circular screw-on filters or the newer magnetic systems are your best bet. Square filters, on the other hand, are bulkier and usually come in bigger pouches (one for the filters, one for the holder).
Budget: A good set of filters is an investment. While all systems range from cheap to high-end, screw-on filters tend to have the most affordable entry points. Magnetic filters are slightly pricier but more convenient, while square systems are often the most expensive, especially when additional holders, adapters, and complete kits are factored in.
Ease of use: This is where magnetic systems shine. They snap on in seconds and make stacking ND and polarizers a simple process. Screw-ons are straightforward but fiddly when swapping filters in the field. Square filters take the longest to set up, but offer the most flexibility if you’re combining multiple filters.
Filter combinations: If you plan to stack filters regularly, square systems are still the gold standard. You can use a polarizer, two ND filters, and a graduated ND filter simultaneously without vignetting. Screw-ons and magnetic filters are great for ND and CPL, but not practical for graduated NDs.
Longevity: Cheap filters are tempting, but I always recommend buying quality. A solid system will last for years. I used my NiSi square filters for ten years, and they’re still in excellent shape.
To sum it up:
- Screw-on filters are economical and light, but limited for stacking. Good if you’re testing the waters or need a compact backup.
- Square filters are the most flexible, but bulkier and slower to use. Best if you want maximum control and don’t mind the extra gear.
- Magnetic filters combine portability with speed, making them ideal for ND and polarizers. They don’t work for graduated NDs, but for most landscape photographers, they hit the sweet spot of quality and convenience.
| System | Pros | Cons | Best For | My Take |
| Screw-On | Affordable, compact, less prone to light leaks | Limited stacking, multiple sizes needed, poor fit for GNDs | Beginners, hikers wanting ultralight kit | Handy as a backup, but not my main choice for serious work. |
| Square | Flexible, allows stacking ND + GND + CPL, professional standard | Bulky, slower setup, potential for light leaks | Serious landscape photographers | My go-to for a decade; powerful but less convenient for travel. |
| Magnetic | Fast, lightweight, stackable, compact, great for ND & CPL | Doesn’t suit GNDs, quality varies, risk of falling without twist-lock | Travel, long hikes, most ND/CPL use cases | My current system of choice (NiSi JetMag Pro) for convenience + quality. |
Best Filter Brands for Landscape Photography
Over the years, I’ve tested all three systems: screw-on, square, and magnetic, ranging from budget to high-end, and I’ve seen what lasts and what doesn’t. Below are the brands I recommend, with a mix of quality-first options and a couple of budget picks for those just starting out.
Screw-On Filters
If you’re dipping your toes into the world of filters, screw-ons are often the easiest entry point. They’re affordable, compact, and perfect if you want to see whether filters fit into your workflow.
- NiSi Screw-On Filters – Excellent optical quality with minimal color cast. NiSi has become my go-to brand due to its consistency and durability across all systems.
- B+W Filters – A long-standing favorite among photographers, known for their excellent coatings and reliability. They do, however, have a warm color cast.
- Budget Pick: Urth Filters – Great value if you want to experiment without committing to a full premium kit. They’re not flawless, but they’re far better than the $10 no-name filters you’ll find online.
I’ve kept a set of screw-ons as a “just in case” option. They’re not my first choice, but before magnetic filters, they’ve saved me more than once when I wanted to travel light.
Square Filter Systems
Square filters are the classic choice for serious landscape photographers. They let you stack multiple filters without vignetting and are the only real way to use Graduated ND filters.
- NiSi 100mm & NiSi 150mm Filters – My primary system for more than a decade. NiSi’s optical quality, holder design, and durability are unmatched in my experience. I currently have the NiSi V7 and S6 filter holders.
- Lee Filters – A respected alternative that has been around for decades. Some prefer their cold color cast, though I find NiSi’s build quality more reliable.
- Budget Pick: Haida M10 – A more affordable alternative to NiSi or Lee. The build is solid for the price, and the filters perform well, though you may notice a slight color cast compared to premium brands. A good entry point if you want to explore square filters without a major investment.
For ten years, square filters were my daily workhorse. I carried them on every outing and workshop because they offered flexibility and top-tier results. The trade-off is bulk, carrying the pouch of filters plus the holder takes up room in your pack.
Magnetic Filters
Magnetic systems are the new kid on the block, and they’ve quickly won me over. They snap on and off in seconds, are slim and lightweight, and are especially great for hiking and travel.
- NiSi JetMag Pro – My current system and the one I recommend most. The twist-lock mechanism adds much-needed security, which is crucial since I’ve seen plenty of magnetic filters fall off and shatter in the field.
- Budget Pick: Maven Magnetic Filters – A solid alternative for those who want to test a magnetic setup without going all-in. They don’t have a twist-lock, which makes them less secure, but they’re still convenient and of good quality.
After a decade of square filters, I’ve now converted to NiSi’s JetMag Pro. For me, the convenience and reliability outweigh the need for the bulkier square system, especially when hiking or traveling.
Final Thoughts on Choosing the Best Filters
While there are countless options on the market, the truth is simple: quality matters more than anything.
The best filters for landscape photography are the ones that deliver sharpness, accurate color, and durability in the field. Cheap $10 filters often soften your images, add unwanted color casts, or fall apart quickly.
If you’re serious about your photography, it’s worth investing in a reliable system. In my experience, NiSi stands out amongst the best filter brands for landscape photography, though Lee, B+W, Haida, and Kase are also strong contenders depending on your needs.
| Filter System | Recommended Brand / Kit | Key Features | Best For | Price Range | Link |
| Magnetic Filters | NiSi JetMag Pro | Fast to attach/remove, lightweight, strong magnets, minimal color cast | Hikers, cold-weather photography, quick swaps | $$$ | Check Price |
| K&F Concept Magnetic Kit (budget) | Affordable entry-level set, decent quality | Beginners testing magnetic filters | $$ | Check Price | |
| Square Filter System (100mm) | NiSi V7 100mm Kit | Excellent optical quality, wide range of ND & GND filters, solid holder | Serious landscape photographers needing flexibility | $$$$ | Check Price |
| Haida M10 Kit (budget) | Reliable, more affordable alternative, good sharpness | Intermediate users | $$ | Check Price | |
| Screw-On Filters | B+W Kaesemann CPL / ND | Top optical quality, brass mount, excellent polarizer | Minimalists, photographers using few filters | $$ | Check Price |
| Urth ND/Polarizer Kit (budget) | Affordable entry kit, decent quality, easy to use | Beginners on a budget | $ | Check Price |
Don’t feel pressured to buy everything at once. Start small with a single ND filter or a circular polarizer, then add to your kit as you grow more confident. Even one well-chosen filter can make a huge difference in your images.
How to Use Filters in the Field (Quick Tips)
Using filters in landscape photography is all about knowing when and how to apply them. Each type of filter serves a different purpose: Neutral Density filters help you control motion, polarizers manage reflections and contrast, and graduated filters balance exposure between bright skies and darker foregrounds.
Below are a few practical tips from the field:
Quick Tips for Using an ND Filter
When using darker ND filters such as a 6-stop or 10-stop, always begin by setting up your composition and focus before placing the filter in front of the lens. Once the filter is attached, switch your camera to manual focus. Apps like NDCalc or PhotoPills can be a huge help in calculating the correct shutter speed for long exposure photography.
If you’d like to dive deeper into mastering long exposure techniques, my Long Exposure Photography eBook is a complete guide to creating smooth water, dramatic skies, and professional-quality results.
Quick Tips for Using a Polarizer
Polarizers are especially powerful in landscape photography, but they need careful handling. Be cautious when using them on ultra-wide lenses, as they can darken only part of the sky and leave uneven results. Rotate the filter while looking through the viewfinder or Live View to see exactly how it affects reflections, glare, and sky contrast before you take the shot.
Quick Tips for Using a Graduated ND Filter
Graduated ND filters require a bit more thought. A soft or medium grad usually blends most naturally, while hard grads can leave a distracting line across the frame. They work best with horizons or flatter scenes. For mountainous landscapes, I generally avoid grads altogether, since they rarely naturally match the terrain.
General Tips When Using Filters
In the field, I recommend keeping your filter pouch handy, hanging it on your tripod, and asking yourself what effect you want: Do you want silky-smooth water, or just a hint of motion? Do you want the sky to be dramatically darkened, or just balanced against the land? Being clear on your intention will help you choose the right filter quickly.
Finally, don’t forget the basics. If you rely on autofocus, switch it back on once the filters are removed. Check focus every time you recompose. And always keep an eye out for smudges, raindrops, or sea spray; nothing ruins an otherwise great photo faster.
Do I Need Filters for Landscape Photography?
It’s a fair question. With today’s advanced cameras and powerful editing software, many photographers wonder whether filters are truly necessary. The truth is that while filters aren’t critical, they can make a big difference both creatively and technically.
There are ways to get by without them.
For example, exposure bracketing allows you to capture multiple exposures and blend them later in Lightroom or Photoshop to balance a bright sky with a darker foreground, essentially mimicking the role of a Graduated ND filter.
Similarly, you can achieve long exposure photography without filters by stacking multiple shorter exposures; however, the results rarely look as natural or smooth as those achieved with a 6- or 10-stop ND filter. And while software such as Nik Color Efex includes a digital polarizer, it can’t truly remove glare from water or cut haze the way a real CPL does.
Filters, particularly NDs and polarizers, remain valuable because they let you solve problems in the field instead of relying entirely on post-processing. They give you creative control that software can’t fully replicate: smoothing water and clouds, reducing glare, or capturing reflections in a way that’s impossible to fake.
In short, you can manage without filters, but if you want the highest quality, they’re one of the most effective tools you can invest in. Some modern cameras, such as the Olympus OM-D series, include built-in tools that mimic ND or GND filters. These features can be useful in certain situations, but they’re not a full replacement for high-quality glass filters.
Conclusion
Filters aren’t strictly required, but they’re among the most powerful tools for improving your landscape photography. A quality polarizer cuts glare and deepens colors, while ND filters let you achieve creative long exposures that no software can truly replicate.
If you’re starting out, I suggest beginning with a circular polarizer and a 6-stop ND filter. From there, think about which system, screw-on, square, or magnetic, you want to invest in long-term. As your skills grow, adding a 3-stop and 10-stop ND will give you a versatile kit.
In my own work, I rely on a CPL, 3-stop, 6-stop, and 10-stop ND. Used well, filters don’t just solve exposure challenges; they expand your creative possibilities and help you capture the scene exactly as you envisioned it.
If you’d like to dive deeper into practical fieldwork with ND filters, my Long Exposure Photography eBook walks you step by step through planning, shooting, and editing. It’s a perfect next step if you want to master filters beyond the basics.
DID YOU ENJOY THIS ARTICLE? THEN DON’T FORGET TO SHARE!
Frequently Asked Questions (FAQ)
Yes, but you can blend exposures or reduce highlights in post instead of using a GND. However, software can’t replicate everything. For example, no editing trick can cut glare from water like a polarizer or smooth moving clouds as naturally as a 6-stop ND filter.
If you’re new to long exposure photography, start with a 6-stop ND filter. It’s versatile enough for smoothing water and clouds in daylight without requiring extremely long exposures. As you progress, you might add a 3-stop and a 10-stop to expand your creative options.
Very rarely. Low-quality filters often soften your images, create strong color casts, or scratch easily. Budget brands like Urth or Haida M10 are fine entry points, but avoid the no-name $10 filters you find online. If you’re serious about your photography, invest in high-quality glass once and it will last for years.
Yes, but only if the glass is poor quality or the filter is dirty. High-end filters from brands like NiSi or B+W are optically excellent and won’t noticeably degrade your images. Always clean your filters before shooting to prevent smudges or raindrops from softening the photo.
Screw-on filters are affordable and compact, but less flexible for stacking.
Square filters are the classic choice for professionals, especially if you need Graduated NDs.
Magnetic filters are the newest option, fast to attach and lightweight, ideal for travel and hiking.
Most filters aren’t needed at night, but there are exceptions. A CPL won’t help in darkness, but an ND filter can be useful for capturing light trails or creative long exposures under artificial light. Dedicated light pollution filters also exist, which reduce the orange glow of city lights when shooting stars or the Milky Way.
If you’re just getting started, I recommend beginning with a 6-stop Neutral Density (ND) filter. It’s one of the most versatile filters you can own and will open the door to creative techniques like smoothing water, blurring clouds, or removing distractions from a scene. Using an ND filter also helps you better understand how shutter speed affects your images, which is fundamental to mastering your camera.
A circular polarizer (CPL) is another excellent choice, especially for daytime photography. It reduces glare, deepens skies, and enhances colors. While a CPL is more about refining an image, the ND filter encourages creativity and experimentation, which is why I recommend starting there.


Response to Steve Backhouse reminds me open question to Christian Hoiberg…
What is your take on the Variable ND + CPL combo filters? I keep one in my bag always that is from brand Haida
Cheers
I read your recent review/endorsement of Nisi JetMag Pro magnetic ND filters and was encouraged to investigate cheaper alternatures.
Earlier this month I was using my Urth/Gobe screw-in CPL & ND Filters whilst away on holiday in Lesvos.
Although I was confident about what I wanted to achieve using & combining CPL & ND, I found the whole experience of attaching & removing the screw-in filters and switching between lenses to be troublesome, time-consuming and quite demotivating.
Whilst away, I’d started to wonder if going magnetic would be worth considering and started to investigate options.
Your Nisi review came at the right time but there was no way I could justify the investment given my proficiency (or lack of).
To cut a long story short, I have invested in Urth’s UV, CPL, ND8 & ND1000 magnetic ‘starter’ kits for 67mm (Canon EF/EFS) and 58mm (Canon RF/RFS) along with 58-67mm & 49-55mm step-up rings.
Although I haven’t got out to use them yet, I have found that the existing original Canon lens-caps don’t fit particularly well into the
Urth filters. Certainly, leaving the step-up rings on the lens is a non-starter unless you use Urth’s magnetic lens/filter caps.
As a result, my investment has been extended to include additional 52mm, 58mm & 67mm Urth Lens filter caps so I can cover both lens and filter ‘stacks’.
It all sounds well-thought through to simplify my ‘on location’ shooting but I have this nagging doubt about vignetting when stacking filters – I’m not even sure if I’ll be able to leave the Hoya Fusion One Next protectors filters on the lenses. For sure, I have no intention to use the UV filters in the Urth magnetic kits.
With a tour of Skye scheduled in October, I’m going to have to get out locally to try the filters on both my Canon EOS 2000D and Canon EOS R100 to get used to using them and check for the dreaded vignetting on wider angle settings.
I’ll aim to give you an update after my tour of Skye.
Made a mistake:
I said I’d bought additional 52mm, 58mm & 67mm Urth magnetic Lens filter caps.
I actually ordered 1 x 67mm & 2 x 55mm Urth magnetic Lens filter caps.
It’s amazing how many mistakes are spotted after posting ?
Although Magnetic filters are good option, however harsh windy condition fly them off the Lens. I have experience that during one of my shoot at Golden Gate, Luckily I was carrying my variable ND + CPL screw in combo in bag so could use that on site. Unable to recover 2 stacked filters flown on the site that evening 🙁
Hi Vijay
Sorry for your loss ?
I guess the sturdiness/strength of the magnetic connection is still a concern for me as there are no locks on the Urth filters.
For tours/critical shoots I will still take my screw-ins for whichever cameras & lenses I’m taking.
It’s obviously against the travel light ideal but for those ‘once in a lifetime’ tours, safety comes first!
Thanks Chris,
My previous comment I ask your opinion about the Variable ND + CPL filters?
Can you share your experience or research on these
Great article, Chris — really loved it!
I’m sure I’ll be referring back to this before every shoot.
The way you’ve detailed the matrix on Neutral Density, Graduated ND, and Polarizers is very insightful, especially in the context of modern post-processing. It’s incredibly useful for understanding not just the technical aspects, but also the practical considerations when choosing between screw-on, square, or magnetic filters – beyond just budget.
Thank you for sharing your hard-earned knowledge.
Truly appreciated! God bless you.