


Seascape photography is an exciting genre that can be extremely rewarding when you know what you’re doing. Come unprepared, however, and you risk damaging yourself, your camera equipment, or the images.
There are more elements involved when photographing seascapes. This is as far from a static landscape as you can get. You’re now dealing with multiple factors and it’s crucial that you’re aware of them all.
Get these things right, and you might walk away with world-class images. Get them wrong, and things can get ugly.
I’m not going too much into the safety aspect of seascape photography in this article but please make sure always to pay attention to your surroundings and don’t take unnecessary risks. The last thing we want is for anything bad to happen.
That being said, let’s take a closer look at how you can capture better seascapes:
#1 Know the Tides for Seascape Photography
The most important part of seascape photography is knowing the tide. Don’t start photographing before you what the current and coming tide is.
There are two main reasons for this:
- Stay safe
- Know the creative possibilities
While there might be other advantages of knowing the tide, these are the two most important. But what exactly do they mean? Let’s take a quick look before moving on.
Note: You can check the tide chars by using websites such as Tides4Fishing or TideCharts.

Know the Tides and Stay Safe
Many photographers push their limits to get a great image. This can sometimes involve a certain amount of risk. We don’t do this because we’re adrenaline junkies but because we know that there’s potential for a great image. Still, we don’t do this without being aware of the consequences and/or dangers.
Photographing seascapes without knowing the tide is like summiting a mountain without any preparation. The risk of getting hurt is significantly higher.
The ocean is no joke. Every year, we hear stories about people who are taken away by sneaker waves. How many of these cases are photographers who wanted to go a little closer to the action?
Knowing the tide doesn’t eliminate all risks, but it certainly makes you more prepared. You know what to expect, and it’s less likely you’ll be surprised by a quickly rising tide.
Know the Tides = Knowing What to Photograph
The second reason why it’s important to know the tide is purely creative. It’s a part of planning your photograph.
Let’s take Skagsanden Beach in the Lofoten Islands as an example. Over the past years, it has become an extremely popular destination for photographers.
It’s a beautiful beach, but it becomes truly magical during low tide. First, when the tide is low, you will see all the incredible textures and patterns hidden in the sand. During high tide, these are underwater, and the beach isn’t nearly as photogenic.
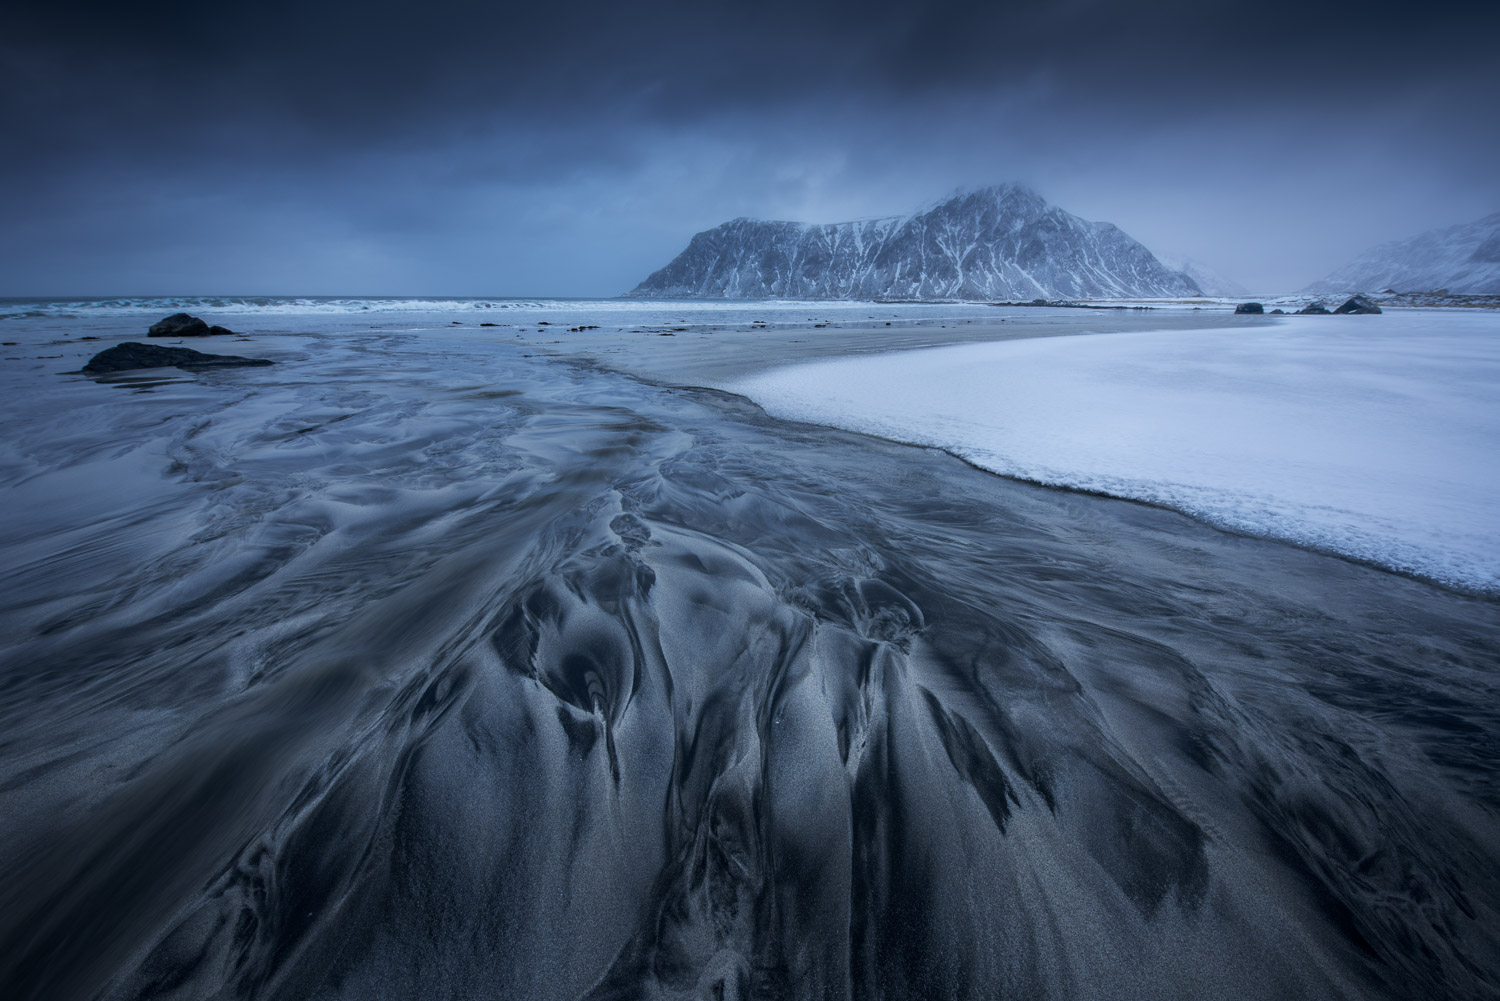
Now, let’s say you want to photograph this beach at sunrise, specifically because you’ve seen images of those amazing textures. Wouldn’t it feel like a waste if you arrived only to realize that they weren’t visible?
I’m sure it would. I see this happen more often than you’d think.
Planning for seascape photography should include a quick search on the tide. If you avoid it, you’ll simply go to a location blindly.
#2 Get Close to the Action
Those who have been photographing for a while know the importance of composition in landscape photography. This is arguably the most important factor in leading the viewer through a visual story.
Seascape photography is no different.
Using a wide-angle lens and getting close to the foreground can significantly improve the composition of your image. Having water motion stretching all the way to your immediate foreground is an excellent way of adding depth and leading the viewer toward the main subject.
Take a look at this image:

Being so close to the action gives an entirely different feel to the photo. It shows the raw power of the ocean that would’ve been difficult to convey if I stood further back and with the camera at a higher perspective.
Getting close to the action is one of the most important tips I can give you. Don’t be afraid to get your feet wet (which is why you need waders for seascape photography!) It can make an average photo world-class.
This is, of course, dependent on the scene you’re photographing. The most important part of finding your composition is analyzing your surroundings. There is no correct solution.
Note: Always take the time to watch the waves before getting too close. Learn how far up the waves go, how much power they have, how deep it is, how the ground reacts… Don’t be too brave!
#3 Use a Tripod for Seascape Photography
A solid tripod is among the most essential equipment for landscape photography. There are scenarios where you can manage without one, but it’s a must-have for photographing seascapes, especially if you’re getting close to the action.
The main reason is that experimenting with the shutter speed is a big part of seascape photography. You’ll be surprised how even a small change can make a big difference.
If you want to capture the motion in the water, you typically need a shutter speed of 1/4th or more. How much depends on how quickly the water moves and how silky you want it to be.
When I’m close to the action, I typically operate with a shutter speed between 1/4th of a second and 1 second. I often use longer exposure times for higher perspectives to make the water look smoother.
Recommended Reading: The Ultimate Guide to Long Exposure Photography
It’s quite difficult to get razor-sharp images when dealing with an exposure time of up to multiple seconds. That’s why you need a tripod. This allows you to get sharp images and use slow shutter speeds. It’s a win-win.
#4 Use Filters to Achieve Longer Exposure Times
As I just explained, experimenting with the shutter speed will make a huge difference to your image.
A shutter speed of 0.5 seconds will capture the water’s motion and keep the textures, while a 30-second exposure blurs it and gives it a silk-like effect.
Using a low ISO and narrow aperture while photographing at dusk or dawn can achieve exposures of up to 1 or 2 seconds; anything longer will require the use of a Neutral Density filter.
These filters are dark pieces of glass that are placed in front of the lens to reduce the amount of light reaching the sensor. To make a well-exposed photo, you must lengthen the exposure time.
Recommended Reading: Why Neutral Density Filters Will Improve Your Photography
6- or 10-Stop Neutral Density filters can be used to achieve ultra-long shutter speeds. I’m talking shutter speeds of several minutes. This can give an other-worldly look to your seascape images.

Another filter that should be in your backpack when photographing seascapes is a Circular Polarizer. Its main objective isn’t to affect the shutter speed but to remove unwanted glare, which is especially useful when photographing during the daytime.
#5 Capture Multiple Images and Blend Them Together
This tip might not apply to those who don’t use Adobe Photoshop or another advanced photo editor that allows layers and masks. Still, it can significantly improve your seascape photography.
Dealing with waves means that you’re dealing with elements that are constantly changing. Normally, it’s not just one wave in your shot; it’s multiple. Capturing all of them in their prime state can be quite challenging.
A popular seascape photography technique is capturing multiple images from the same composition. By shooting dozens of exposures, you’re likely to get waves that look good in different areas.
For example, one image might have the perfect water structure in your immediate foreground, another has a nice wave in the middle ground, and a third has a nice splash on a distant rock.
Taking all three images and blending them together using layers and masks will give you “the perfect” shot. A shot that might not have been possible otherwise.
#6 Don’t Like Wet Feet? Bring Waders!
This might not be relevant for those who are photographing somewhere tropical. You can keep on enjoying that warm water!
Here in the Arctic, we don’t quite have the luxury of photographing in oceans that have pleasant temperatures. Even in summer, the water isn’t warmer than a few degrees above freezing.
Waders might not be the most fashionable clothing, but they are a lifesaver when photographing in cold water. Be it a river or the ocean.

I’ve discussed the importance of getting close to the water. This means you’re quite likely to get wet. Waders are great for keeping you both dry and warm while getting close enough to the action.
#7 Take More Images Than You Need
A typical tip in landscape photography is to slow down and take fewer images. Spend more time setting up your composition and waiting for the light to be optimal. This will help you become more aware of your surroundings and make better decisions about your image.
It’s a little different in seascape photography. You still need to pay close attention to your composition, but once you’ve found it, don’t be shy about pressing the trigger button.
The reason is what we’ve already discussed: the elements are constantly changing. One wave will not look like the next.
It’s nearly impossible to plan the perfect wave. You need to take many exposures. The more you take, the more likely you are to get an image where all the elements look great (and also, the more images you’ll need to delete from your Lightroom folder!).
Bonus Tip: Bring Microfiber Cloths and Lens Cleaning Wipes
One thing you’ll learn from getting close to the waves is that your lens quickly gets covered in sea spray. A little water on the front of your lens isn’t dangerous for your camera, but it will ruin an image.
I strongly recommend always having a couple of microfiber cloths in your pocket. The wetter the conditions, the more you’ll need.
After wiping the lens for a while, you’ll notice that the saltwater begins smudging the element, making the image diffuse and hazy. In this case, use a pre-moistened lens wipe to clean it off.
Ideally, you shouldn’t wait until the lens is that bad, but you get the point. It’s part of keeping the equipment clean, which again is part of improving the quality of your image.
Unlike other photography equipment, lens cleaning wipes are very inexpensive. I use the Zeiss Pre-Moistened Lens Cleaning Wipes, which cost as little as $15 for 220 wipes. You should have these in your backpack, regardless of what subgenre of outdoor photography you’re doing.
DID YOU ENJOY THIS ARTICLE? THEN DON’T FORGET TO SHARE!
Conclusion
Seascape photography is unlike most other types of landscape photography. It’s far from static, and you’re dealing with multiple elements that all need your consideration and attention.
Having all these extra elements means that even small adjustments in your behavior or approach can result in big differences in your images, for better or for worse.
The seascape photography tips shared throughout this article are those that I’ve found most helpful when being out in the field myself. These are all part of my routine and thought process. Does it mean that they’re right all the time? No.
At the end of the day, everything depends on the scenery you’re photographing and the situation you’re in.
Now, what are you waiting for? Get out there and create some beauty!
Do you enjoy seascape photography? Make sure to share your best images and tips with us below!


Not just a seascape but also in landscape, during golden time, taking 3 different exposure images will always help you in post-processing and using mask layers you can achieve sky as well as foreground details very clearly. And during seascape photography either wake up early before sunrise or go at the time of sunset but i prefer on sunrise when merely no crowd is there and you can freely shot your images. This are my tips.?✌?