

There’s no denying that sunset photography is one of the most popular genres in landscape photography, and for good reason. A glowing sky drenched in soft pinks, deep reds, or golden light has a magical way of transforming even simple scenes into something special.
But while many sunset photos look beautiful at first glance, fewer truly stand out. That’s because it takes more than a colorful sky to make a compelling image.
So, what separates a good sunset photo from a great one? How do you go beyond just documenting color, and instead create images that tell a story, evoke emotion, and feel intentional?
The good news is: it’s not about chasing gear or waiting for rare conditions. With a few small changes to your approach, your sunset photography can dramatically improve.
Let’s take a look at eight proven tips to help your sunset photos go from “nice” to unforgettable.
#1 Arrive Early and Stay Late
Patience is one of the most underrated skills in photography, especially when it comes to sunsets.
You can’t expect to show up five minutes before golden hour, fire off a few shots, and walk away with a portfolio-worthy image. Those moments do happen… but they’re rare.
Instead, give yourself time. Arriving early allows you to slow down, explore the location, and find strong compositions before the light peaks. If it’s your first visit to a location, arrive even earlier. Use the extra time to scout different angles and get a feel for the scene. If it’s a place you know well, you’ll still want to be set up well before the sky begins to glow.
Just as important, don’t pack up too early. Some of the most magical light appears after the sun has dipped below the horizon. That soft post-sunset glow, or even an unexpected burst of color during blue hour, can completely transform a scene.

I’ve lost track of how many times I left a location too soon, only to look in the rearview mirror and see the sky exploding behind me. Trust me, you don’t want to learn that lesson the hard way.
#2 Know the Sun’s Position
While there’s always an element of unpredictability in sunset photography, knowing where the sun will set is one of the easiest ways to improve your chances of success.
The sun’s position affects everything: the direction of the light, how your subject is illuminated, and even where the most vibrant colors appear in the sky. By planning ahead, you’ll know whether your scene will be bathed in warm sidelight, silhouetted in backlight, or gently lit by soft frontal glow.
Use apps like PhotoPills or The Photographer’s Ephemeris to see exactly where and when the sun will set at your location. This helps you visualize the direction of light and prepare your composition accordingly.
There’s a common misconception that sunsets only work if the sun is directly in front of your camera. That’s not true. Great light comes from all angles; you just need to adapt your approach. Sometimes, shooting away from the sun gives you the most interesting glow in the clouds. Other times, side light will beautifully shape the landscape.
It all comes down to knowing what to expect and being ready to adjust when nature surprises you.
#3 Watch Out for Lens Flare
Lens flare is one of the biggest challenges when photographing directly into the sun. Unless it’s intentional, flare often ruins an otherwise great image, adding distracting blobs, streaks, or color casts that pull the viewer’s attention away from your subject.
Unfortunately, avoiding flare isn’t always as simple as putting on a lens hood. When using filters or wide-angle lenses, the sun can easily sneak in and bounce around the glass elements.
Here are a few practical ways to deal with it:
- Slightly adjust your composition to move the sun just outside the frame.
- Use your hand or a finger to block the sun during part of the exposure, especially useful if you’re bracketing or using a tripod.
- Capture two versions of the scene: one normal, and one with the sun blocked. You can blend them later in post-processing to remove the flare while keeping the light quality.
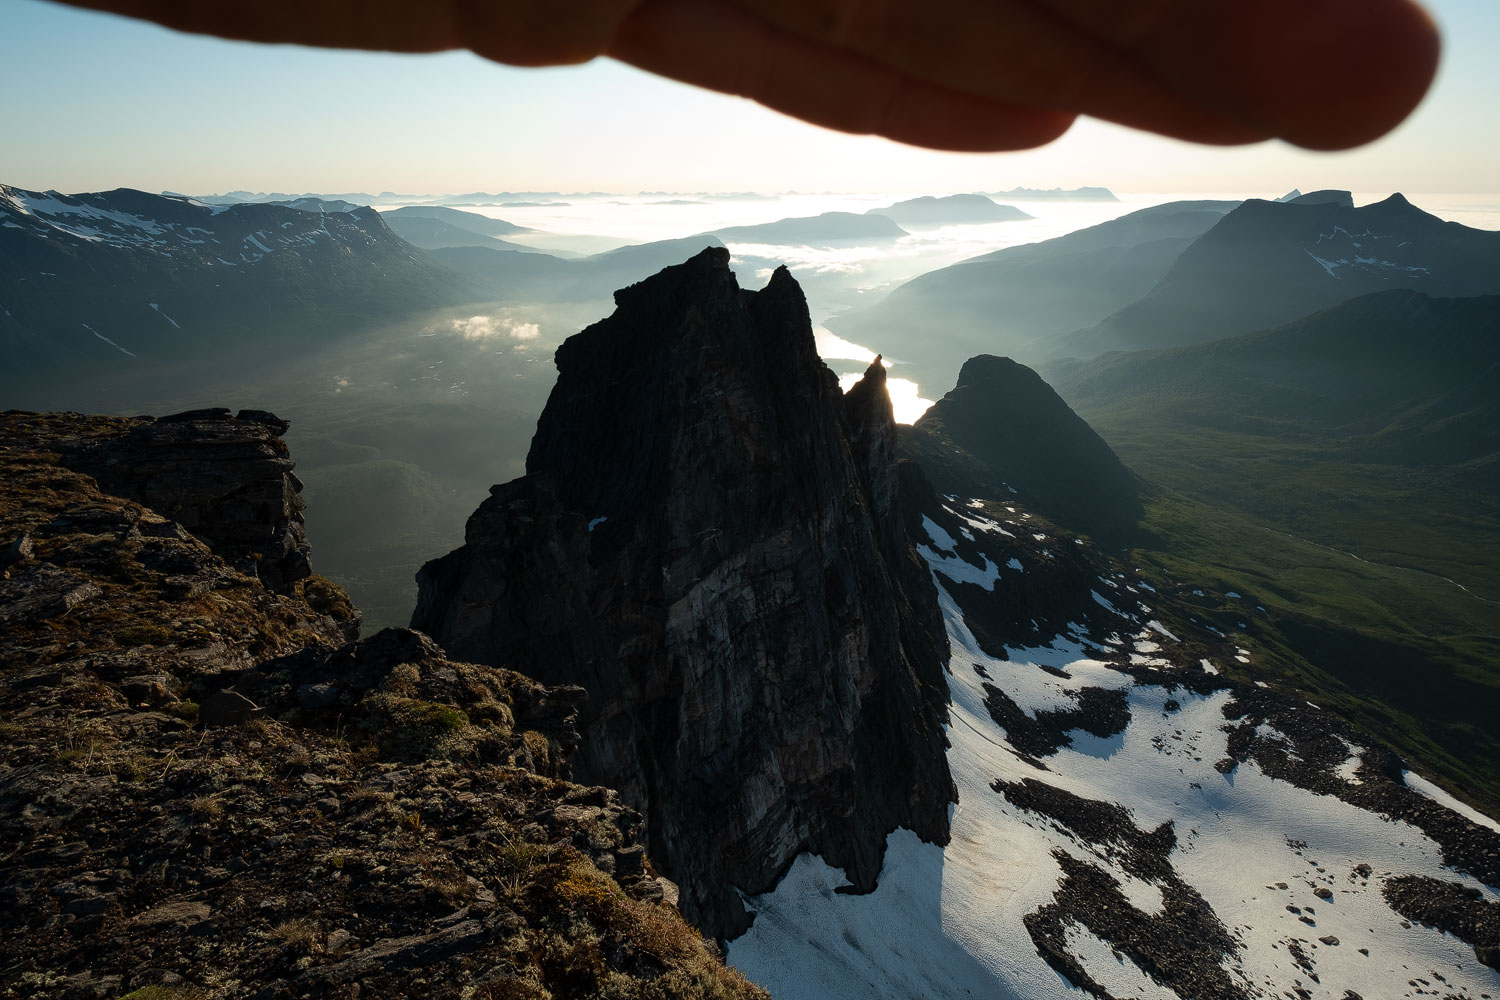
This technique takes a little practice, but it’s a game-changer. Simply block the sun with your fingers so the landscape is clean, then mask that version into your final image using software like Lightroom or Photoshop.
Of course, there are situations where a subtle lens flare can add atmosphere, but the key word here is intentional.
Most of the time, you’ll get a stronger, cleaner photo by keeping unwanted flare out of the shot.
Recommended Reading: Understanding Layers and Masks in Photoshop
#4 Avoid Silhouetted Landscapes
It’s easy to get carried away when the sky explodes with color, but if the land beneath it is pure black, your image might not be as strong as you think.
Silhouettes can work beautifully when used deliberately. But more often than not, a completely dark foreground is just the result of an underexposed shot. Instead of adding mood, it creates a flat and disconnected image, one where the foreground plays no real role in the story.
To avoid this, you have a few solid options:
- Expose for the landscape by increasing your overall exposure (slower shutter speed or higher ISO). This may brighten the sky too much, but it gives you foreground detail to work with.
- Use a Graduated ND filter to hold back the bright sky while allowing more light into the darker areas.
- Bracket your exposures so you can blend a well-exposed foreground with a correctly exposed sky in post-processing.
Modern cameras have made this much easier. Dynamic range performance is so good now that you can recover both highlights and shadows with a RAW file and careful processing.
Just remember: the goal is balance. You don’t always need to capture everything perfectly, but a foreground with shape and detail gives the viewer something to connect with, and makes your sunset photo feel more intentional.
Recommended Reading: Graduated ND Filters or Multiple Exposures: Which is Best for Landscape Photography?
#5 Bracket Images
There are times when even your best efforts to expose correctly just won’t cut it. The sky might be too bright, the landscape too dark, or the scene may include something like a mountain or tree jutting into the sky, making filters less effective.
That’s when bracketing becomes your best friend.
Bracketing simply means taking multiple shots at different exposures; typically one for the highlights, one for the shadows, and one neutral. Later, you blend them together in post-processing to create a balanced image that shows detail in both the sky and the land.
Here’s a basic step-by-step:
- Mount your camera on a tripod to ensure perfect alignment.
- Take 2–3 exposures: one exposed for the sky, one for the foreground, and (optionally) one in between.
- Blend the images in post-processing, either manually using layers and masks in Photoshop (or Luminosity Masks) or automatically using HDR tools.
This technique takes a little practice, especially when it comes to blending naturally. Done well, it lets you overcome extreme dynamic range while keeping the image realistic, or stylized, if that’s your intent.
It also gives you creative flexibility. The camera’s limitations no longer bind you; you’re in control of what the final image looks like.
#6 Experiment with Shutter Speeds
Shutter speed is one of your most powerful creative tools, especially when photographing sunsets.
Even small changes to the shutter speed can have a huge impact on how your image looks and feels. A fast shutter speed can freeze motion, while a slower one introduces blur that adds mood, movement, or softness.
Let’s say you’re photographing waves or a river. A shutter speed of 1/30s might freeze the texture and energy of the water, while 2 seconds creates a soft flow, and 20 seconds turns it into a silky mirror. Each choice tells a different story.
Here’s a quick cheat sheet:
- Fast shutter (1/100s or faster): Freezes movement. Great for dramatic skies or crashing waves.
- Slow shutter (1/2s to 2s): Adds motion blur while keeping detail. Ideal for flowing water or drifting clouds.
- Long exposure (5s and up): Transforms motion into softness. Perfect for minimalist images or dreamy scenes.
The best approach? Try them all.
I still experiment with different shutter speeds during every shoot. Sometimes what works best surprises me. Even when you think you know what you want, testing a few variations can elevate your image.
Just make sure to use a tripod and, ideally, a remote shutter or 2-second timer to keep the camera steady.


In the example above, both images were taken from the same spot, but with very different shutter speeds. The first was captured at 1/25s, the second at 20 seconds. The difference is significant. Personally, I find the long exposure far more compelling. It introduces mood, softness, and a sense of quiet that transforms the scene. The quicker exposure isn’t bad, but it feels more ordinary by comparison.
#7 Use Different Focal Lengths
When we think of sunset photography, most of us picture wide-angle scenes; vast skies painted in color, with a sweeping foreground to anchor the frame. And while that certainly works, it’s far from the only option.
Using different focal lengths is a powerful way to change both the feel and the story of your sunset images. A wide-angle lens emphasizes space, openness, and grandeur. A longer lens compresses the scene, isolates subjects, and often creates more abstract or intimate results.
One isn’t better than the other. It’s about intention.
For example, a 14mm lens might be perfect for capturing a dramatic foreground leading into a colorful sky. But that same scene, photographed at 200mm, could reveal glowing ridgelines in the distance or layers of mist catching the last light of day.
Sunset photography is a perfect time to explore this contrast. The changing light adds dimension and atmosphere, and experimenting with different focal lengths can help you discover compositions you wouldn’t notice otherwise.

If you’re just getting started, try bringing at least one wide and one telephoto lens in your kit. Switch between them once the composition is set. You might be surprised at how often your favorite image ends up being the one you almost didn’t take.
It wasn’t until I started photographing with a telezoom that I learned to look beyond the grand landscape and appreciate the smaller details that make it up.
My Gear
Want to know what lenses I personally use for sunset photography? Here’s my go-to kit:
- Wide-Angle: Nikkor Z 14-24mm f/2.8 – Ideal for dramatic foregrounds and sweeping vistas.
- Midrange: Nikkor Z 24-70mm f/4 – Versatile and lightweight, ideal for travel and mid-range compositions.
- Telephoto: Sigma 100-400mm f/5-f/6.3 – Lightweight and perfect for compressing scenes or isolating details in the distance.
These are affiliate links, which help support the site at no extra cost to you.
#8 Focus on the Composition
All the tips above can help improve your sunset photography, but none of them matter much if the composition isn’t working. A colorful sky alone isn’t enough to carry an image; it needs something more.
That “something” is a strong composition.
It’s easy to get distracted when the sky lights up. I’ve been there too: scrambling to set up, moving from one angle to another, chasing the color before it fades. But the best images often come from slowing down, observing, and composing with intention.

One of the most common mistakes I see is placing too much emphasis on the sky, while the rest of the image lacks purpose. A great sunset photo usually balances the sky with a compelling foreground or midground, something that leads the viewer into the frame and creates depth.
Ask yourself:
- What’s the visual path through this scene?
- Are there leading lines, shapes, or subjects to anchor the image?
- Does the sky enhance the composition, or distract from it?
Ironically, strong compositions often include less sky, not more. That’s because you’re treating the color as a supporting element, the final touch on an already-interesting image. Not the entire image itself.
So the next time the sky explodes in color, take a deep breath. Then look for ways to bring balance and purpose into your frame. Your images will thank you for it.
Conclusion
Sunset photography is a favorite for good reason. The golden glow, dramatic skies, and calm atmosphere make it an ideal time to be outside with your camera. But while it’s easy to be drawn in by the colors alone, creating images that truly stand out takes more than just pointing your lens at the sky.
Mastering sunset photography is about making small, intentional decisions: arriving early, staying late, watching how the light interacts with the landscape, and crafting a composition that tells a story. Learning to control exposure and using the right tools, like ND filters or bracketing, gives you creative freedom to shape the image the way you envisioned it.
In the end, it’s often the little things that make the biggest difference.
So next time the sky lights up, slow down and think through your shot. The more you practice, the more second-nature these decisions will become, and the more memorable your sunset images will be.
DID YOU ENJOY THE ARTICLE? THEN DON’T FORGET TO SHARE IT!


Frequently Asked Questions About Sunset Photography
There’s no one-size-fits-all answer, but a good starting point is ISO 100, aperture between f/8 and f/11, and a shutter speed based on your creative intent. A slower shutter speed can blur motion for effect, while a faster one freezes it. Always expose to protect the highlights in the sky.
Use techniques like exposure bracketing, graduated ND filters, or post-processing blends to manage the high dynamic range. Avoid exposing for the shadows only; you risk losing detail in the sky.
Not always, but they can make a difference. Graduated ND filters help balance the exposure between a bright sky and a darker foreground. ND filters allow for longer shutter speeds, which can be used creatively to blur motion.
Cameras can’t always capture the full dynamic range or vividness of what you see. Shooting in RAW and applying subtle contrast, color, and clarity adjustments in post-processing can help bring back the magic.
Absolutely. While a DSLR or mirrorless setup gives more control, you can still get great results with a phone if you compose carefully and expose for the highlights. Using apps that let you shoot in RAW is a big plus.


Thank you for a compelling article. Excellent suggestions to be practised.
Hi John,
Thanks for your comment! I’m glad to hear that you found it useful. Let me know if you have any questions as you begin implementing some of these tips into your workflow!