There are some instances where it’s important to quickly edit images. Perhaps you’re out traveling and want to keep your friends and family updated or you need to send an image to your client as quickly as possible, or maybe you just don’t like spending time processing. Here’s how you can edit images in less than two minutes without using Lightroom Presets.
Adobe Lightroom
If you’re a frequent reader of this website you might have noticed that Adobe Lightroom is one of, if not the, best softwares for basic image processing. As we have shown in our Lightroom 101 series this software is much more than just a tool to edit images.
One way to quickly edit images is by using Lightroom Presets but I won’t cover that in this article. Lightroom Presets is a quick and simple way to process images by simply selecting the preset and you’re done. Personally I haven’t used them much as I tend to spend more than two minutes editing images, for the images I need to quickly process I’ve developed a workflow that’s almost just as fast. That being said, don’t be frightened of using Lightroom Presets as many of them are excellent, especially when editing a large amount of images.
Shooting in Raw
To get the most out of an image file you should always be shooting in RAW. If this is a new term or you haven’t yet switched away from JPEG; photographyconcentrate.com gives 10 reasons you should be shooting RAW.
The workflow we will use as an example below works for both JPEG and RAW but the differences are huge. When using JPEG there’s a decrease in quality after only minor adjustments on exposure or shadows.
Let’s list a couple reasons you should be using RAW before we get started with the workflow:
- Higher in Dynamic Range (better display of highlights and shadows)
- Uncompressed files
- Gives a greater control over contrast, highlights, shadows, exposure etc.
- Get a perfect White Balance
- Process without doing damage on the file
Workflow to Edit Images in Less Than Two Minutes
Since the goal is to edit an image is less than two minutes I’ll keep this brief.
The tools used in this workflow will be found in Lightrooms Develop Module.
1. Profile Corrections & Chromatic Aberration
I’ve know many photographers have this as their final step in the Lightroom workflow. That is understandable as these two options are almost on the bottom of the tool section.
The reason I choose to check of the two boxes as the first step in my workflow is because Profile Corrections may have a small impact on the overall exposure. Rather than going back and change half the adjustments involving exposure later, I find it more effective to do this right away.
Profile Corrections: Fixes lens issues such as distortion and vignetting. Normally the profile corrector will automatically choose the right profile for your lens. However there are a few lenses that aren’t included in Lightroom, such as the Samyang 14mm. If your lens is not supported a quick google search will most likely lead you to a file that you can upload and use.
You can also use the Manual tab to fix the Profile Correction by adjusting the sliders.
Remove Chromatic Aberration: When zooming in on an image you might have noticed a colored line following the horizon or edges of trees and buildings. Chromatic Aberration is caused by lens dispersion, with different colors of light travelling at different speeds while passing through a lens.
Lightrooms Remove Chromatic Aberration tool does a outstanding job eliminating these unwanted colors. Simply check the box and you’ll see the difference. From time to time it’s not able to do a perfect job, if this is the case you can manually remove the chromatic aberration by using the Color tab.
2. White Balance
As I pointed out above one of the benefits of photographing in RAW is that you have total control over your White Balance in post production. I’ve heard photographers say to their clients “don’t worry about the White Balance, you can fix it in post!”. Do not listen to them! Yes, you can fix it in Lightroom but try to get it as accurate as possible in the camera. Understanding how the camera works is important.
As with anything else in photography; there’s no blueprint to the correct settings. It depends on the mood you wish to convey. Is it a cold scene? Use a temperature of around 5k. Is it a warmer sunset? Try something around 6k. I suggest pulling the slider around and explore the different options and see how the change the image.

For more information on how to get the correct White Balance take a look at our popular article “How to Master White Balance Like a Pro“.
3. Exposure, Contrast & Tones
This is where most of the magic happens in Adobe Lightroom. In fact, if you’re in a real rush this is the only place you need to make adjustments.
Exposure: Changes the overall exposure of an image. Drag the slider towards the right to increase light and towards left to decrease it. How big changes you can make before effecting the image quality depends on your camera and it’s dynamic range. Since I try to get the proper exposure in the camera I tend to keep within +/- 1 stop on the exposure slider. From time to time it happens that an image turns out too dark or too bright and you didn’t notice it before importing it. You can make drastic changes on the exposure but keep an eye on the image quality.
Contrast: Kind of self explanatory it effects the global contrast of the image. Normally I do not touch this slider as in the next adjustments we’ll manually add contrast.
Highlights: Recovers lost details in the highlight of an image. Drag the slider towards the left to bring back details and towards the right to brighten the highlights. Typically you want to drag the slider towards the left to recover details.
Shadows: Pull the slider towards the right to reveal details in the shadows or darken them while protecting against clipping by dragging towards the left. Normally you wish to bring out more details from the shadows, so drag the slider towards the right.
Whites: Defines the true whites of an image. Unlike highlights I recommend dragging this slider towards the right and increase the whites.
Blacks: Defines the true blacks of an image. Normally I pull it slightly towards the left to darken the darkest points a little.

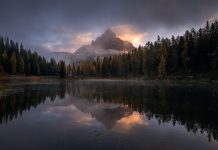
On the image to the left you can see the settings I used for the image I have edited throughout this article. I wanted to have a darker mood and bring out the colors of the intense sunset.
As I’ve mentioned earlier each image is different and these settings wont necessarily work on every single image. However I tend to pull the sliders in these directions on 99% of my images.
Remove Dust Spots
At this point your image should be more or less finished. The White Balance is correct, profile corrections have been fixed and contrasts is adjusted. The only thing remaining now is to remove dust spots.
You can use the Visualize Spots tool to reveal them (if there is any!).
Before/After
Now that we have edited the image, let’s look at the Before and After.
Making these adjustments takes less than two minutes and, as you can see, the difference is huge. While the changes are subtle we’ve brought out much more colors and details in both the sky and landscape, while adding some nice contrast.
If you wish to add some texture and increase the colors even more you can use the Clarity, Saturation and Vibrance sliders. Be aware that pulling too hard on these sliders will quickly break the image and make it appear surreal. I rarely go higher than +10 on any of them.


