Focal length blending and perspective blending are two terms that you might have picked up on if you’ve been around the block for a while. They are frequently mentioned in post-processing tutorials, especially those focusing on advanced techniques.
But what exactly is this technique? What does focal length blending or perspective blending actually mean? Do you need to use it for your own photography? Will it make you a better photographer?
Let’s find out!
What is Focal Length Blending?
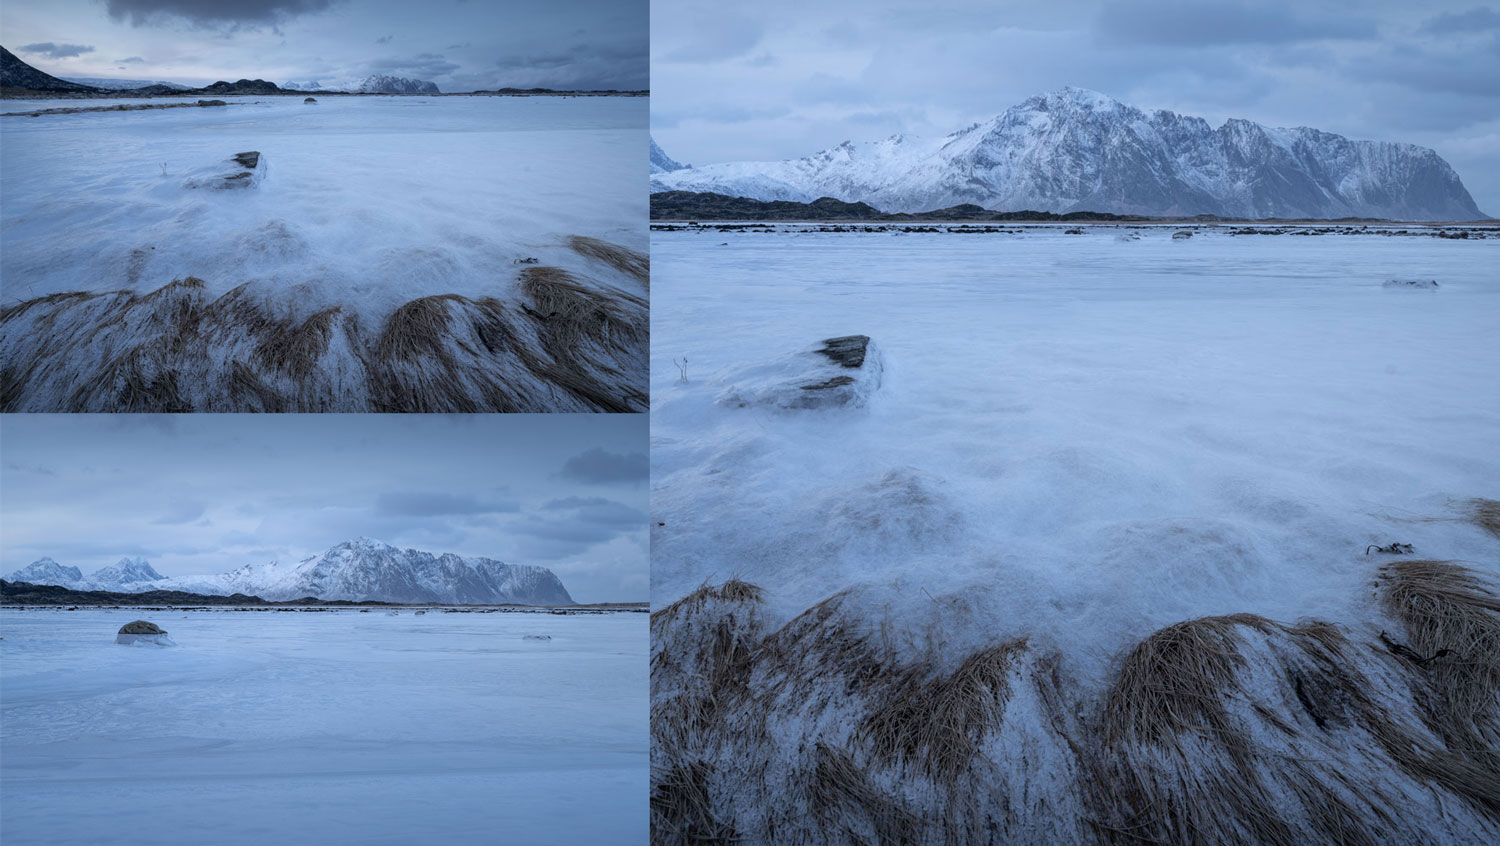
Simply put, focal length blending is a technique where the photographer captures two, or more, images with different focal lengths and blends them together in post-processing. Typically, the foreground is photographed at a wider focal length than the background. The purpose of this is to capture the immediate foreground without losing the impact of a distant subject.
I’m sure many of you are familiar with the downsides of using ultra-wide-angle focal lengths such as 14mm. At this focal length, the foreground looks bigger and more impressive than what your eyes see but the distant subjects, such as mountains, look smaller.
That’s why focal length blending has become a common workaround for photographers who want to include a nice foreground and keep the impact of distant subjects.
There’s no secret that some use the technique as a more creative endeavor to take an image further away from reality. But, I’m not here to start that discussion.
Recommended Reading: 6 Pro Tips for Better Wide-Angle Landscape Photography.
How to do Focal Length Blending
As I’ve already mentioned, focal length blending is a two-part technique that takes place both in the field and in post-processing. It’s considered a semi-advanced technique that requires a basic understanding of fieldwork and a good understanding of your photo editor.
Let’s start by looking at what steps you need to make in the field:
Step 1: In the Field
Your first job consists of capturing the images that you’re going to use for the focal length blend. Exactly how many images depend but I’d say that the most common is using one wide-angle image and one mid-range image.
Start by using a wide focal length and set up your composition focusing on the foreground. Take the image (or several if you also need to focus stack).
Next, zoom in on the background or distant subject. Exactly how much you zoom in depends on how far away it is and how big you want it in the final image. There’s no right or wrong but I recommend not overdoing it. You want the proportions to look natural. Adjust your composition and take the second shot.
Now that you’ve got both images, the in-field step is over. Not that difficult, right?
I know there are a few different opinions on what you can and can’t when it comes to re-adjusting the composition between shots. Some photographers keep the camera in the exact same position for both shots while others move it around and set up individual compositions to optimize both parts.
When it comes to post-processing, it doesn’t matter much which of the two options you choose. The process will be the same. (Though adjusting the composition can help make the blend easier)
Step 2: In Post-Processing
Exactly which photo editor you choose for this task is up to you. The only requirement is that you use layers and masks (which means that, for example, Adobe Lightroom won’t work).
I’m going to use Adobe Photoshop for this example but the steps will be similar in other software too:
- Start by opening the two images as layers. Personally, I prefer to have the foreground (main image) at the bottom
- Lower the opacity of the top layer and align the horizons
- Apply a black layer mask to the top layer. This will conceal the layer and make only the main image visible.
The exact steps you follow next depends on the complexity of the blend. Images that have a distinct horizon with no overlapping elements in the middle require very little effort to blend. Those with lots of overlapping elements, however, require a more specific mask.
Let’s start with the easier version.
The Easy Blend
An easy blend is the type of image where you have a distinct horizon with no overlapping elements. That means you can use everything below the horizon or middle for the foreground and everything above for the distant subjects.
In that case, you can, for example, use the Gradient Tool (G) to create your mask. Make sure that the gradient goes from black to white. Then click and drag from just below the horizon and a little down. Exactly how far you make the transition depends on how many details there are in the middle region.
Take the image below as an example.
This is a fairly straightforward blend. After aligning the horizons, I simply clicked and dragged a Gradient Tool from just below the horizon and 100 or so pixels down. This makes a relatively smooth transition.
Since there aren’t many details in the ice, the smooth transition looks ok. However, there are a few spots that get the ‘ghost effect’. They look off.
To fix this, I used a black paintbrush and painted onto the layer mask in the areas that needed to be fixed. A black brush hides the current layer while a white brush reveals it.
I always recommend zooming in to make sure that there aren’t any odd-looking areas.
The Difficult Blend
The example above is the dream scenario. At least for me, I’m lazy! Unfortunately, focal length blending won’t always be this straightforward. Once you’ve got more details in the middle ground or have elements that project from the foreground and over the horizon, the processing becomes more complicated.
Unlike the easier blend we just looked at, this requires a much more precise mask. Using the Graduated Tool won’t work. Instead, you need to create a mask that targets the specific areas that will be replaced.
This video from 2-Minute Photography Tutorials shows a good example workflow that deals with a difficult blend.
Conclusion
Focal length blending is used by a lot of landscape photographers in order to create well-balanced images where both the foreground and distant subjects get the attention they deserve.
It’s a semi-advanced technique that takes place both in the field and in post-processing. Simply put, it consists of capturing two images at different focal lengths and merging them together in a photo editor such as Photoshop.
Images where multiple elements project above the horizon require some more work to blend. Typically, you need to use either Luminosity Masks or Precision Masks, as well as the Clone Tool to make them look seamless.
Focal length blending is not a technique that you need to use all the time. It has its time and place. Overdoing it is likely to do more harm than good for your images.
However, it can make a boring image more interesting if the distant subjects would otherwise lose impact when using a wide-angle lens.


